Arduino.ru
Оператор If..else
Конструкция if..else предоставляет больший контроль над процессом выполнения кода, чем базовый оператор if, позволяя осуществлять несколько проверок, объединенных вместе. Например, аналоговый вход может быть проверен и выполнено одно действие, если на входе меньше 500, или другой действие, если на входе 500 или больше. Код при этом может выглядеть так:
Другой способ создания переходов со взаимоисключающими проверками использует оператор switch case.
Else позволяет делать отличную от указанной в if проверку, чтобы можно было осуществлять сразу несколько взаимоисключающих проверок. Каждая проверка позволяет переходить к следующему за ней оператору не раньше, чем получит логический результат ИСТИНА. Когда проверка с результатом ИСТИНА найдена, запускается вложенная в нее блок операторов, и затем программа игнорирует все следующие строки в конструкции if..else. Если ни одна из проверок не получила результат ИСТИНА, по умолчанию выполняется блок операторов в else, если последний присутствует, и устанавливается действие по умолчанию.
Отметим, что конструкция else if может быть использована с или без заключительного else и наоборот. Допускается неограниченное число таких переходов else if.
Другой способ создания переходов со взаимоисключающими проверками использует оператор switch case.
Логические операторы if … else Arduino

Конструкция if в Arduino проверяет условие, если оно верно то выполняется блок кода в фигурных скобках. Без фигурных скобок выполнится только одна строчка кода следующая за условным оператором. Рекомендуем всегда использовать фигурные скобки, так как в этом случае сложнее допустить ошибку в программе. Рассмотрим с примерами условия, порядок условий и операторы сравнения Ардуино.
Условия if else Arduino описание
Для этого занятия потребуется:
- Arduino Uno / Arduino Nano / Arduino Mega
Arduino if используется с операторами сравнения для проверки истинности условий. Фигурные скобки логически группируют несколько строк в один блок. Пример кода, который проверяет превышает ли значение переменной заданное число:
Конструкция if..else предоставляет больший контроль над программой, чем один оператор if. И позволяет определить действия не только для случая, когда выражение истинно, но и для противоположного случая (когда значение выражения ложно):
Arduino if else несколько условий
За else в Arduino IDE может следовать еще один if, создавая целую цепочку проверок. Проверки условий будут выполняться друг за другом, пока не встретится истинное выражение. При этом будет выполнен блок кода, следующий за условием:
Если ни одного истинного выражения не обнаружено, то выполнится самый последний блок else (если он существует). Конструкция else if может быть без завершающего блока else и наоборот. Допускается неограниченное количество ветвей else if.
Операторы if else Arduino примеры
Пример конструкции if else Arduino при подключении фоторезистора:
Операторы равнения, порядок условий
Операторы сравнения Arduino
x == y (x равно y)
x != y (x не равно y)
x y (x больше y)
x = y (x больше или равно y)
Не путайте знак равенства ‘=‘ и оператор сравнения ‘==‘. Использование знака равенства в условном операторе if может дать другой результат при выполнении программы (скетча). Например, if (y = 100) не тоже самое, что if (y==100). Знак равенства – это оператор присваивания, который устанавливает значение переменной равным 40 , а не проверяет значение переменной на равенство 100.
Логические операторы (not and or) Arduino
Для связи нескольких логических величин используются логические операторы:
! (not) логическое НЕ, отрицание
&& (and) логическое И
|| (or) логическое ИЛИ
Порядок условий
Порядок условий играет важную роль при оптимизации кода и попытке сделать скетч более быстрым. Дело в том, что логические выражения/величины проверяются слева направо, и если первая проверка делает выражение неверным, то дальнейшая проверка условий прекращается. В примере, если условие water > 100 является ложным, то следующее выражение value > 100 уже не проверяется.
Условия arduino ide
Doubts on how to use Github? Learn everything you need to know in this tutorial.
Last Revision: Searching.
Last Build: 2022/10/07
Description
The if statement checks for a condition and executes the following statement or set of statements if the condition is ‘true’.
Syntax
Parameters
condition : a boolean expression (i.e., can be true or false ).
Example Code
The brackets may be omitted after an if statement. If this is done, the next line (defined by the semicolon) becomes the only conditional statement.
Notes and Warnings
The statements being evaluated inside the parentheses require the use of one or more operators shown below.
Comparison Operators:
Beware of accidentally using the single equal sign (e.g. if (x = 10) ). The single equal sign is the assignment operator, and sets x to 10 (puts the value 10 into the variable x ). Instead use the double equal sign (e.g. if (x == 10) ), which is the comparison operator, and tests whether x is equal to 10 or not. The latter statement is only true if x equals 10, but the former statement will always be true.
This is because C++ evaluates the statement if (x=10) as follows: 10 is assigned to x (remember that the single equal sign is the (assignment operator)), so x now contains 10. Then the ‘if’ conditional evaluates 10, which always evaluates to TRUE , since any non-zero number evaluates to TRUE. Consequently, if (x = 10) will always evaluate to TRUE , which is not the desired result when using an ‘if’ statement. Additionally, the variable x will be set to 10, which is also not a desired action.
Switch (case) Statement, used with sensor input
LAST REVISION: 10/05/2022, 01:00 PM
An if statement allows you to choose between two discrete options, TRUE or FALSE. When there are more than two options, you can use multiple if statements, or you can use the switch statement. Switch allows you to choose between several discrete options. This tutorial shows you how to use it to switch between four desired states of a photo resistor: really dark, dim, medium, and bright.
This program first reads the photoresistor. Then it uses the function to map its output to one of four values: 0, 1, 2, or 3. Finally, it uses the statement to print one of four messages back to the computer depending on which of the four values is returned.
Hardware Required
photoresistor, or another analog sensor
10k ohm resistors
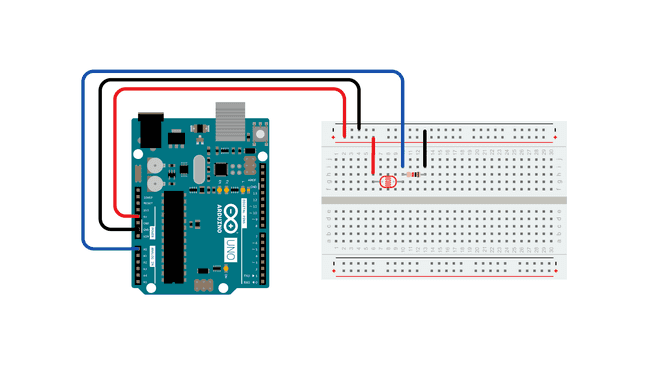
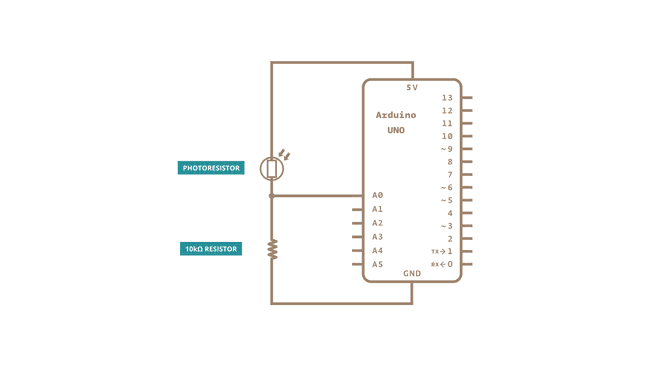
Circuit
The photoresistor is connected to analog in pin 0 using a voltage divider circuit. A 10K ohm resistor makes up the other side of the voltage divider, running from Analog in 0 to ground. The function returns a range of about 0 to 600 from this circuit in a reasonably lit indoor space.
Schematic
Learn more
You can find more basic tutorials in the built-in examples section.
You can also explore the language reference, a detailed collection of the Arduino programming language.