Вики IT-KB
Пошаговые руководства, шпаргалки, полезные ссылки.
Инструменты пользователя
Инструменты сайта
Ручное подключение Ubiquiti UniFi UAP-Pro к UniFi Controller
В конфигурации по умолчанию точки доступа Ubiquiti UniFi UAP-Pro настроены на L2 Discovery, то есть могут автоматически обнаруживать контроллеры управления только при условии, если эти точки доступа расположены в одном физическом сегменте сети с контроллером. Однако возможно и обнаружение на уровне L3. Для этого могут быть задействованы такие механизмы как DNS , DHCP И т.п. Доступные методы управления L3 описаны в статье UniFi — Layer 3 methods for UAP adoption and management
Здесь мы рассмотрим пример того, как вручную подключить точку доступа к контроллеру управления. Это может быть полезно в том случае, если мы не хотим заморачиваться с использованием Discovery.
Подключимся к точке доступа по протоколу SSH со стандартными учётными данными ubnt/ubnt (если они не были изменены ранее) и сбросим текущие настройки, как описано UniFi — How to reset the UniFi Access Point to factory defaults. Выполнить команду Soft Reset можно так:
Если адрес точки или учётные данные не известны, то можно сделать Physical Reset. Для этого нажмите и удерживайте в течение 10 секунд кнопку reset.
Чтобы понять текущее состояние точки доступа можно посмотреть расшифровку индикации в документе UniFi — What do the LED Color Patterns Represent for UniFi Devices?
После сброса настроек до заводского состояния точка доступа получить IP адрес с DHCP. Переподключимся к точке доступа по протоколу SSH со стандартными учётными данными ubnt/ubnt и выполним команду явной установки адреса контроллера управления:
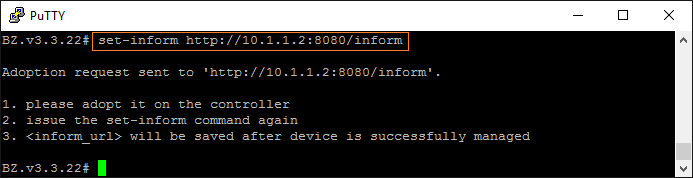
Перейдём на веб-консоль контроллера управления и в разделе Devices для появившейся точки доступа кликнем ADOPT.
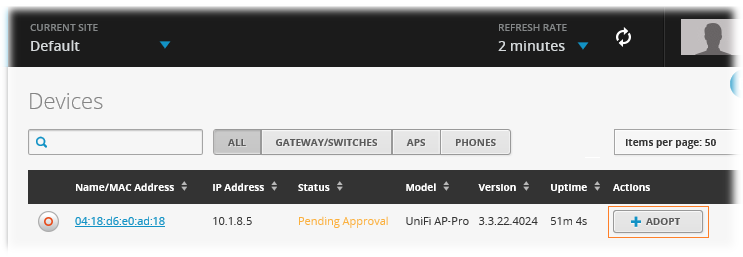
После этого точка перейдёт в режим Disconnected…

В этот момент снова выполним на точке ранее использованную команду:
После выполнения команды статус точки доступа изменится на Provisioning…

Затем статус изменится на Connected и станут доступны кнопки для вызова функций управления точкой доступа
ИТ База знаний
Курс по Asterisk
Полезно
— Узнать IP — адрес компьютера в интернете
— Онлайн генератор устойчивых паролей
— Онлайн калькулятор подсетей
— Калькулятор инсталляции IP — АТС Asterisk
— Руководство администратора FreePBX на русском языке
— Руководство администратора Cisco UCM/CME на русском языке
— Руководство администратора по Linux/Unix
Навигация
Серверные решения
Телефония
FreePBX и Asterisk
Настройка программных телефонов
Корпоративные сети
Протоколы и стандарты
Инициализация и адаптация точек доступа UniFi
Корпоративная система WiFi
3 минуты чтения
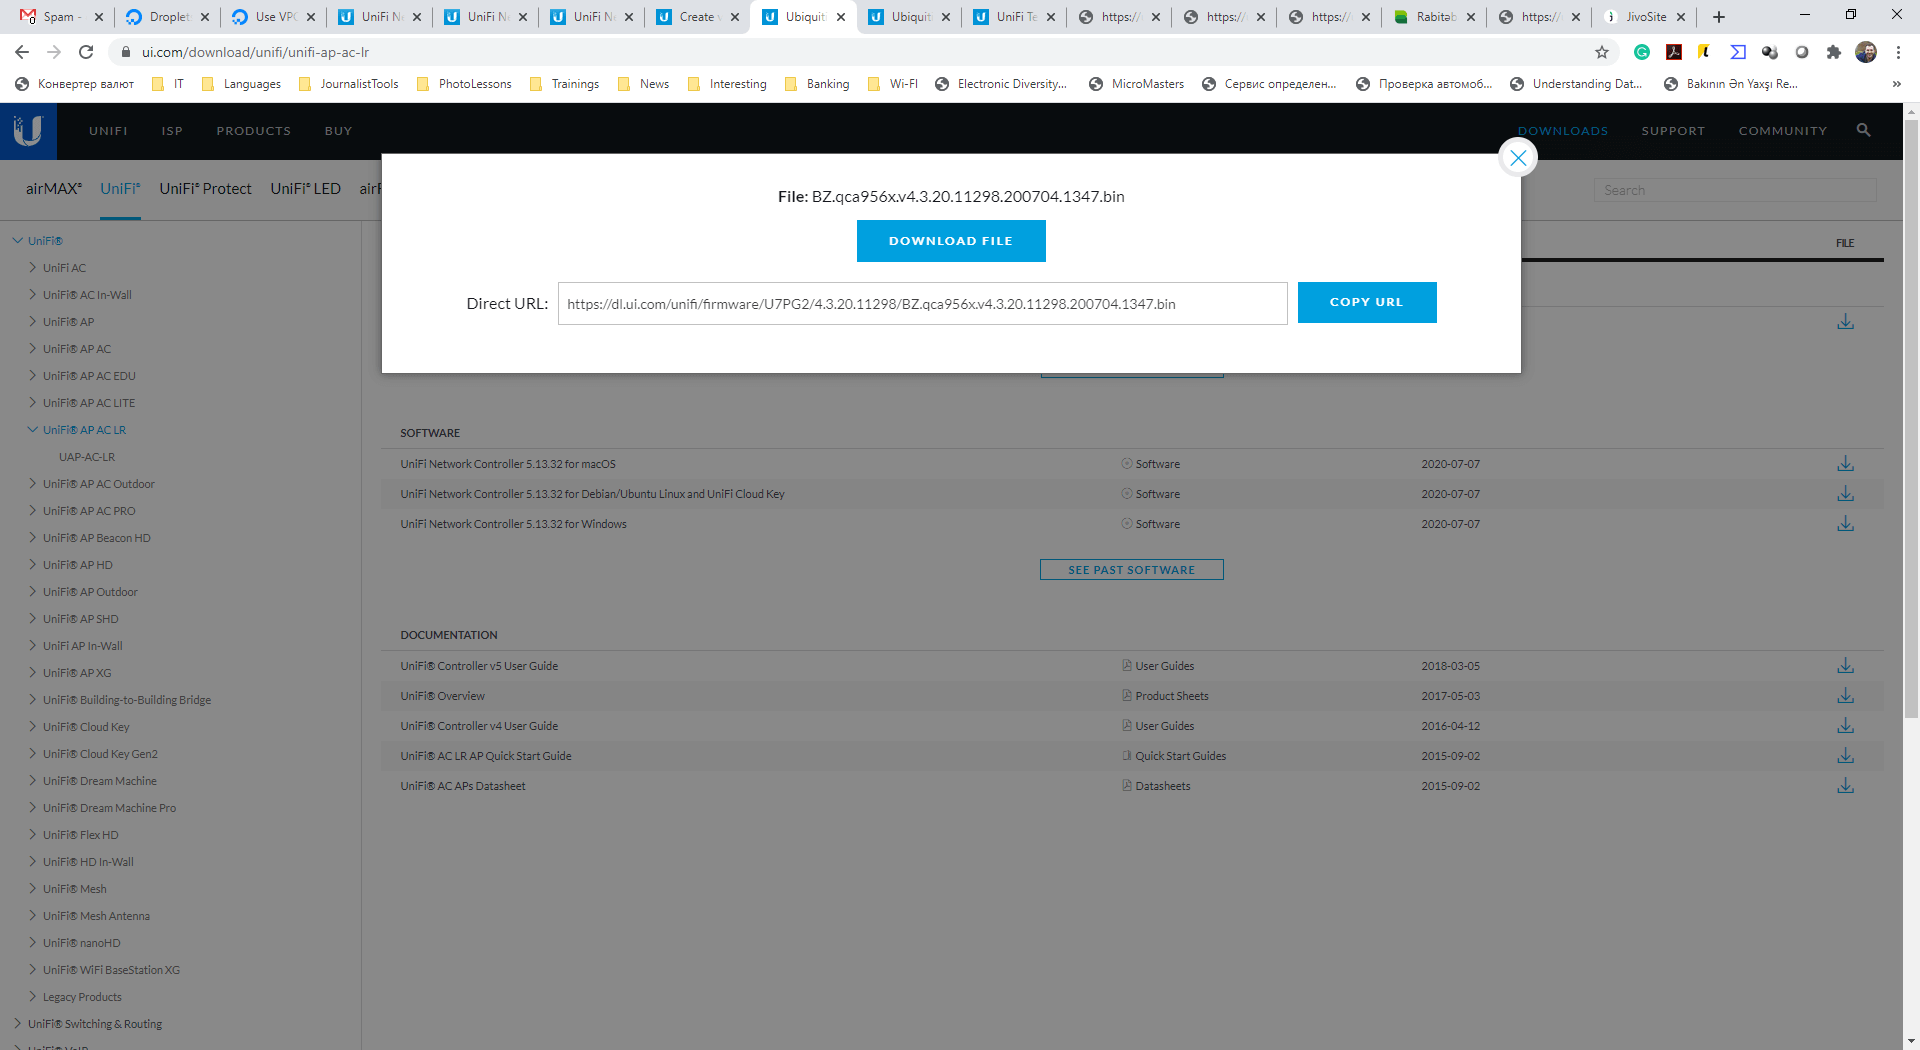
Подключаем точку доступа к сети с DHCP сервером, узнаем IP адрес и подключаемся к ней по SSH. Логин/пароль: ubnt/ubnt. Далее запускаем обновление прошивки на точке доступа. Для этого переходим по ссылке https://www.ui.com/download/unifi и выбираем модель оборудования. В разделе Firmware нажимаем на значок закачки, принимаем условия лицензии и нажимаем на Copy url:

Самые важные знания по основному протоколу Интернета – BGP (Border Gateway Protocol) за два с половиной часа.
После этого в терминале вводим команду:
Данная команда скачает прошивку и запустит обновление.
Шаг №2
Поднимаем контроллер на виртуальной машине. В качестве ОС выбираем Linux Debian 9, и устанавливаем Ubuntu 18.04 Server. Рекомендую на DNS сервере создать A запись для контроллера. Что-то вроде unifics.domain.com. Даем доступ серверу в Интернет. Подключаемся к серверу и вводим следующие команды:
Контроллер установлен. Состояние контроллера можно проверить следующей командой:
Остановка, запуск и перезапуск:
Шаг №3
Теперь нужно подружить точки доступа с нашим контроллером. Для этого в Google Chrome скачиваем расширение Uni-Fi Discovery Tool.
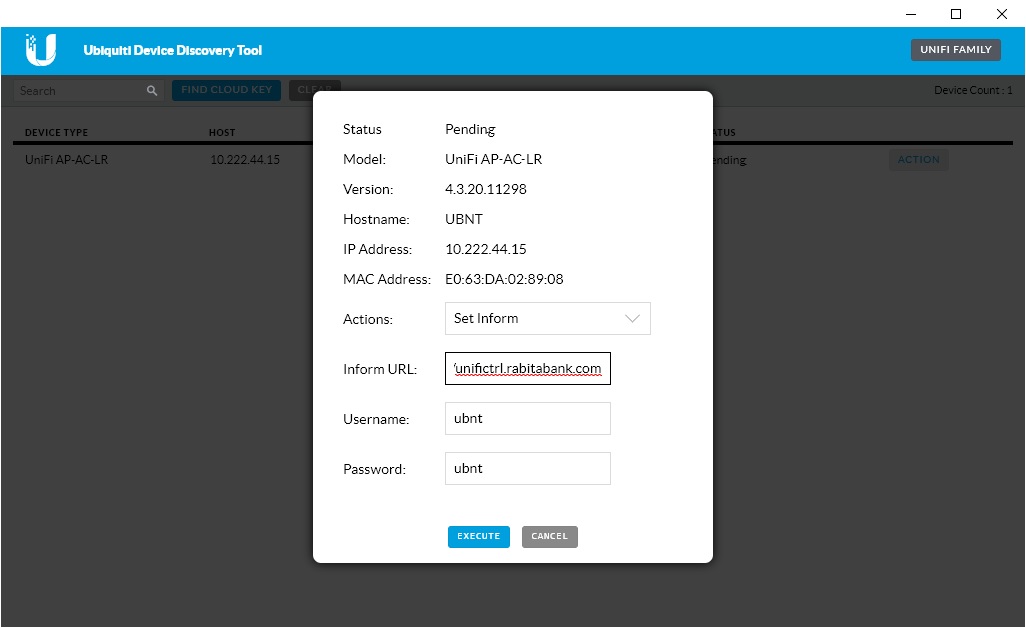
Чтобы утилита определила подключенные к сети точки доступа (Access Point AP), компьютер с запущенной утилитой и AP должны находиться в одной подсети. Запускаем утилиту, нажимаем на кнопочку UniFi Family. Утилита найдет все устройства UniFi в сети. Нажимаем кнопку Action. Внимание, с первого раза кнопка может на отработать, так как там работает Java, поэтому стоит подождать. Далее в открывшемся окне в строке Inform URL вбиваем доменное имя нашего контроллера. Все остальное (порт, протокол) не меняем!
Шаг №4
Переходим на https://account.ui.com/register и регистрируемся в Облаке Uni-Fi. Это необходимо для удаленного управления устройствами с любой точки мира.
Шаг №5
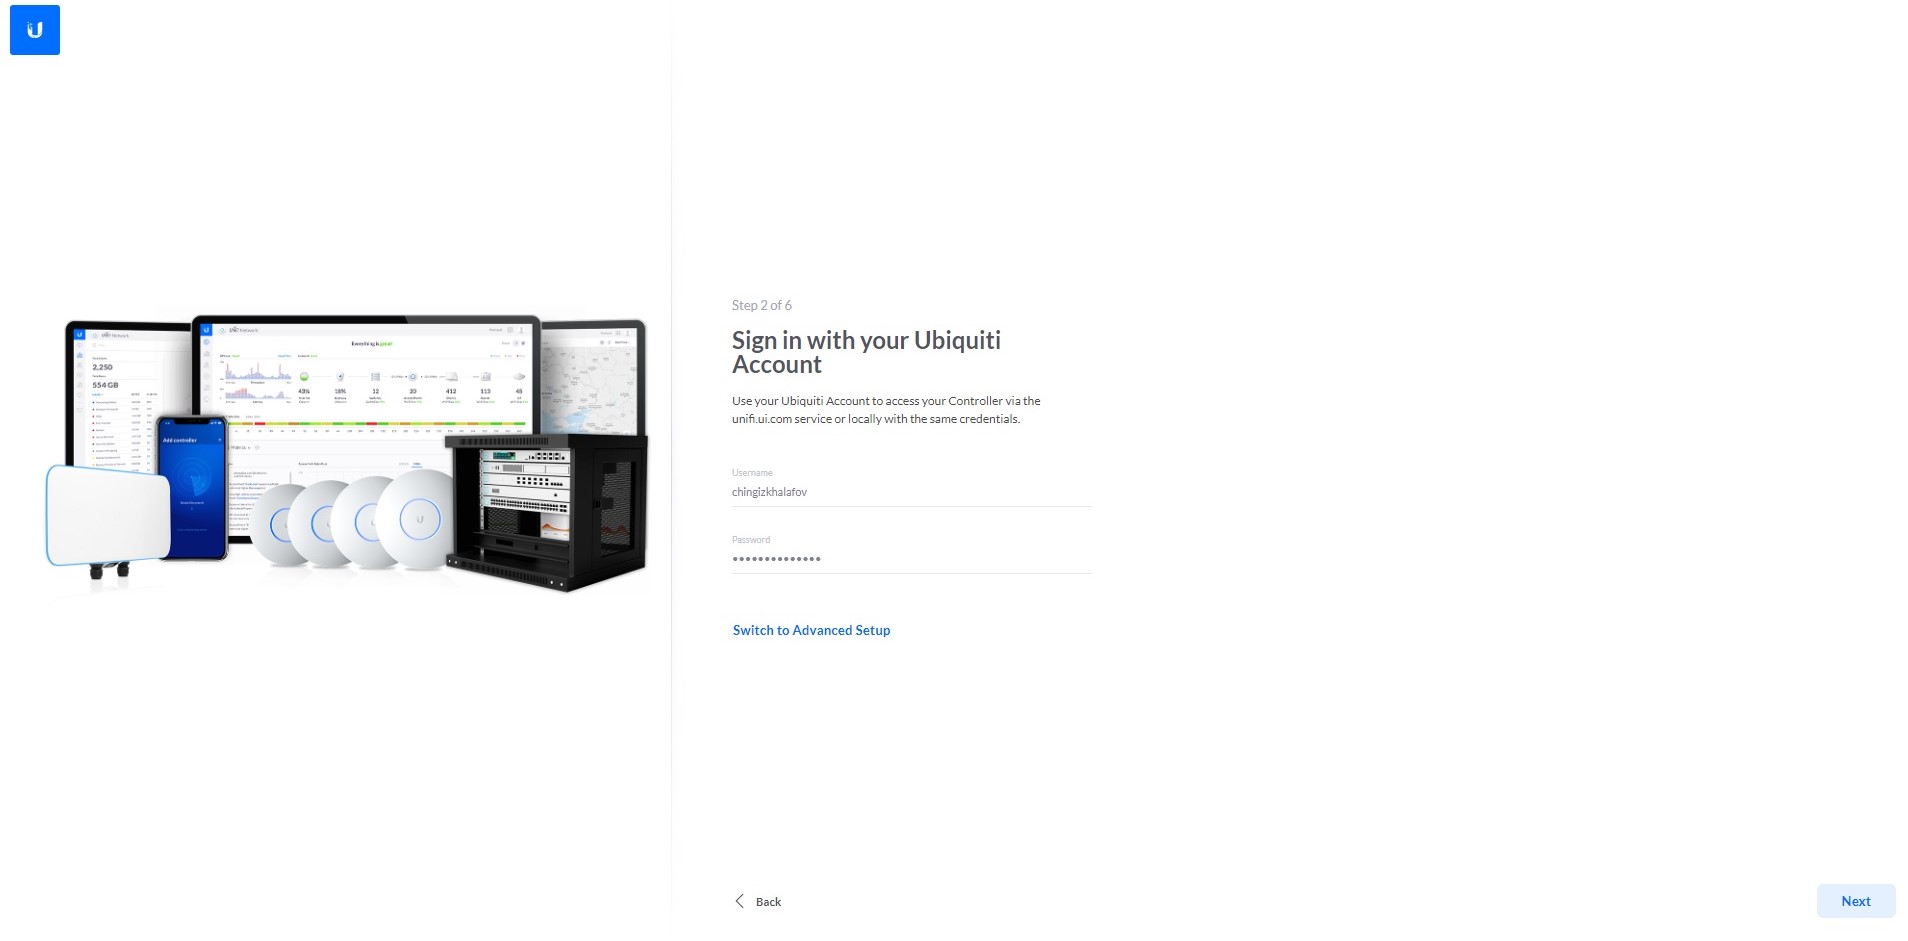
Затем в браузере — рекомендуется Google Сhrome, открываем панель управления нашего новоиспеченного контроллера: https://unifics.domain.com:8443. У нас запросит название нашего сайта, то бишь Wi-Fi домена. Нажимаем Next. Вводим логин и пароль от облачного аккаунта, который зарегистрировали на предыдущем шаге:
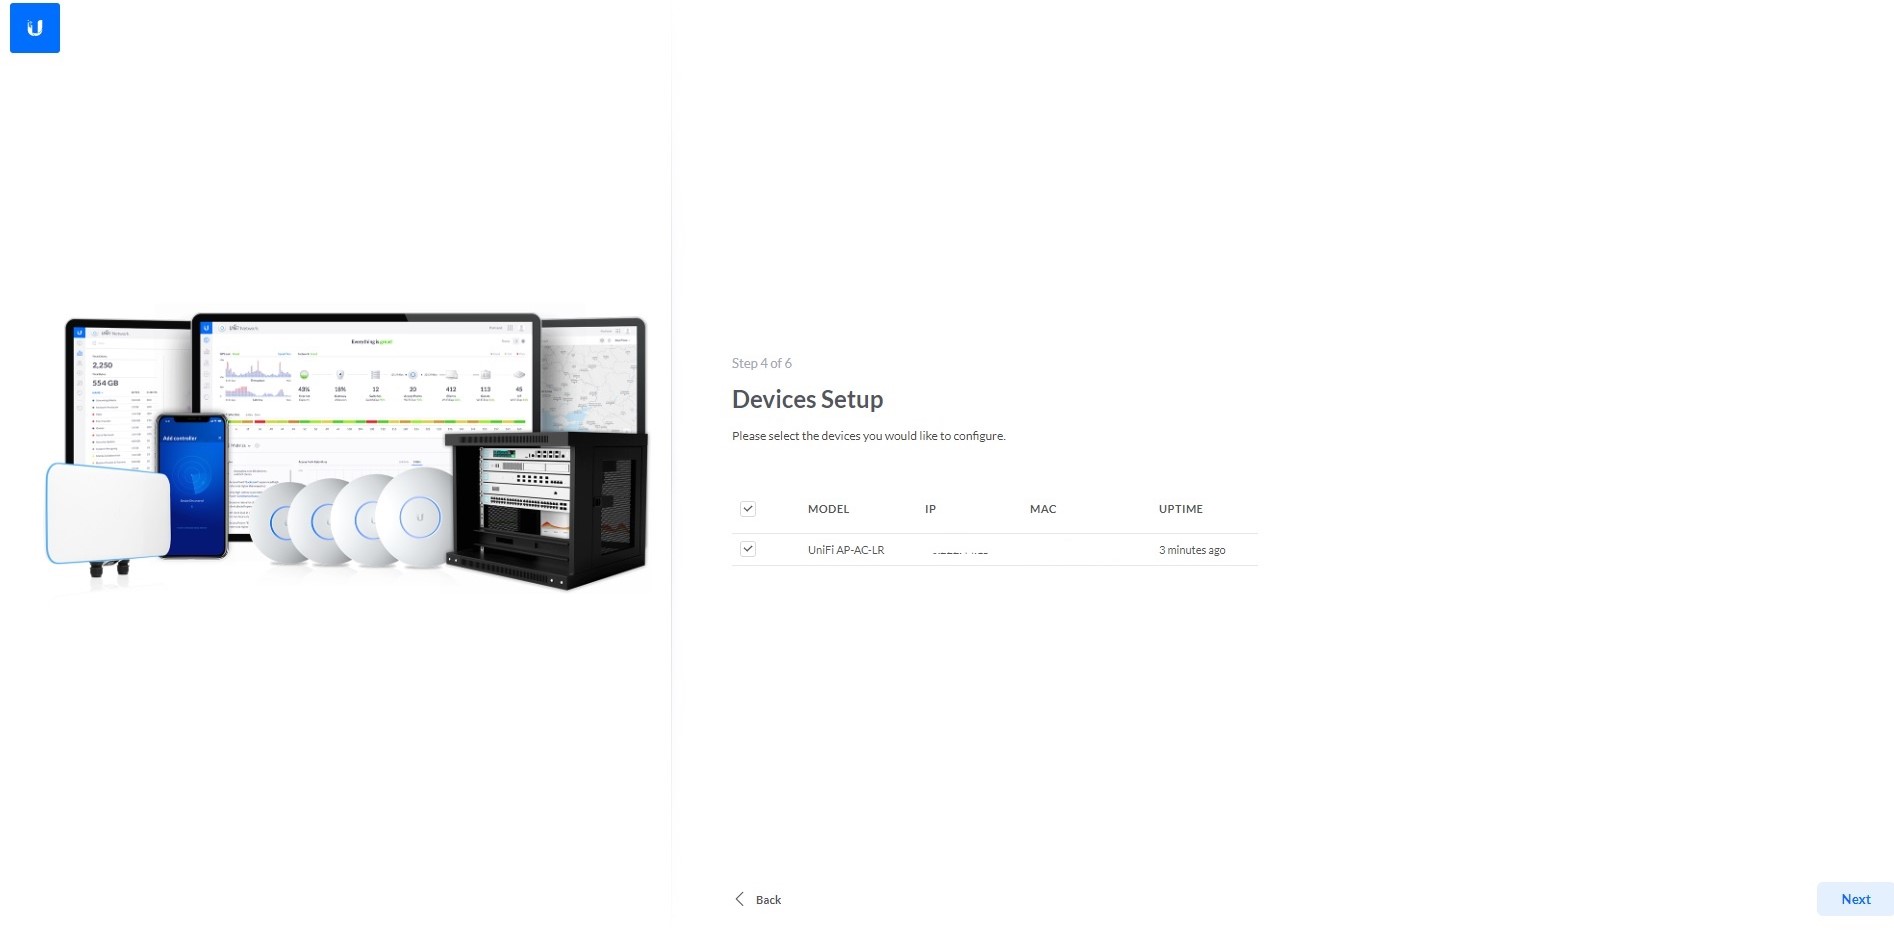
Нажимаем Next. Контроллер отобразит точки доступа в сети, благодаря действия, которые проделали на третьем этапе (никакой магии).
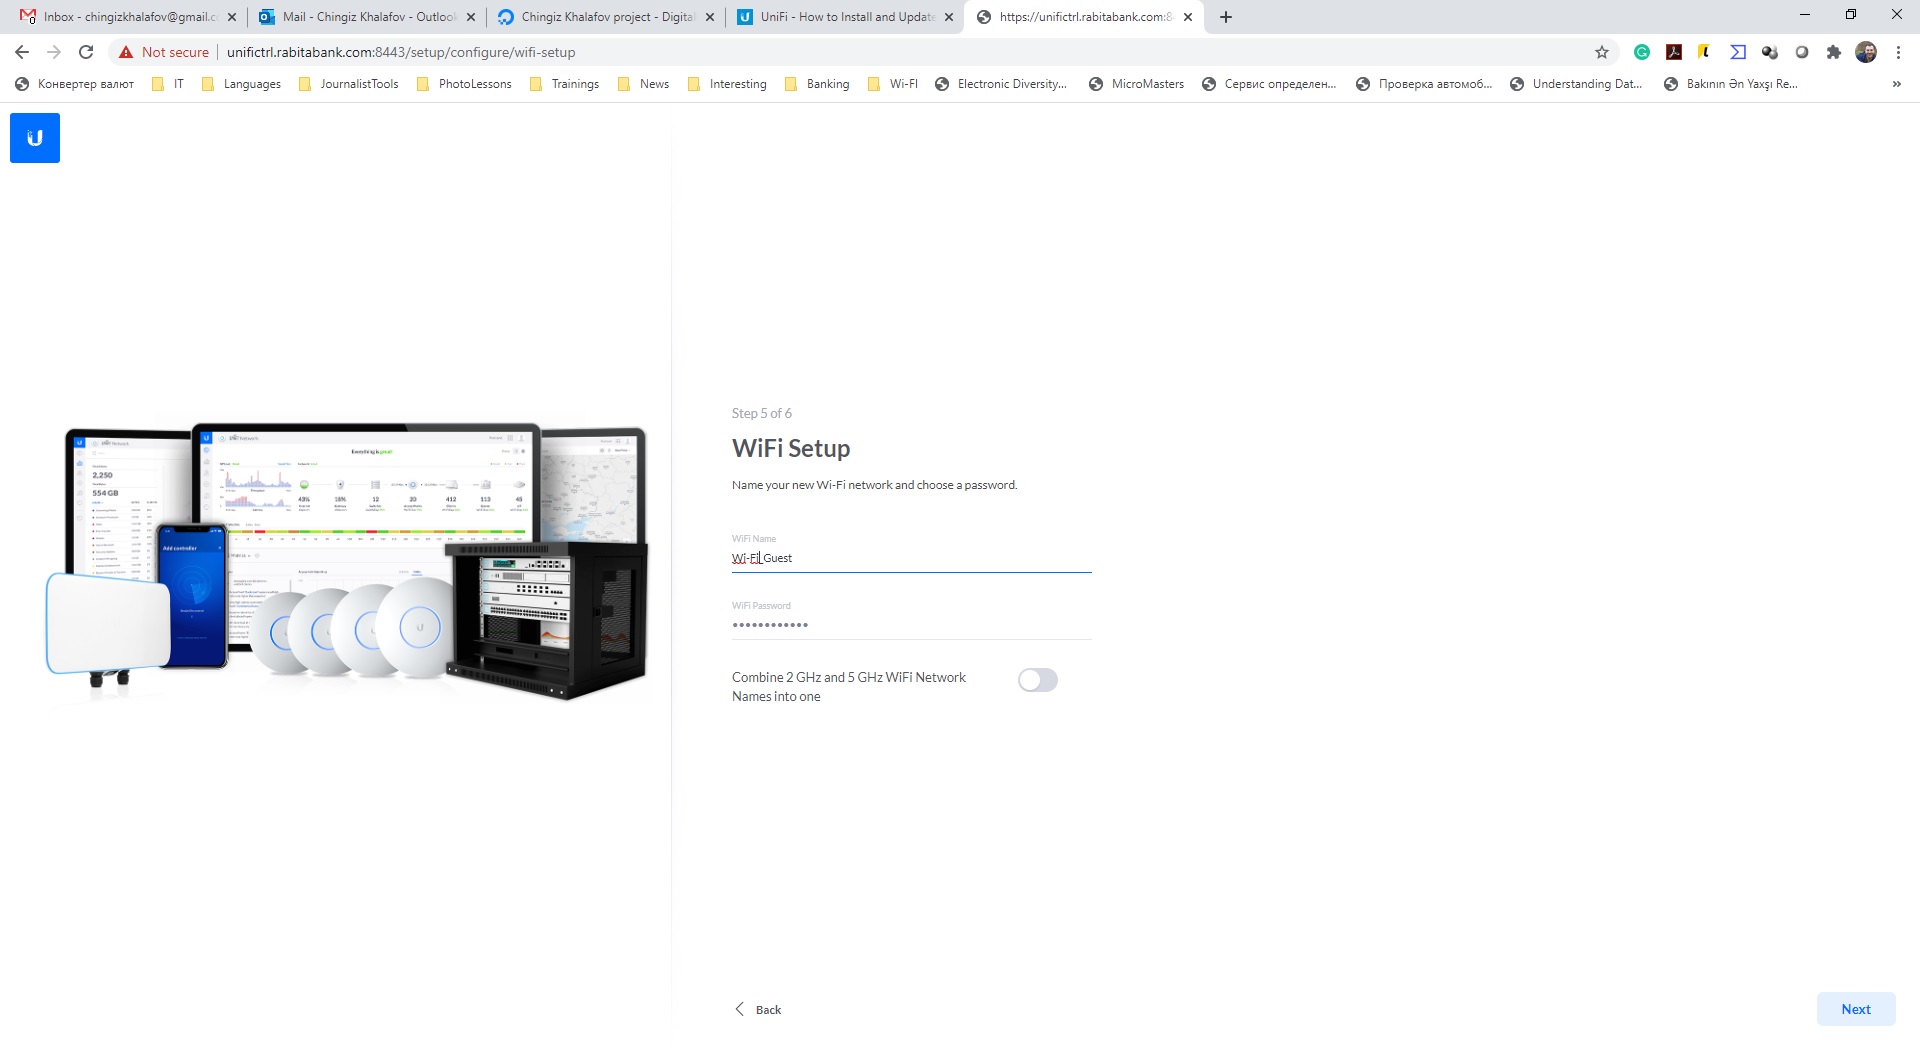
Нажимаем Next. Задаем название (SSID) и пароль Wi-Fi сети. Всё это можно будет поменять. Переключатель Combine 2.4 GHz и 5 GHz Wi-Fi Network Names into one не трогаем.
Нажимаем Next. Выбираем часовой пояс, страну и нажимаем Finish. Контроллер начнёт применять изменения на точку доступа.
Шаг №6
Переходим в настройки кликнув на значок шестеренки в левом нижнем углу панели управления контроллером. В строке Controller Hostname/IP прописываем доменное имя нашего контроллера и обязательно ставим галочку перед Override inform host with controller hostname/IP.
Шаг №7
При добавлении новой точки доступа выполняем первый и третий шаг для каждого устройства. Затем среди доступных точек доступа появится AP со статусом Pending. Выбираем устройство и нажимаем Adopt. Контроллер применит все настройки на новое устройство.


Бесплатный вводный урок на онлайн курс по кибербезопасности
Изучи хакерский майндсет и научись защищать свою инфраструктуру! Самые важные и актуальные знания, которые помогут не только войти в ИБ, но и понять реальное положение дел в индустрии
Полезно?
Почему?
😪 Мы тщательно прорабатываем каждый фидбек и отвечаем по итогам анализа. Напишите, пожалуйста, как мы сможем улучшить эту статью.
😍 Полезные IT – статьи от экспертов раз в неделю у вас в почте. Укажите свою дату рождения и мы не забудем поздравить вас.
How to SSH into Unifi AP (Access Point)
Published:15 December 2021 — 5 min. read
Read more tutorials by Anthony Metcalf!

Meet Active Directory and Windows Server auditing, security and compliance needs with ManageEngine ADAudit Plus. Download Free Trial!
Table of Contents
A new (or second-hand) Ubiquiti Unifi Access Point (AP) can be an intimidating beast. Setting up Unifi APs is different from most other networking equipment you may come across. But don’t worry, learn how to SSH into Unifi AP (access point) in this tutorial.
Ready? Read on to get started!
Table of Contents
Prerequisites
This tutorial comprises hands-on demonstrations. To follow along, ensure you have the following in place.
- A Unifi access point. This tutorial uses a UAP-AC-Lite model, version 5.43.52.
- An SSH client. This tutorial uses the Windows SSH client from a PowerShell prompt on Windows 11 Build 22518, but any SSH client will work.
- A Unifi controller (Ubiquiti) version 6.2.26 is used in this article.
Identifying a Previously Adopted Access Point
Before you can SSH into a Unifi AP, you must first determine if the AP was previously adopted or not. A controller centrally manages all Ubiquiti devices with an access point. An access point that a controller has claimed (associated with) is referred to as “adopted” while a new or factory rest AP is “unadopted”.
To view an AP’s status, open your favorite browser, and log in to your controller by connecting to the URL and filling in the username and password fields.
Next, click the AP icon on the left-hand side to display the device listing.
The image below shows two APs connected to a controller. The first AP (denoted by a white status dot) is claimed by another system, while the controller claims the second AP (denoted by a green status dot).
Note the IP addresses of both APs like the ones below, as you’ll need them to access both APs later.
If you cannot see the AP in the devices page of the controller (or you haven’t set up a controller yet), try your DHCP server. The AP can usually be found on your internet router and should list all of the devices on your network with their IP and MAC addresses.
You don’t need to know what a MAC address is, but know it’s on a label on the underside of the access point called “MAC ID.” Match the MAC address on your AP to an IP on your network, and you are good to go.
The status of the access point makes a difference as to which username and password that you use to connect to the AP. For an unadopted access point, or one which has been recently reset, the SSH credentials will be (depending on the firmware):
- Username: root | Password: ubnt
- Username: ubnt | Password: ubnt
But for the unadopted access point used in this tutorial, the credentials are ubnt for the username and ubnt as the password. Take note of the username and password, as you’ll need them to access the unadopted AP in the following section.
If the access point is adopted, the credentials will be root/your-SSO-account’s-password (account.ui.com).
Accessing an Unadopted Access Point
Once you know your access points’ state, you can now access them, but first, start with accessing the unadopted one.
If the access point has been previously adopted, the username and password may have been reset, so jump to the “Accessing an Adopted Access Point” section.
Open a terminal, and run the command below to SSH into the AP. When prompted, enter the unadopted AP’s password you noted in the “Determining if the AP has Previously Been Adopted” section.
If the SSH session is successful, you’ll get a BusyBox built-in shell (ash) message like below.
If the credentials do not work, reset the access point by performing the reset procedure on your AP.
Resetting a Previously Adopted Access Point
Now that you can access an unadopted AP via SSH, you can also access a previously adopted AP. But first, you’ll reset the previously adopted AP. Doing so sets the AP in a ready-to-be “adopted” state by your controller.
Resetting an AP causes downtime. So ideally, only try this on an Access Point that is not yet in use unless you’re prepared to face some angry users.
Run the set-default command below to clear Unifi access points config and reboot the AP, which takes a few minutes to complete. This command puts the AP into the same state as using the physical reset switch on the device.
Resetting an Access Point’s Default Password
Not leaving your network settings on default is a sensible idea. A new username and password will automatically be set up with new details for your network when you adopt a device. So to be on the safe side, reset the default password now.
Run the passwd command at the shell prompt, and then enter a new password and confirm it.
Here’s How to SSH into Unifi AP via Accessing an Adopted Access Point
Perhaps you have an adopted AP; how do you access it? SSH into the AP using the username and password you set up when configuring the controller.
Note that if you set up your controller to use your account.ui.com address and enable two-factor for device authentication, SSH access will not work.
If you do not know the AP username and password, you will need to factory reset the AP like in the “Resetting the Access point Default Password” section or use the controller to access the AP.
But you can also use the controller to reset the username and password globally. This action affects all adopted APs on your network.
To reset the credentials for all access points on your network:
1. Open the controller, and select the settings (gear) icon.
2. Navigate to System Settings —> Controller Configuration.
Now select Device SSH Authentication and change the Username and/or Password (or add SSH Keys for public-key authentication).
Avoid using “root” as the username as it’s a special user on the Linux-based operating system of the access point.
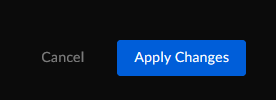
Finally, click the Apply Changes button to save the changes.
Conclusion
In this tutorial, you’ve learned that there’s nothing you can do from the console of Unifi AP that you can’t also do from the controller. But still, knowing how to SSH onto Unifi AP is a handy exercise. This access method lets you quickly check and automatically pull information, such as the current AP firmware.
You can also SSH to an AP to update the firmware, which could be automated via SSH if you have many devices, rather than clicking through the web GUI of the controller.
Now how do you plan to build upon this newfound knowledge? Perhaps use SSH to integrate the AP into a configuration management system, such as Salt or Ansible, to automate updates?
Hate ads? Want to support the writer? Get many of our tutorials packaged as an ATA Guidebook.
More from ATA Learning & Partners

Recommended Resources!
Recommended Resources for Training, Information Security, Automation, and more!

Get Paid to Write!
ATA Learning is always seeking instructors of all experience levels. Regardless if you’re a junior admin or system architect, you have something to share. Why not write on a platform with an existing audience and share your knowledge with the world?

ATA Learning Guidebooks
ATA Learning is known for its high-quality written tutorials in the form of blog posts. Support ATA Learning with ATA Guidebook PDF eBooks available offline and with no ads!


