Arduino LCD Tutorial- Tinkercad
What is LCD ?

LCD (Liquid Crystal Display) is a type of display that uses liquid crystals for its operation. A 16×2 LCD means there are 16 columns and 2 rows. Therefore a maximum of 32 characters can be displayed at a time. All characters are displayed in a 5×7 pixel matrix format in 16X2 LCD. Other Various configurations include (1 line by 20 X char up to 8 lines X 80). This LCD has two registers, namely, Command and Data.
The command instructions given to the LCD are stored in the command register. For performing various tasks like LCD initialization, clearing the display, assigning cursor positions, text display location, etc., various commands are given to LCD in hexadecimal format. The data register is used to display data on LCD. The data is the ASCII value of the character to be displayed on the LCD.
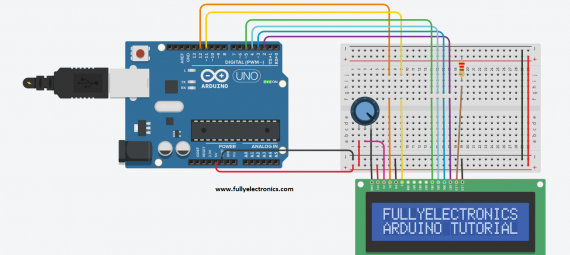
In this tutorial, we will learn how to connect the Liquid Crystal Display or LCD to the Arduino board using Tinkercad software. LCD nowadays is very popular and broadly used in electronic projects as they’re good for displaying information like sensors data from your circuit and also there are very cheap.
If you are new to Arduino you can refer to the below link :
If you are confused with how to start with Tinkercad, refer to the below link:
TMP36 Temperature Sensor and LCD Display Using Arduino (Tinkercad)

Introduction: TMP36 Temperature Sensor and LCD Display Using Arduino (Tinkercad)
Hello Everyone! We are students from University Tun Hussein Onn Malaysia (UTHM) carrying out a project to demonstrate how we can simulate a temperature sensor, a lcd, and an Arduino using Tinkercad as part of our curriculum for UQD0801 (Robocon 1) (Group 7)
Temperature sensors and LCD can serve as a simple mechanism in different situations such as room temperature monitoring and even plant monitoring or any place that considers temperature as an important element!
Step 1: List of Required Components
This project requires components that are very easily acquirable in the market.
List of Components :
1. Arduino Uno R3 (1)
2. Temperature Sensor (TMP36) (1)
4. 250kΩ Potentiometer (1)
5. 220Ω Resistor (1)
Step 2: Circuit Connection in Tinkercad
Tinkercad provides pre-built circuits that can help users to not complicate their circuits by building from scratch.
In the Circuit Desinger, we can search for lcd, which will show that there is a starter circuit that has a pre-connected circuit between an Arduino and LCD.
Step 3: TMP36 Temperature Sensor
In Tinkercad, there is only one temperature sensor available, which is the TMP36.
The TMP36 does not have a temperature sensitive resistor. Instead this sensor uses the property of diodes; as a diode changes temperature the voltage changes with it at a known rate. The sensor measures the small change and outputs an analog voltage between 0 and 1.75VDC based on it. To obtain the temperature, we need to measure the output and perform some calculation to convert it to degree celsius.
Step 4: Connect the TMP36 to the Arduino
The TMP36 has 3 pins, which can be easily identified by noticing the flat side of the sensor.
The first pin is the +5V pin which will be connected to the supply.
The second pin is the Vout which will be connected to the Analog In pin, (could be A0-A5). We used A0 for this project.
The third pin is the GND pin which will be connected to the ground of the Arduino.
Step 5: Lets Do Some Coding!
Initially, there will be a code in the code editor found in Tinkercad.
This is because we used a starter circuit from Tinkercad, loading its code along with it to allow new users to explore and simulate the output.
We can delete all of that and design our code.
For any Arduino code that we are about to design, we need to ensure that the libraries related to the project is included.
Which in this case, we require two libraries; -Library for LCD (LiquidCrystal.h)
-Library for Serial Communication (SoftwareSerial.h)
Both this libraries are present in Tinkercad, meaning there is no need to download any library from external sources.
Therefore; the first lines of the code is
Step 6: Rest of the Code
// include the library code:
#include
LiquidCrystal lcd(12, 11, 5, 4, 3, 2); //connecting the pins rs,en,d4,d5,d6,d7 to the arduino at pin 12 11 5 4 3 2
int celsius; //declare a function celsius as an integer
Serial.begin(9600); //set the baud rate at 9600 bits per second
lcd.begin(16, 2); //lcd size is 16×2 // Print a message to the LCD.
Serial.println(«Temp Display»); //print the message at the serial monitor >
celsius = map(((analogRead(A0) — 20) * 3.04), 0, 1023, -40, 125);//map to obtain temperature mathematically.Meaning 0 = -40degrees and 1023 = 125degrees
lcd.setCursor(0,0); //cursor set to the first pixel of the lcd.
lcd.print(«Temp Display»); //print message to lcd
lcd.setCursor(0,1);//cursor set to the second line first pixel
lcd.print(celsius); //prints the celsius output from the analog read onto the lcd at 0,1
lcd.print(«C»); //print alphabet «c»
Serial.println(celsius); //output shown in the serial monitor
delay(1000); //reading refreshes every 1 second
lcd.clear(); //clears the lcd
On occasion, there might be a «*» character between the space between lines when copied onto Tinkercad. Ensure that any other character apart from the code found above is erased in order to prevent errors during compilation.