KY-009 — Модуль RGB светодиода (SMD). Подключение к Arduino.
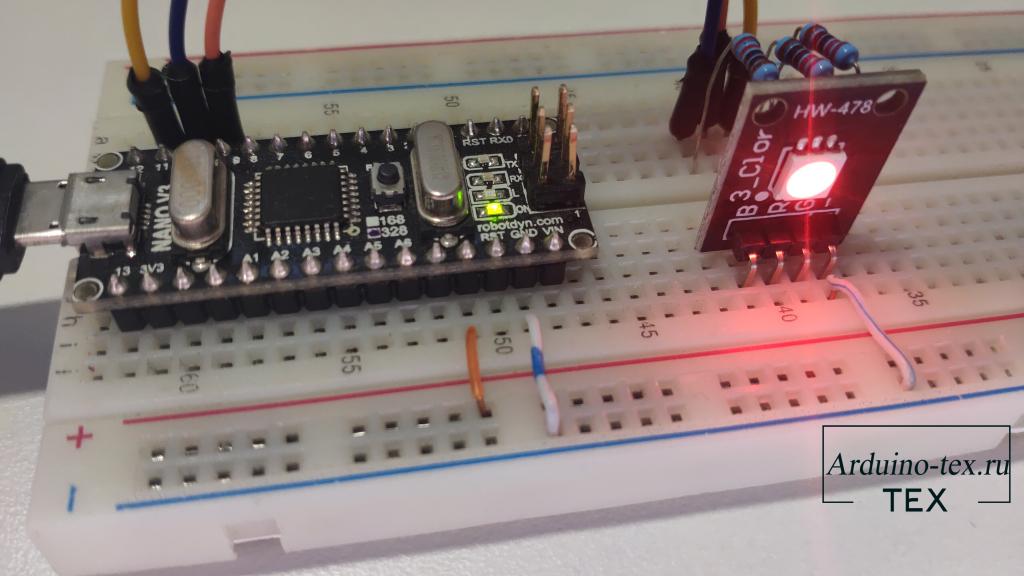
Для световой индикации в Arduino проектах часто используют светодиоды, а для экономии места можно поставить RGB светодиод. Сегодня в уроке рассмотрим KY-009 модуль, который оснащён SMD RGB светодиодом. Но, к сожалению, у данного модуля нет обвязки, как у других модулей из набора «37 in 1 Sensors Kit for Arduino». На мой взгляд это не логично. На модуль достаточно просто установить 3 резистора. И в принципе KY-009 это не модуль, а просто RGB светодиод.
Описание модуля KY-009
Полноцветный светодиодный модуль RGB KY-009 для Arduino излучает различные цвета, смешивая красный, зеленый и синий свет. Количество каждого цвета регулируется с помощью ШИМ. Что позволяет вывести до 255 оттенков для каждого канала.
Технические характеристики KY-009
Cветодиодный SMD-модуль KY-009 RGB состоит из светодиода SMD 5050, который используется с ограничивающими резисторами для предотвращения перегорания. Совместим с популярными платформами, такими как Arduino, Raspberry Pi и ESP8266.
При сборке схемы, рассчитанной на напряжение питания 5 В, следует установить в линиях R, G и B резисторы сопротивлением:
Для красного канала (R) не менее 180 Ом.
Для зеленого (G) и синего канала (B) не менее чем по 110 Ом.
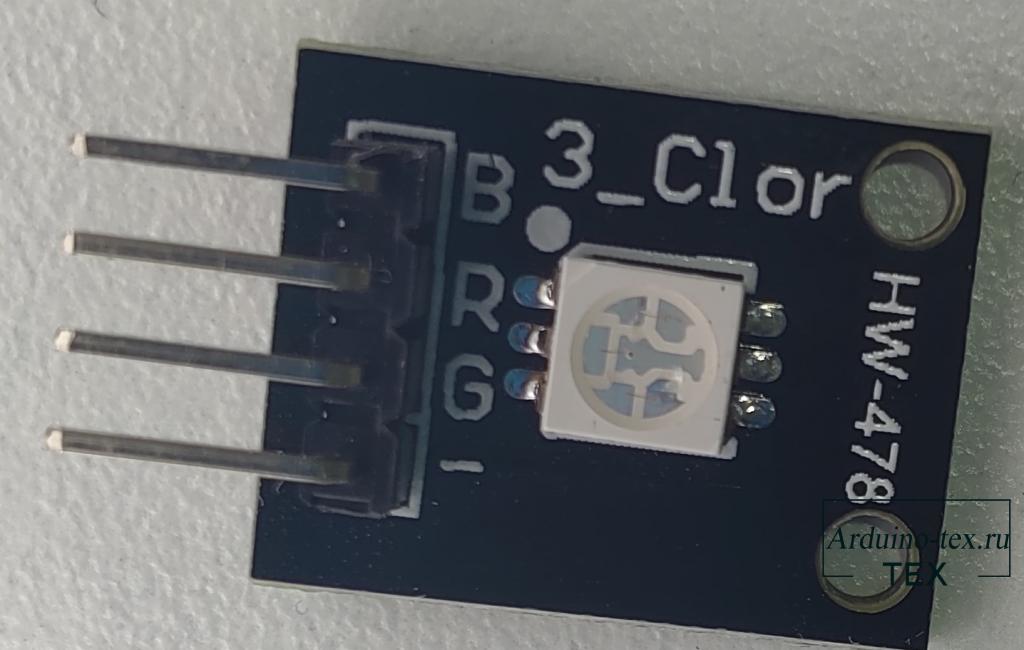
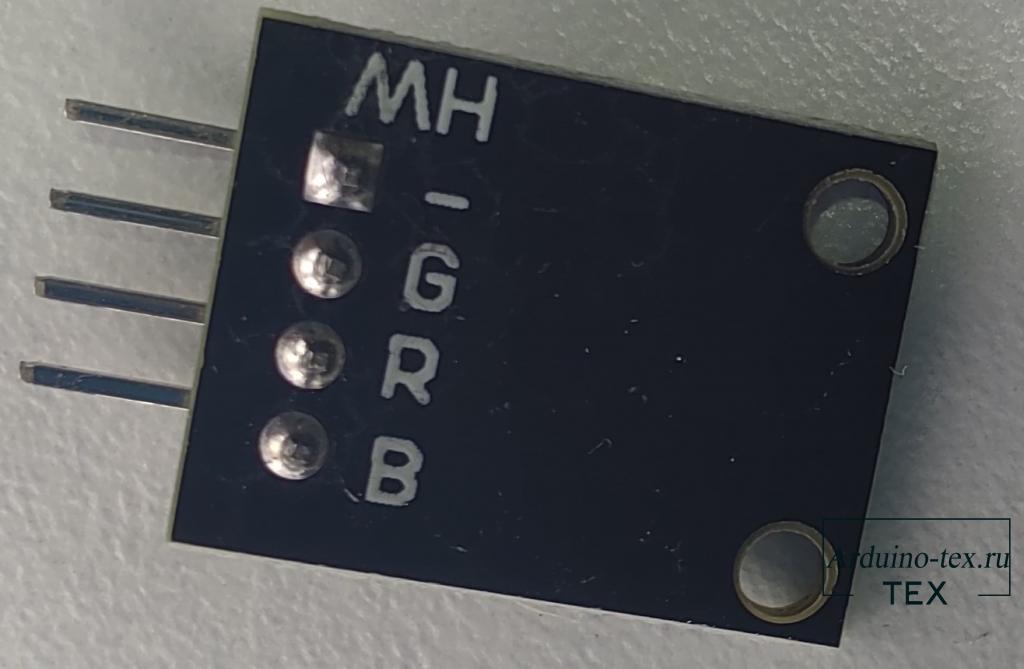
Контакты:
- I – общий провод, подключается к GND.
На эти контакты подается питание положительной полярности:
- R – красный ,
- G – зеленый ,
- B – синий .
Схема подключения KY-009 к Arduino UNO.
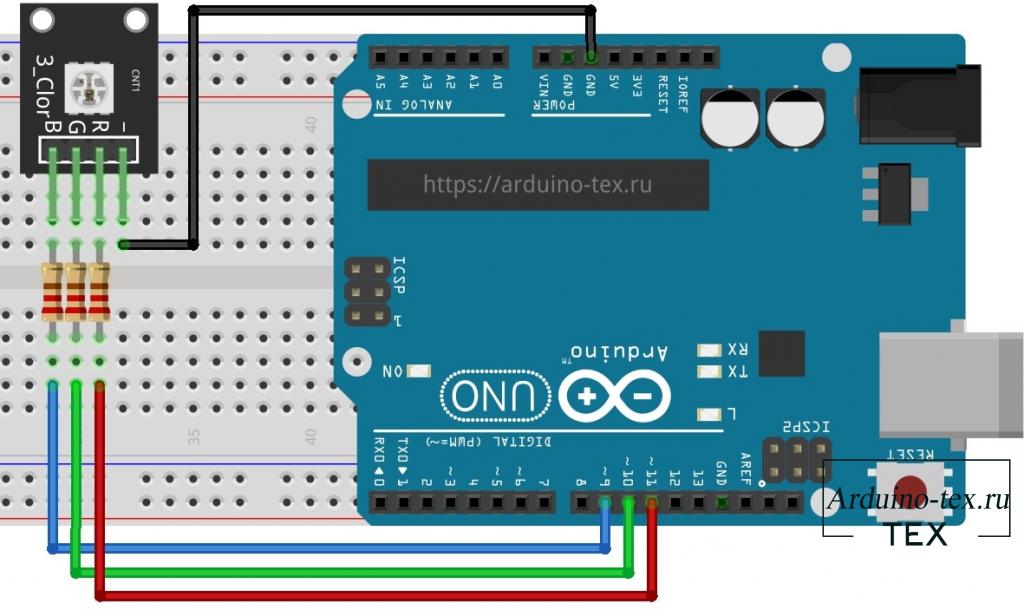
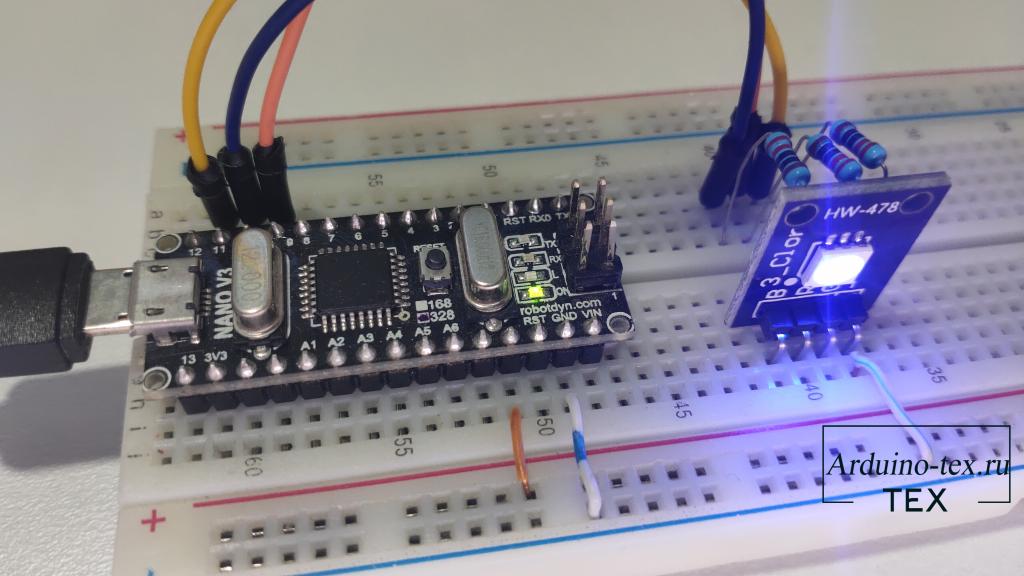
Схема подключения KY-009 к Arduino NANO.
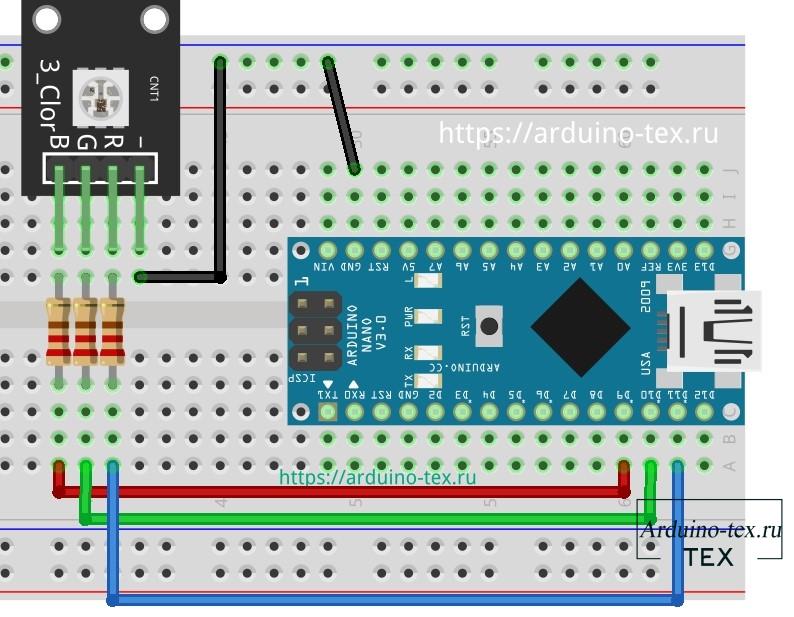
Для того чтобы модуль KY-009 не вышел из строя, необходимо использовать резисторы, с номиналом который рассмотрели выше. Дополнительную информацию можно найти в техническом описании SMD 5050 LED внизу статьи, в разделе «файлы для скачивания».
KY-009 Пример кода Arduino.
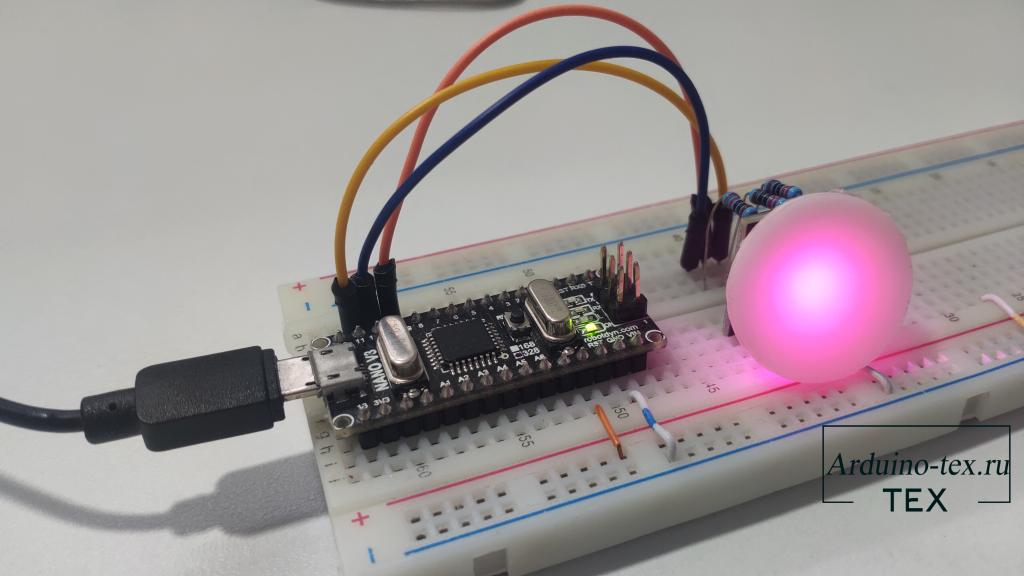
Следующий пример кода для Arduino будет циклически переключаться между различными цветами, изменяя значение ШИМ для каждого из трех основных цветов.
Второй вариант кода позволяет плавно изменять цвет из одного оттенка к другому и так по кругу.
Код не оптимальный, но для понимания этого достаточно. Кроме этого, для облегчения работы с RGB светодиодами также есть библиотеки, например: RGBLed Arduino library.
Использование библиотеки RGBLed Arduino library для работы с модулем KY-009.
Скачать библиотеку RGBLed можно на github или внизу статьи, в разделе «файлы для скачивания»
Заходим в Arduino IDE и выбираем в меню: «Скетч –> Подключить библиотеку –> Добавить .ZIP библиотеку…»
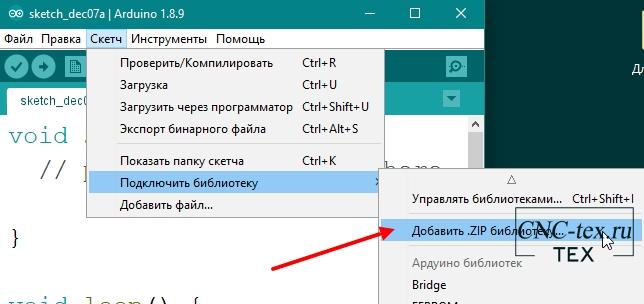
Выбираем скаченный архив RGBLed-master .zip и нажимаем кнопку «Открыть». После установки вы увидите надпись, что библиотека успешно добавлена.
Для начала работы с библиотекой RGBLed ее нужно подключить.
Затем создать объект для подключения, указав пины подключения светодиода к Arduino.
В дальнейшем мы можем, в основном цикле loop(), оперировать цветом светодиода, для этого в библиотеке есть функции:
Для того чтобы загорелся красный светодиод на 100 мс, достаточно в коде добавить строчку:
Также в библиотеки есть палитра цветов.
С библиотекой идут примеры использования. Например Вспышка:
Как видим из кода, у нас будем мигать светодиод красным и синим цветами, на подобии полицейской мигалки, про которую есть у меня на сайт отдельный урок: Полицейская мигалка своими руками из светодиодов на Arduino
Вывод.
Как видим, работать с RGB светодиодом достаточно просто, и для этого есть готовые инструменты. Сейчас мы можем смело использовать данный модуль в своих проектах на Arduino.
Описание всех датчиков из набора «37 in 1 Sensors Kit for Arduino» вы можете посмотреть на странице описания данного набора модулей для Arduino .
Понравился Урок KY-009 — Модуль RGB светодиода (SMD). Подключение к Arduino ? Не забудь поделиться с друзьями в соц. сетях.
А также подписаться на наш канал на YouTube, вступить в группу Вконтакте, в группу на Facebook.
Спасибо за внимание!
Технологии начинаются с простого!
AVR Freaks
SMD crystal package modification question

I like to use crystals vs resonators for AVR boards (both Arduino and home made standalone). To replace the resonator on an Arduino board, a 2 smd no-lead package of size 3.2mm x 2.5mm in needed. I unsolder the resonator, remove the center PCB trace (gnd) with a razor blade and hot air solder on the crystal. Of course I would like to use the same type of crystal for standalone boards as well (the package neatly fits between adjacent pads of a protoboard).
My problem / question is this: the only value crystal I can get in the 2 smd 3.2×2.5 package is 16.0000 MHz. I prefer to use 22.1184 MHz. crystals to get «integer perfect» serial baud rates.
Unfortunately, the only package that this frequency is available in (in the 3.2×2.5 size) is 4 smd. The 4 smd parts have 4 pads on the bottom, a diagonal pair are the crystal and the other diagonal pair are case ground.
Obviously, soldering these to an Arduino board will produce a direct short across the MCU crystal pins.
My idea is to either solder a small piece of wire to each ground pad and use it to rip the pads off the package, or else use a razor blade to get under the pads and peel them off the package (or if the ground pads ONLY contact the case from the outside, cut the connection between the pads and the case with a razor blade).
I know this seems barbaric, but I don’t see any other way to do it.
So, the questions:
* Will the crystal work OK without the case grounded?
* Should I solder a tiny wire from the case to ground to re-establish the ground?
* Will removing the pads the way I described destroy the crystal?
* Anyone have a better idea?
Any input will be appreciatted.
Gentlemen may prefer Blondes, but Real Men prefer Redheads!
Arduino: The Noiasca Liquid Crystal for your Character Display (LCD)
With so many Arduino LCD Libraries, why do we need just another one? The Noiasca Liquid Crystal supports I2C, SPI and parallel interfaces but more over, it handles special characters right. The days of octal codes for printing on a LCD are finally over!
Teaser: What does Noiasca Liquid Crystal different?
The «Noiasca Liquid Crystal» library does a character mapping from UTF-8 to the existing characters in the Hitachi HD44780U A00 ROM. As example some special characters in the second row of the display:

(Degree, Division, middle Point, n with tilde, Pound, Yen, Tilde, Square root, Proportional to, Infinity, Left Arrow, Right Arrow, Backslash)
For the beginning you should know that you don’t need to enter the octal ROM addresses of the special characters manually but these print can be done by a simple:
On this page I would like to dig deeper into what happens in the library. You can read more about this character mapping on the language specific LCD page or in the German section of this site.
Supported Hardware
The library offers several classes depending on the used hardware:
It’s always necessary to include the library:
The next include depends on the used hardware:
After choosing the hardware, you need the constructor for your display, for example:
The needed parameters differ from hardware to hardware. The parallel LCD needs GPIO definitions, the I2C LCD needs to know the I2C address, the SPI display needs the chip select pin etc. See the Hello World sketch of the respective hardware to get the constructor right.
For I2C and SPI interfaces, don’t forget to add a Wire.begin() or SPI.begin() to your setup. If you forget to begin() your interface, it LCD might not work.
The Character Set of the HD44780U A00 ROM
If you check the HD44780U datasheet page 17ff you can see following:
- In the lower range (to 127) there are 3 characters which differ from 7bit ANSI / 8bit ASCII (red marked). The backslash is used for a Yen sign, the tilde was replaced by an arrow, and an additional arrow was added.
- Other «special characters» like (alpha, beta, micro, ä, ö, ü, . ) are available, but have different addresses.
- The Arduino will send these special characters in UTF-8.

On page 18 you will find a second character set, but HD44780U displays always come with either the hardware support of A00 or A02. Other LCD controllers might have the possibility to change between character sets (e.g. the ST7070), but not the HD44780U. If you need the support for South European, East European or Cyrillic letters — you have to buy a LCD with A02 ROM. But be carefully, lot of advertised «Russian» displays seem to use the SPLC780D1 with Cyrillic letters starting at 0xA000 — not a HD44780U A02 ROM.
In general the first 128 characters (0-127) of UTF-8 are mostly similar to ASCII (lower 7bit ANSI). But characters can be encoded in up to 4 bytes. This is the reason, why you will get two «Japanese» characters, if you send for example the degree symbol. These characters are called «Katakana half-width» and are defined in UTF-8 from 0xFF65 to 0xFF9F. The degree Symbol ° is encoded as 0xC2B0 and therefore you will get the Japanese character 0xC2 and 0xB0 if you try to print ° with a LCD library without UTF-8 support.
The following table shows some of the characters and their representation in the character ROM A00.
| char | UTF-8 | A00 | Name |
|---|---|---|---|
| \ | 5C | 7C | REVERSE SOLIDUS («Backslash») |
| 7E | 2D | TILDE | |
| £ | C2 A3 | ED | POUND SIGN |
| ¥ | C2 A5 | 5C | YEN SIGN |
| ° | C2 B0 | DF | DEGREE SIGN |
| µ | C2 B5 | E4 | MICRO SIGN |
| · | C2 B7 | A5 | MIDDLE DOT |
| ä | C3 A4 | E1 | LATIN SMALL LETTER A WITH DIAERESIS |
| ö | C3 B6 | EF | LATIN SMALL LETTER O WITH DIAERESIS |
| ü | C3 BC | F5 | LATIN SMALL LETTER U WITH DIAERESIS |
| Ä | C3 84 | *) | LATIN CAPITAL LETTER A WITH DIAERESIS |
| Ö | C3 96 | *) | LATIN CAPITAL LETTER O WITH DIAERESIS |
| Ü | C3 9C | *) | LATIN CAPITAL LETTER U WITH DIAERESIS |
| ß | C3 9F | E2 | LATIN SMALL LETTER SHARP S |
| ñ | C3 B1 | EE | LATIN SMALL LETTER N WITH TILDE |
| ÷ | C3 B7 | FD | DIVISION SIGN |
| ñ | C6 9F | F2 | LATIN CAPITAL LETTER O WITH MIDDLE TILDE |
| Σ | CE A3 | F6 | GREEK CAPITAL LETTER SIGMA |
| α | CE B1 | E0 | GREEK SMALL LETTER ALPHA |
| β | CE B2 | E2 | GREEK SMALL LETTER BETA |
| ε | CE B5 | E3 | GREEK SMALL LETTER EPSILON |
| μ | CE BC | E4 | GREEK SMALL LETTER MU |
| π | CF 80 | F7 | GREEK SMALL LETTER PI |
| ρ | CF 80 | E6 | GREEK SMALL LETTER RHO |
| ← | E2 86 90 | 7F | LEFTWARDS ARROW |
| → | E2 86 92 | 7E | RIGHTWARDS ARROW |
| √ | E2 88 E8 | E8 | SQUARE ROOT |
| ∝ | E2 88 9D | E0 | PROPORTIONAL TO |
| ∞ | E2 88 9E | F3 | INFINITY |
At the bottom of the list — you can find some 3 byte characters.
There are some additional things to know about UTF-8
- If a character starts with 0b11xxxxxx (0xC0 and higher), more bytes will follow
- 0b110xxxxx means exactly one start byte and a second byte will follow
- 0b1110xxxx (0xE0 and higher) means the character consists of three bytes (e.g. the character for square root)
- 0b11110xxx (0xF0 and higher) means, the character consists of four bytes
If you read that the first time, it sounds very complex, but Wikipedia sumarizes UTF-8 very well. If you want to know more about UTF-8 — it’s worth reading.
Simply spoken, the library write method does three steps if you call write (either directly or implicit with print):
- if it is the first character, decide if you should write the character or just store it as «first byte»
- if we receive a following byte, decide if we got already enough characters and if yes, activate writing (and delete the special character storage)
- if something has to be written to the LCD, check — if we need a further mapping.
To make this happen, the LCD class adds a 4byte storage for the special character and uses an internal function to do these decisions and character mapping.
Your own Character Converter (Short Version)
If you need for any reason a different converter for the characters you can hand over your own callback function as optional last parameter to your LCD object.
Obviously — you also have to implement the callback function in your user sketch to do all the magic.
The minimum callback function looks like:
The callback function needs references to the the internal storage of previous special characters and the actual value to be printed.
If you want to print a character (the character in value), return the constant PRINT. If you don’t want to print the value, you can store it into the special character buffer and return a NOPRINT.
Your callback function will be called internally every time you write a character, the .write method will always return 1, meaning «one value processed» even if it was not immediately displayed on the LCD but stored into special.
This enables the handling of UTF-8 characters which can consist of up to 4 bytes.
See the general example «50 Convert» how to write your own character converter.
Further information can be found on LCD Language Support.
German Umlauts
For my German readers: the default constructor enables the support for the small letters ä ö ü and ß. The large German umlauts Ä Ö Ü will be converted to their counterpart A O U, as there are no capital Umlauts in the Standard A00 Character set. If you want to try other variants, you can use following predefined callback functions
The callback «convert_special» will use the custom characters 5, 6 and 7 for the large Umlauts. To create the large umlauts you have to call the method to create the custom characters Ä Ö Ü in setup:
Lowercase Letters with Descender (g j p q y)
There are alternative lowercase letters (minuscule) with descender (g j p q y) in the ROM A00. You can write them by adding 0x80 to the letter («8 columns to the right»). But I don’t like them very much. These letters are still one pixel higher even if they use the space below the baseline and are looking larger then the rest. See this example which prints the first line in the default font and the second line using the pixel below the baseline:

If you would like to test on your own, use writeOld:
Direct access to special characters .writeOld()
If you are already writing special characters with the .write() method, you should remember, that .write() will apply the character converter. If you want to write characters without the converter, you have to write them using the .writeOld() method.
Example: this will write ä on the display:
Why this? All characters in the ROM from 0xC0 onwards are effected by write. If you really need the direct access — you have to replace the method. But with the «Noiasca Liquid Crystal» you can print them anyway using .print().
Not effected are the custom characters 0 — 7 you might have created with the 5×7 bit pattern. These custom characters are well below 0xC0 and can be printed with .write() as with any other library.
Arduino IDE 1.8.9 or higher
To see UTF-8 characters properly you should use at least Arduino IDE 1.8.9 as this adds the «Fix UTF8 related bugs on Windows». If you can’t see UTF-8 characters in the IDE or in the Serial Monitor, update your IDE.
Caveats
With so many LCD libraries out there, what are the caveats of Noiasca Liquid Crystal?
First, this library is not optimized for speed. This library does not read the busy flag (BF) of the display. It just waits the waiting time during the commands like defined in the datasheet. It’s the same like in lot of other libraries. Nevertheless the I2C should be faster that the default «Liquid Crystal I2C» library.
Second, it will take (a little bit) more memory (SRAM and FLASH) for the character mapping. If you are low on memory, you can always use a minimum implementation adding a «_base» to the constructor. Nevertheless I put in some efforts and the library might take less memory than others (to be honest, quite less then other libraries around).
And third, the constructors are not highly variable. There are some fixed values in the code you can’t change from the user sketch. The library works fine as long as you can live with the internal default values. I’m just convinced that a programmer should initialize the hardware correctly and not change it during runtime.
Version of Noiasca Liquid Crystal Library
You have the latest Library if you use Version 2.1.1 (2022-07-29)
The LCD Library is tested with Arduino IDE 1.8.13
ESP32 Core 1.0.6
ESP8266 Core 2.7.4
MiniCore 2.1.2
Summary
If you need an easy support of the given character set of a HD44870 display or if you want to have one unique interface for several hardware variants of LCDs take the «Noiasca Liquid Crystal» library in consideration. If you are from an European country and you need better support of Latin1-4 letters you should buy a SPLC780D1 LCD — which is also supported by this library.
Links
- Download Noiasca Liquid Crystal as ZIP, Version 2.1.1 (2022-07-29)
- How to install a library
- UTF-8 on Wikipedia
- This page in German
- Datasheet for the HD44870 (LCD IC)
- Short Demo on Youtube
- LCD Display on Aliexpress (Affiliate — Advertisement)
- LCD Display on Amazon (Affiliate — Advertisement)
(*) Disclosure: Some of the links above are affiliate links, meaning, at no additional cost to you I will earn a (little) comission if you click through and make a purchase. I only recommend products I own myself and I’m convinced they are useful for other makers.
History
First upload: 2020-09-02 | Version: 2022-07-29
Kontakt
Alle rechtlichen Angaben und Kontaktmöglichkeiten: