Arduino и Bluetooth JDY-31
Описание
В наборе GyverKIT обеих комплектаций есть Bluetooth модуль JDY-31 (аналог популярного HC-06). Данный модуль обеспечивает беспроводную связь UART – COM порт, что позволяет использовать его для удобного обмена данными между Arduino и приложением на смартфоне или программой на компьютере. Основные характеристики:
- Рабочая частота: 2.4 GHz
- Интерфейс: UART
- Напряжение питания: 3.6.. 6V
- Ток потребления: 5 мА в режиме поиска,
8 мА в режиме передачи
Официальную документацию на JDY-31 можно открыть по ссылке .
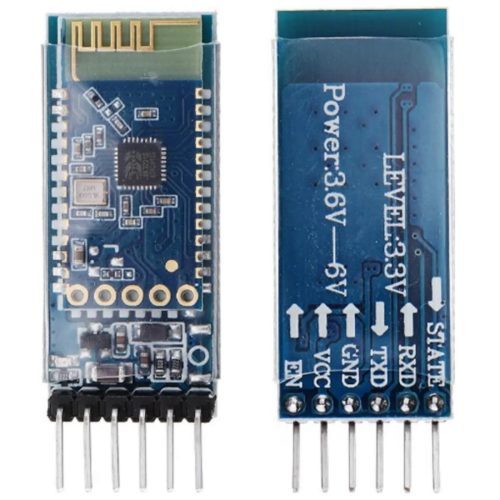 Индикация состояния подключения:
- Ожидание
- Светодиод мигает
- Пин STATE: LOW
- Подключено
- Светодиод горит постоянно
- Пин STATE: HIGH
Подключение
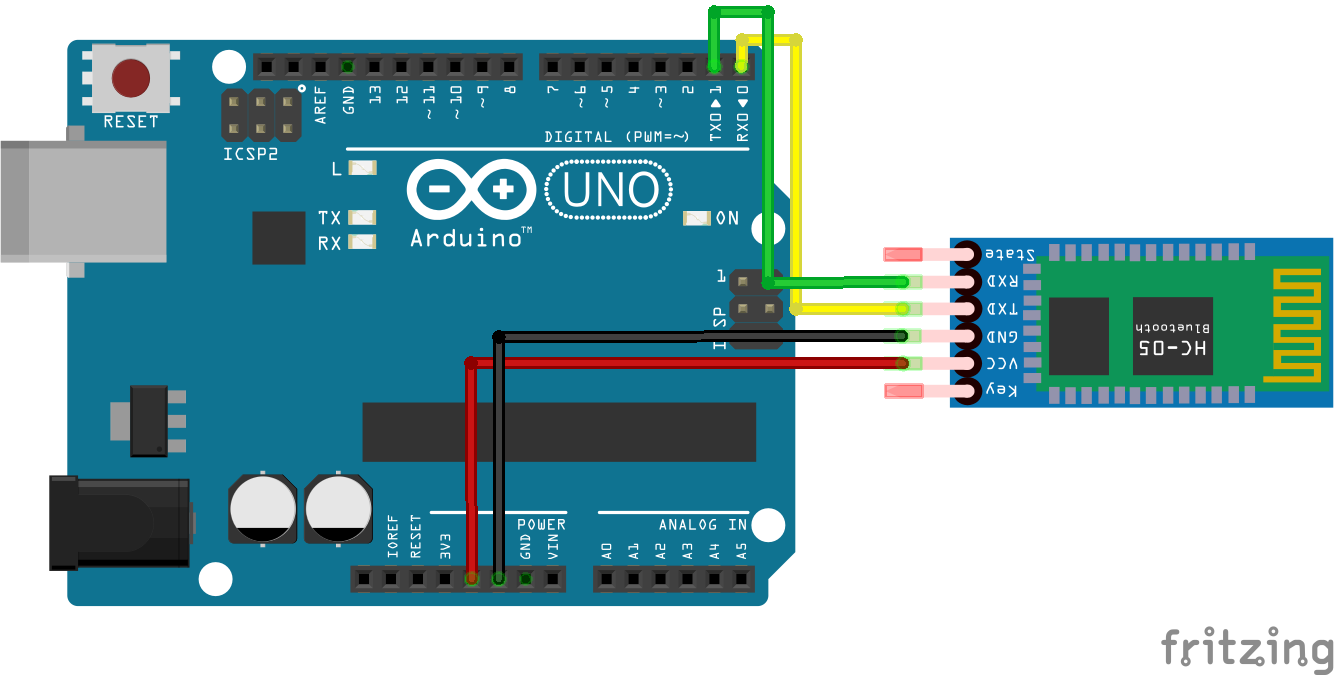
Модуль подключается к питанию и цифровым пинам МК:
- JDY-31 > Arduino
- GND > GND
- VCC > 5V
- RX > Serial TX
- TX > Serial RX
- Опционально можно подключить EN на любой цифровой пин для отслеживания состояния подключения.
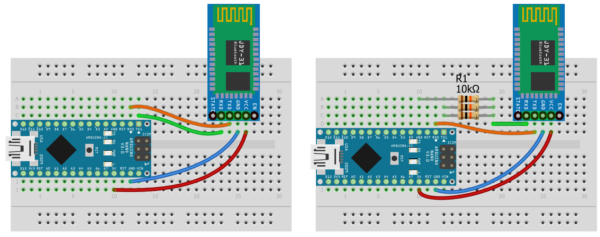
На левой схеме я подключил JDY-31 к аппаратным выводам UART напрямую, на правой – через делитель напряжения, образованный тремя резисторами по 10 кОм (есть в наборе GyverKIT). Такой делитель 2:1 обеспечит около 3.1V на вход RX модуля. Правая схема предпочтительнее, но от прямого подключения модуль ещё ни у кого не выходил из строя, насколько я знаю.
При таком подключении:
- Модуль будет мешать загрузке прошивки (она загружается по RX TX), на момент загрузки нужно отключить провода от пинов RX и TX Arduino
- С модулем можно общаться при помощи штатного Serial, фактически он будет дублировать монитор COM порта
 На следующих двух схемах я подключил модуль к любым двум цифровым пинам Arduino:
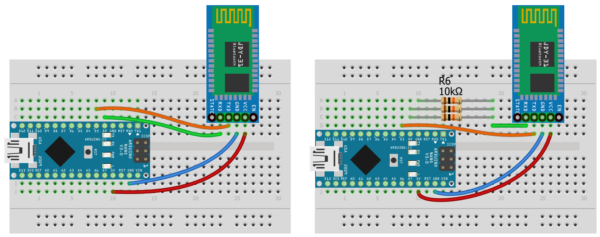 При таком подключении модуль ничему не мешает, но для работы с ним придётся использовать стандартную библиотеку программного Serial – SoftwareSerial.
Подключение к Bluetooth
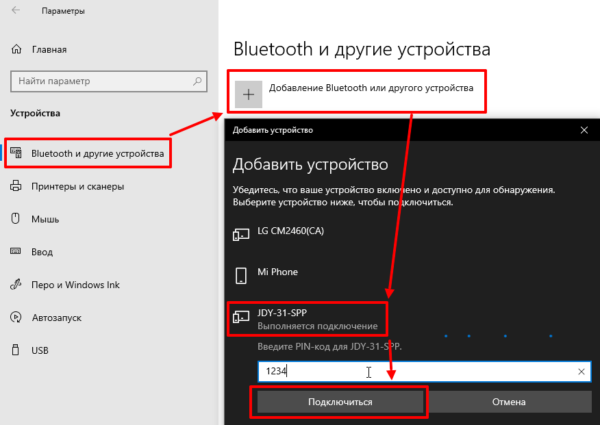
Windows
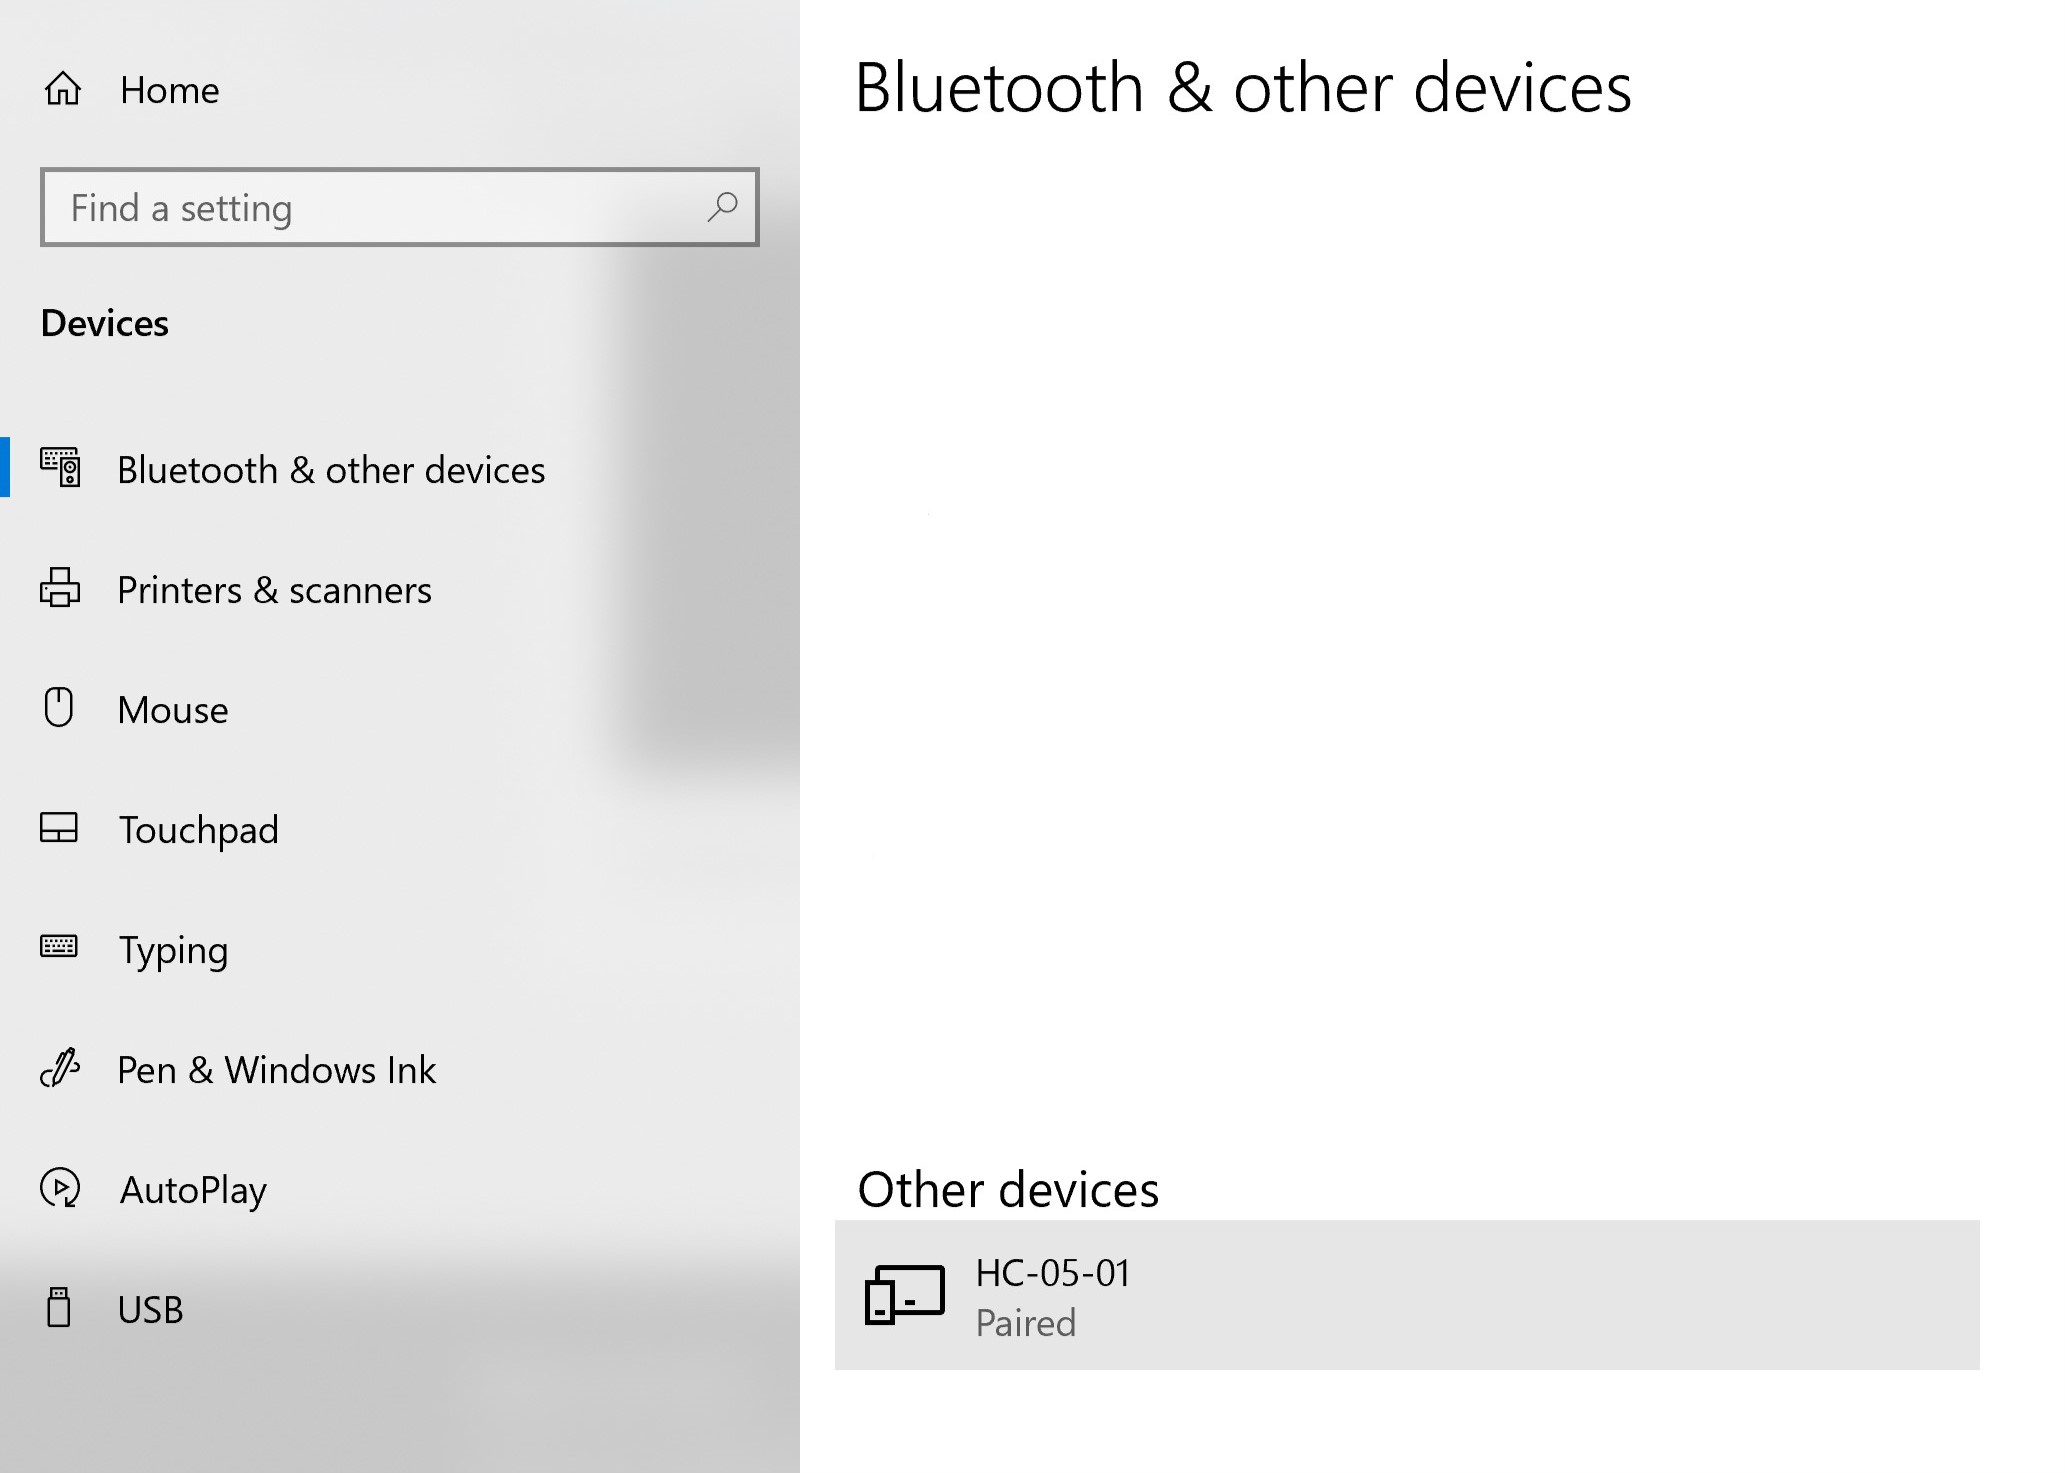
Для работы на компьютере у вас должен быть Bluetooth адаптер. Заходим в панель управления, добавляем Bluetooth устройство, вводим пин 1234 для сопряжения:
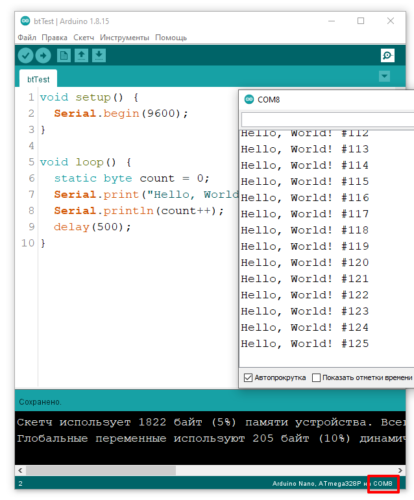
После этого в Arduino IDE появится ещё один COM порт. Загрузим следующий пример, который просто выводит в порт строчку со счётчиком. Модуль подключен к аппаратному UART.
Откроем Bluetooth порт и увидим вывод:
Точно таким же образом можно подключиться к Arduino из своей программы, написанной например на Processing или Python. У меня есть уроки по этой теме:
Android
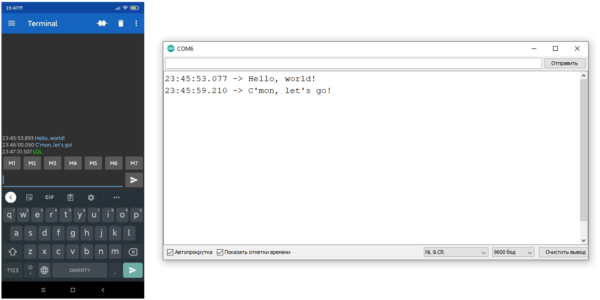
Для теста на Android я использую приложение Serial Bluetooth Terminal. Сопрягаемся с паролем 1234, заходим в программу, открываем настройки слева, Devices, выбираем JDY-31 и подключаемся (кнопка со штекером в левом правом углу экрана. Модуль подключен к аппаратному Serial, на Arduino прошит код, отправляющий принятые данные обратно в Serial (эхо):
Пишем в терминал – модуль нам отвечает. Своё приложение с Bluetooth можно сделать в MIT App Inventor, этим мы займёмся в будущих уроках.
SoftwareSerial
В качестве примера подключим модуль по второй схеме (на пины D2 и D3) и загрузим простую программу, которая будет пересылать данные с программного Serial (на пинах D2 и D3, Bluetooth) на аппаратный (который мы можем смотреть через монитор порта в Arduino IDE):
Откроем терминал и монитор порта и можем общаться с компьютером, Arduino выступает в роли посредника и перекидывает данные с Bluetooth на USB и наоборот:
 Точно так же можно использовать SoftwareSerial для программ и приложений, если аппаратный UART на Arduino нужен для других целей.
Настройка JDY-31, AT команды
Рассмотрим также настройку самого JDY-31, делается это при помощи AT-команд:
- Чтобы модуль отвечал на команды, он должен находиться в режиме ожидания подключения (светодиод мигает)
- Загружаем в Arduino пустую программу (Файл/Новый). Либо любую другую, в которой не задействован Serial. Либо подключаем пин RST к GND, чтобы микроконтроллер не запустился и нам не мешал
- Подключаем JDY-31 на RX TX Arduino (аппаратный Serial) наоборот: TX > TX, RX > RX
- Открываем монитор порта, ставим текущую скорость модуля (по умолчанию 9600 бод), конец строки NL & CR
Отправляем команду AT+VERSION . Если всё сделано правильно – модуль ответит +VERSION=JDY-31-V1.35,Bluetooth V3.0
Какие ещё есть команды? Полный список есть в документации, давайте разберём:
View Serial Monitor Over Bluetooth © CC BY-NC-SA
Use a Bluetooth module to replace a traditional wired connection for transmitting serial data.
This project uses an HC-05 Bluetooth module to replace a traditional wired connection used for viewing the serial monitor.
As an Amazon Associate I may earn from qualifying purchases.
This code is a simple serial communication example taken from the provided examples in the Arduino IDE. You can find it in: File > Examples > Communication > Ascii Table
- Make sure your baud rate is set to 9600
- Almost any code that uses a serial connection to the computer will work, but this is just a simple example.
After the code has been uploaded to the board, disconnect the power. Next, Attach the Bluetooth module to the circuit as seen above:
- GND to Ground
- VCC to 5v pin
- TXD to pin 0
- RXD to pin 1
Step 3: Bluetooth Connection
- Power on the Arduino
- Open your computer’s Bluetooth settings
- Pair with the HC-05 module:
- Find the module’s serial port name in «devices and printers»:
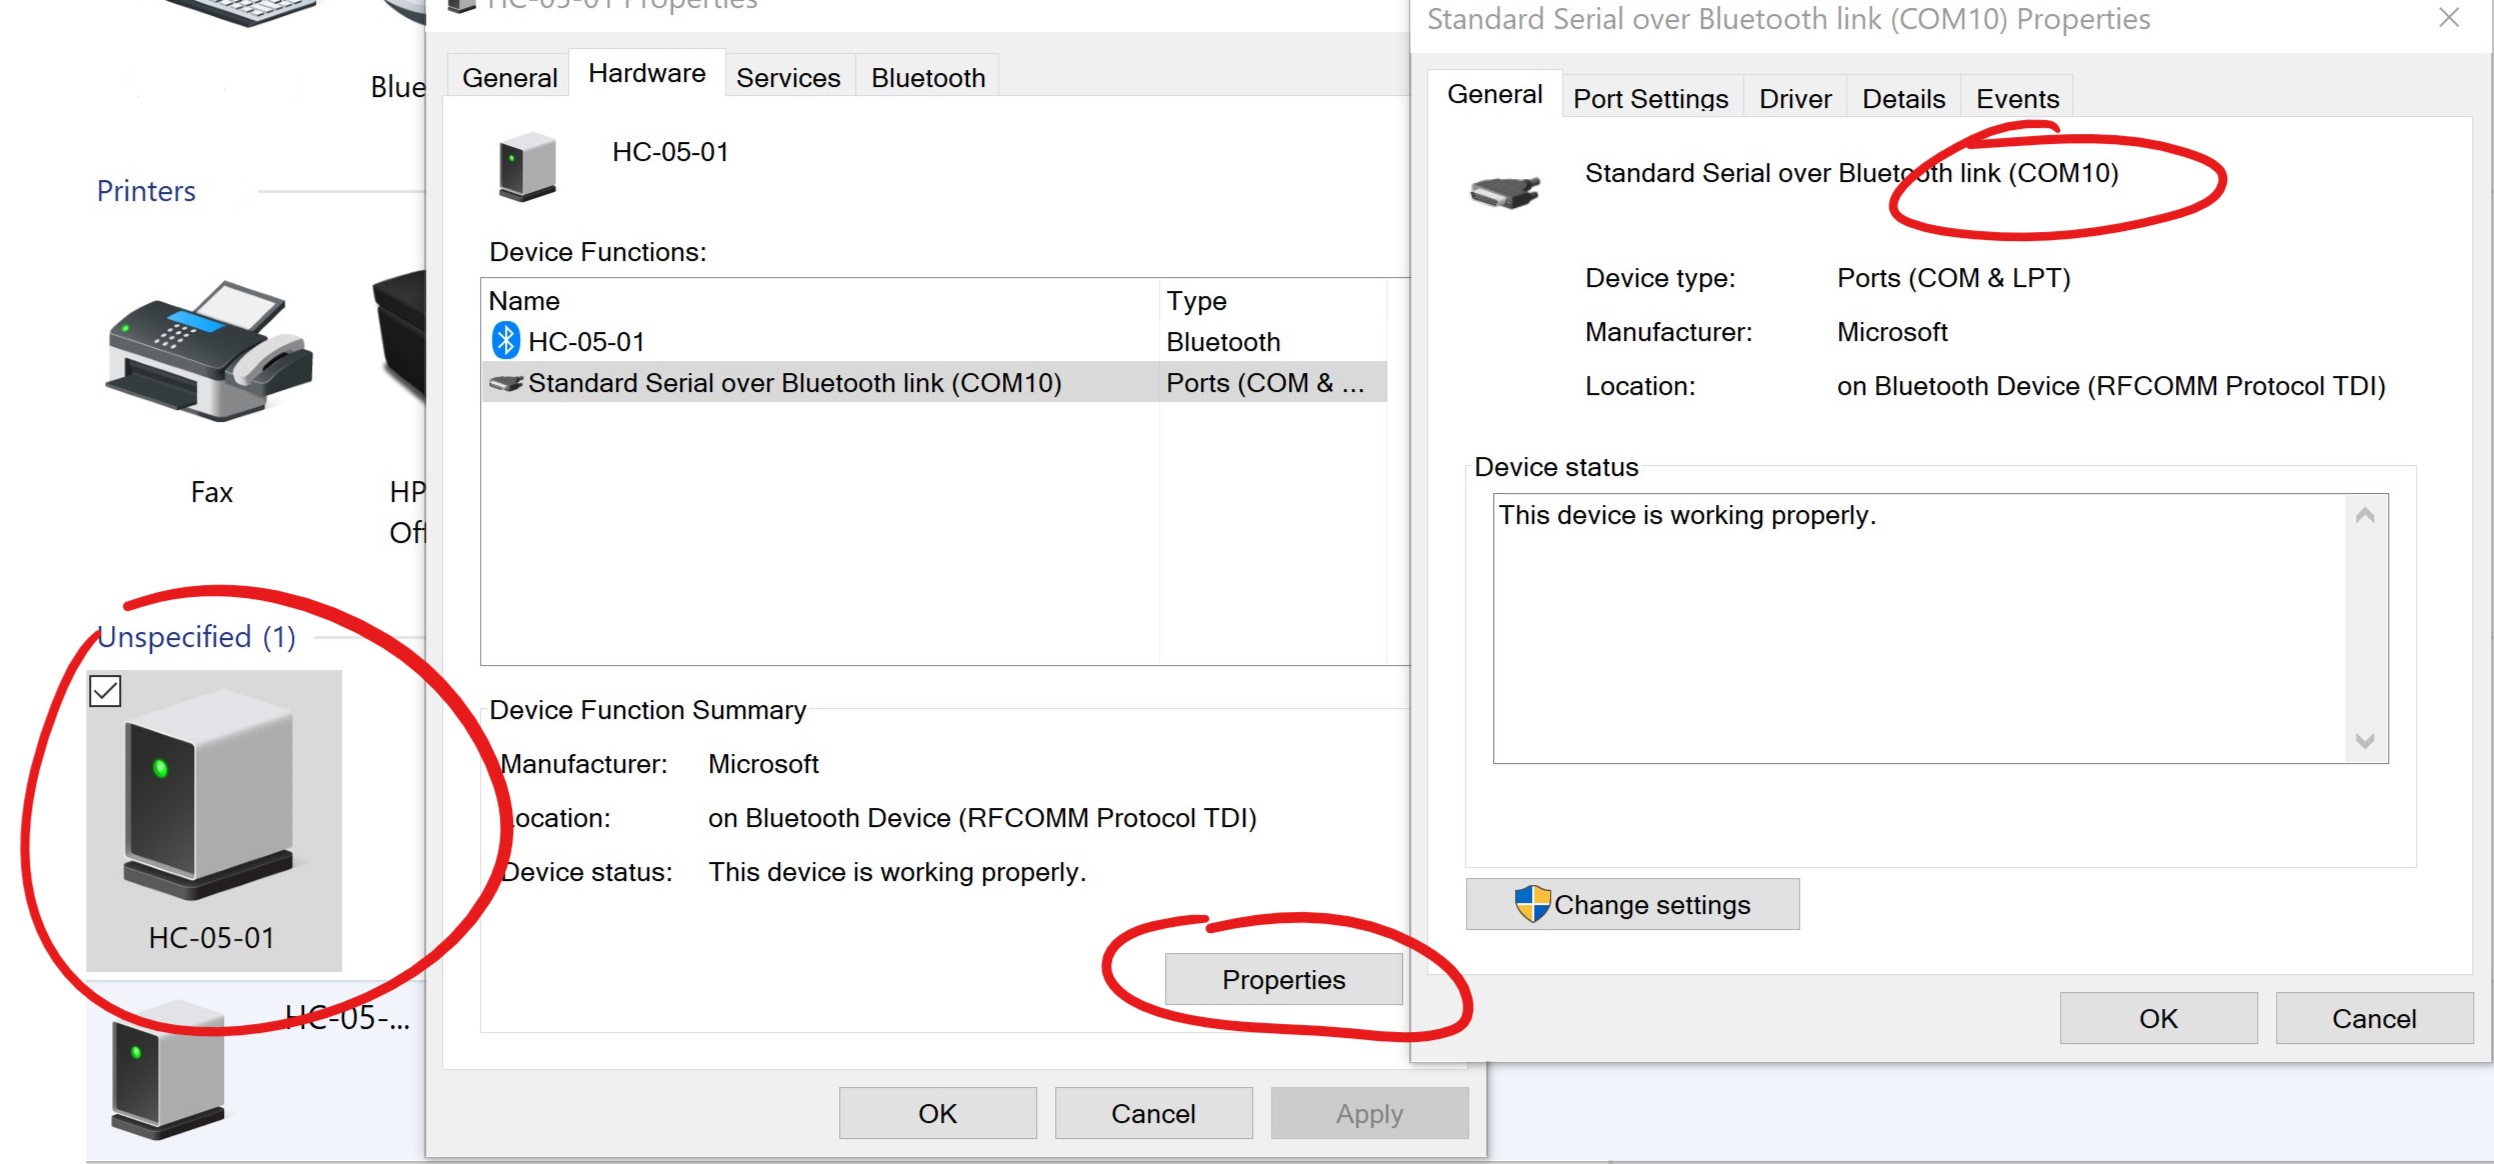
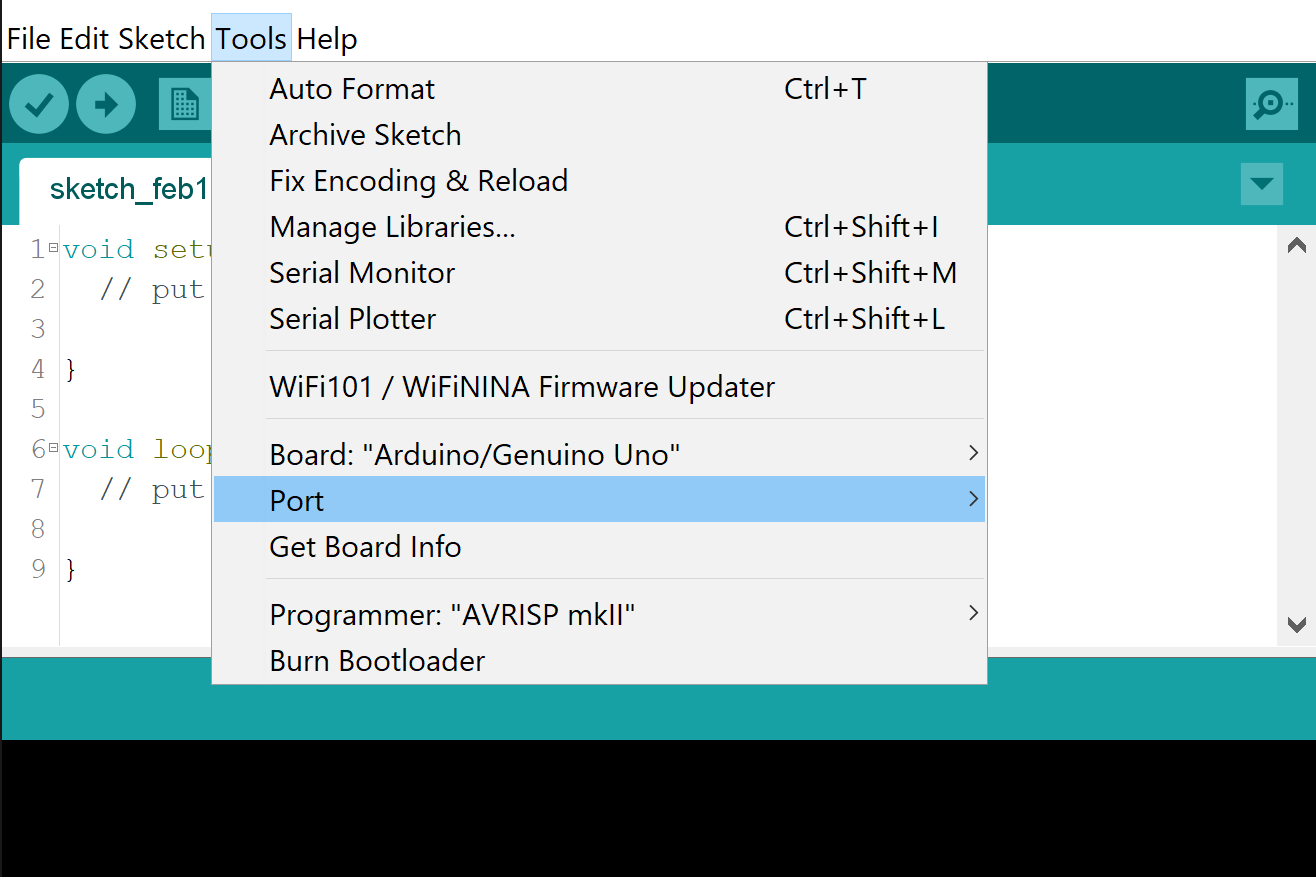
- In the Arduino IDE, choose serial port of Bluetooth module (mine is COM10)
- Open the serial monitor as normal to view incoming information
Here are some optional things you may want to try out:
- You can use virtual serial ports instead, but I found that using the real ones works a lot faster (and it’s generally easier).
- You can also use this process with the standard Firmata example to allow for wireless control with Processing (set the speed to 9600 first)
Bluetooth AT Commands Settings (HC05 HC06) © Apache-2.0
Do you want to set a customized name and password for your bluetooth devices and robots!? then read this tutorial to help through.
Hey guys! I Hope you already enjoyed my previous tutorial » High torque servo motor control «. This is another informative tutorial to teach you how to interface with your Bluetooth module and configure its settings through AT commands, so if you want to change your Arduino Bluetooth name or password or any other Bluetooth paramerters, this will be the best guide for you to achieve it.
During the making of this tutorial, we tried to make sure that this article will be the best guide for you in order to enjoy learning the basics of how the bluetooth modules operates under AT command mode and learn some useful information about how to use properly the AT command set.
Such details are so important especially for those who want to start electronics and robotics learning. so we hope that this tutorial contains the needed documents.
What you will learn from this tutorial:
- Learn the history of AT command appearance.
- Understand the differance between HC bluetooth modules.
- Learn the hardware of the HC Bluetooth module.
- Make the appropriate wiring diagram with an Arduino board.
- Set the Bluetooth to AT command mode.
- Start the Bluetooth new settings
Step 1: How to Interface With Bluetooth Modules
Starting with the project description, we will customize the Bluetooth module parameters, but how could we communicate with the Bluetooth modules!
Like many other devices Bluetooth modules accept the communication through AT commands to configure them settings like name, password, baud rate and other settings.
What are these AT commands!
Backing to the year 1981 Dennis Hayes invented a specific command language to interface the “Hayes smartmodem device” and this command language set consists of a series of short text strings which can be combined to produce commands for operations such as dialing, hanging up, and changing the parameters of the connection. From here it comes the idea to develop more and more the Hayes set or the AT commands set to interface more devices using some sort of prefix character.
Like the other devices, the Bluetooth modules has AT command mode where you can interface them using AT commands to set them parameters.
So in order to send AT commands to a Bluetooth module we need first to turn it to AT command mode.
The most popular Bluetooth modules are the HC-06 and the HC-05 module which will be used in our tutorial.
It is hard to distinguish between these two Bluetooth just by seeing, but using a breakout board the difference is on the pins.
Step 2: The Bluetooth Hardware
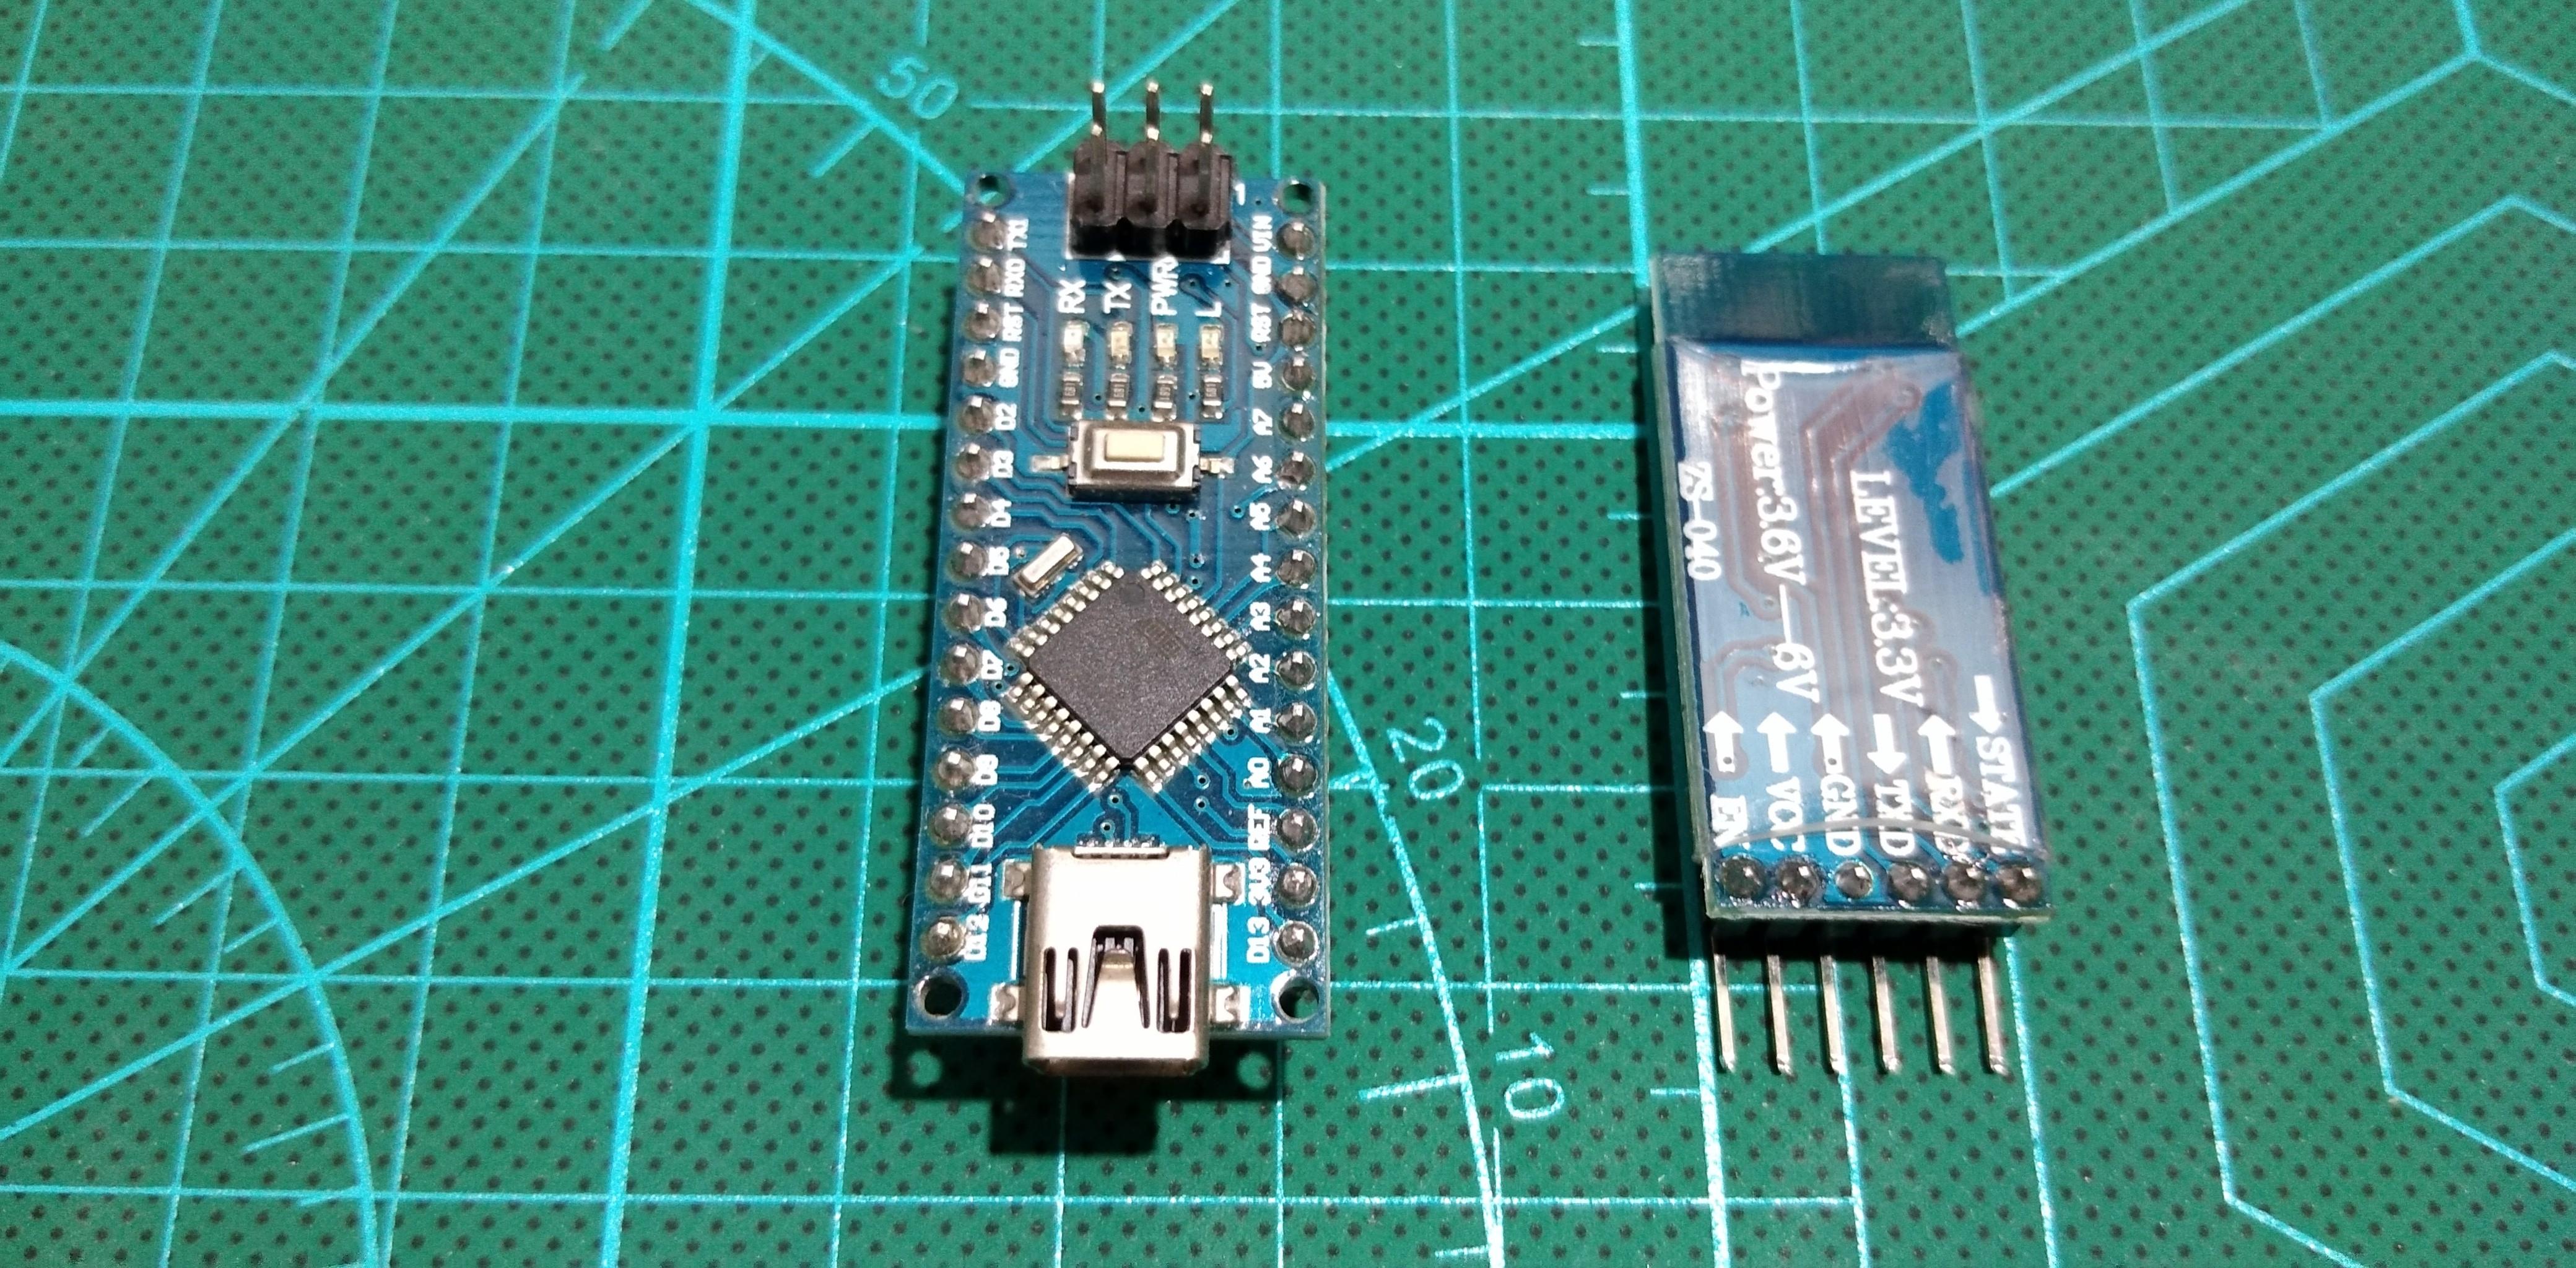
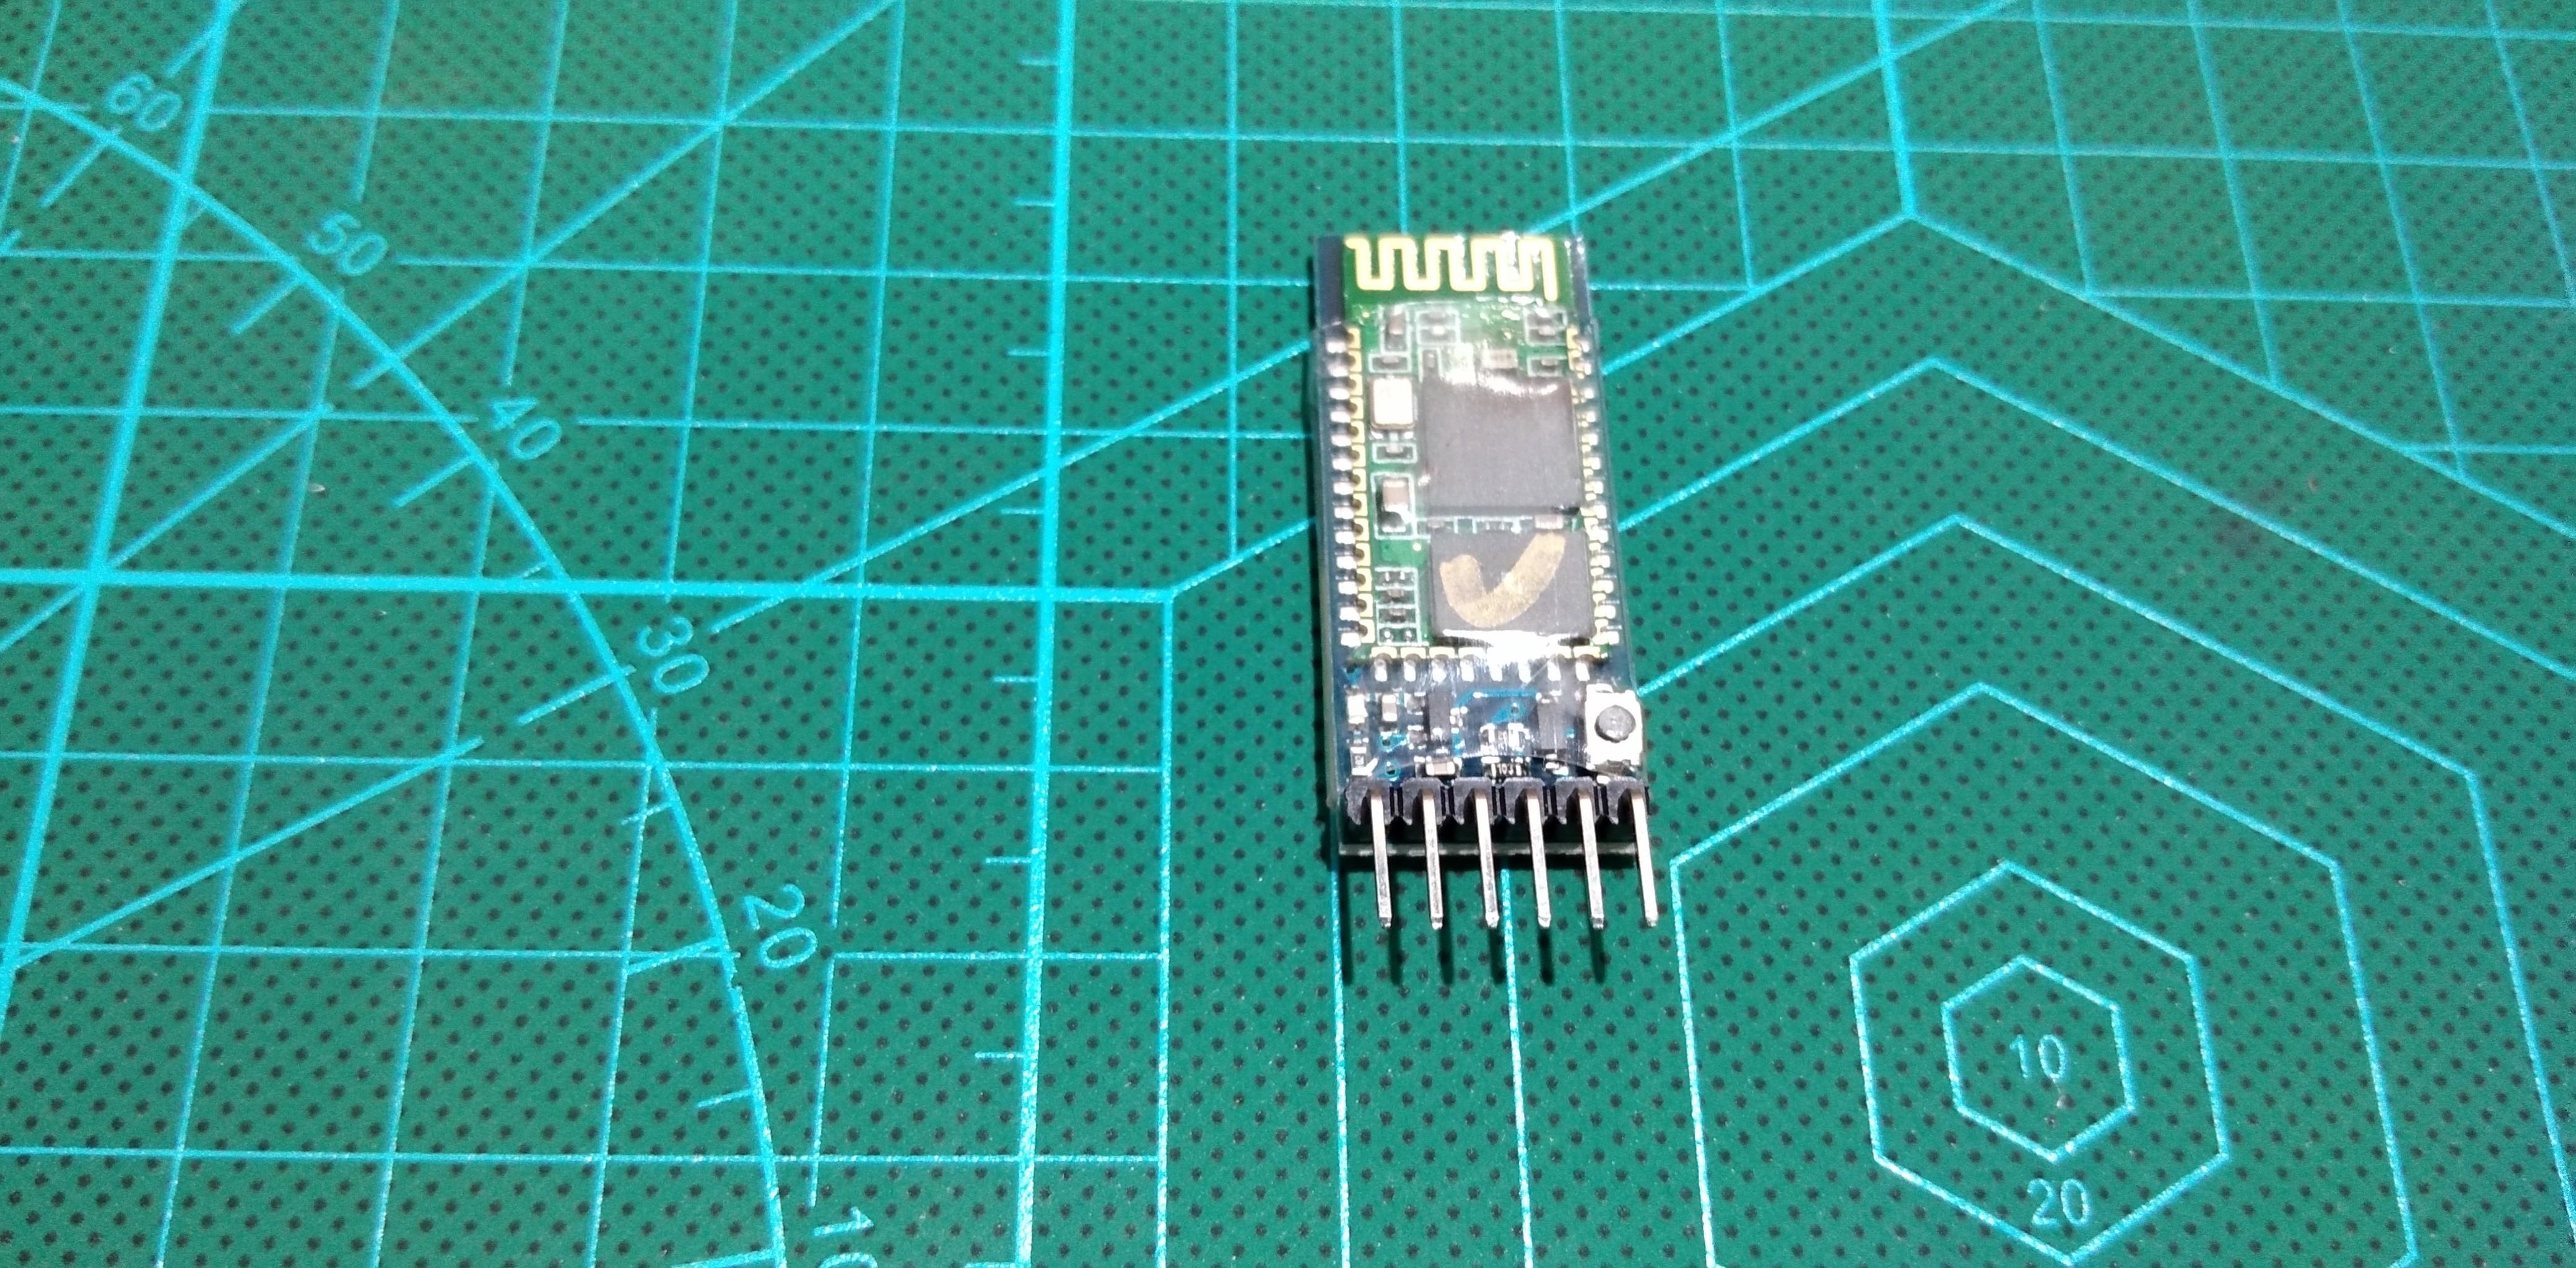
For our HC-05 module we have all these six pins :
- KEY or Enable: This pin has to be pulled high to enter AT mode. In our Bluetooth module we already have a push button so important to establish the pull high set of the KEY pin
- VCC and GND for power supply.
- RXD and TXD for serial input/output data
- STATE pin, just ignore it because probably it is not connected to none of the Bluetooth pins and we will not need it in this tutorial.
I will use the Arduino board to send the serial AT commands to my Bluetooth module.
Step 3: Circuit Diargram
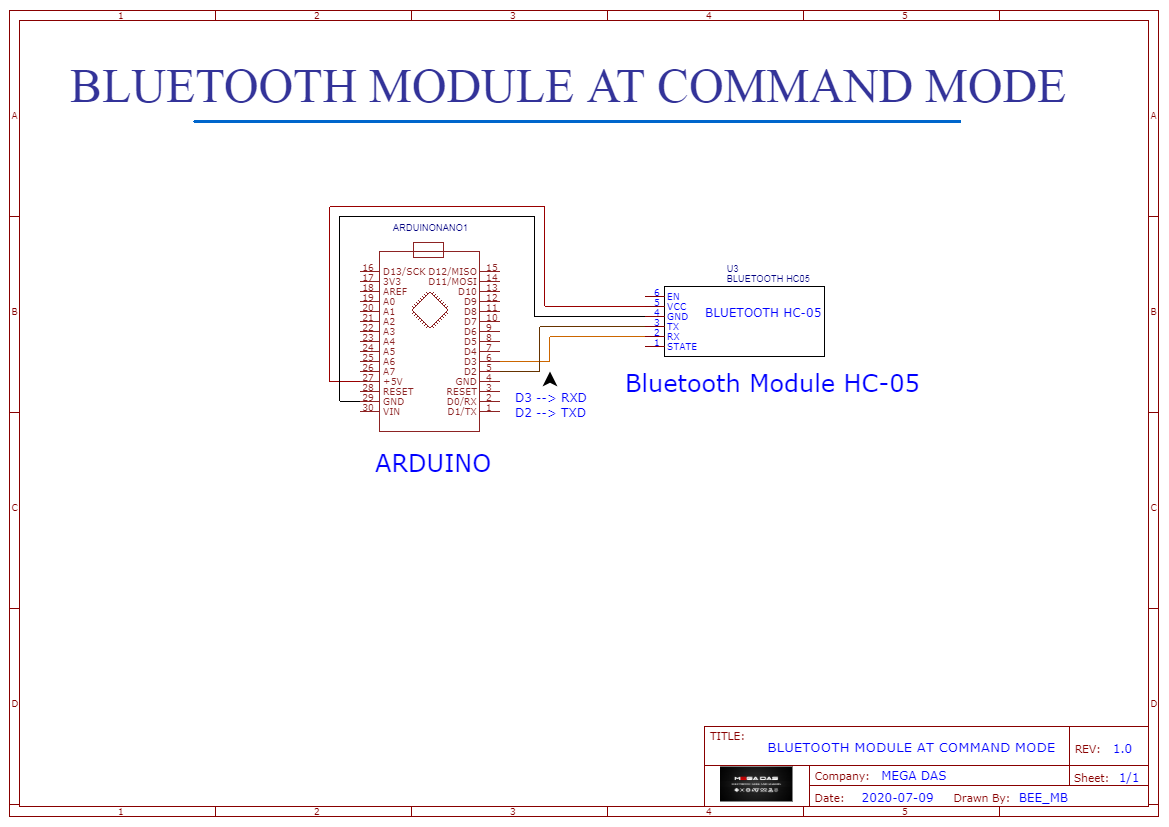
I moved to easyEDA to create my circuit diagram for this tutorial and here is how to wire the bluetooth module to the Arduino, all what it takes is the pin number 3 from Arduino to RXD of the Bluetooth and the pin number 2 of the Arduino to TXD of the Bluetooth, GND to GND and VCC to Arduino 5V.
Step 4: Codes and Tests
Moving to the software part, as I already mentioned we will be using Arduino board to communicate with the Bluetooth.
Once we power the Arduino we will have the Bluetooth LED blinking fast in an interval of half of a second that means the AT mode wasn’t entered so before powering the Arduino just hold the push button pressed and then power your Arduino, as a result you will have the LED blinking slower in an interval of 2 seconds which indicates the successful entering of the AT command mode . Now we run the Arduino serial monitor or any other serial monitor like teraterms to start sending the AT commands, you can get the AT commands document from the download link below, this document shows the available AT commands list for our Bluetooth module.
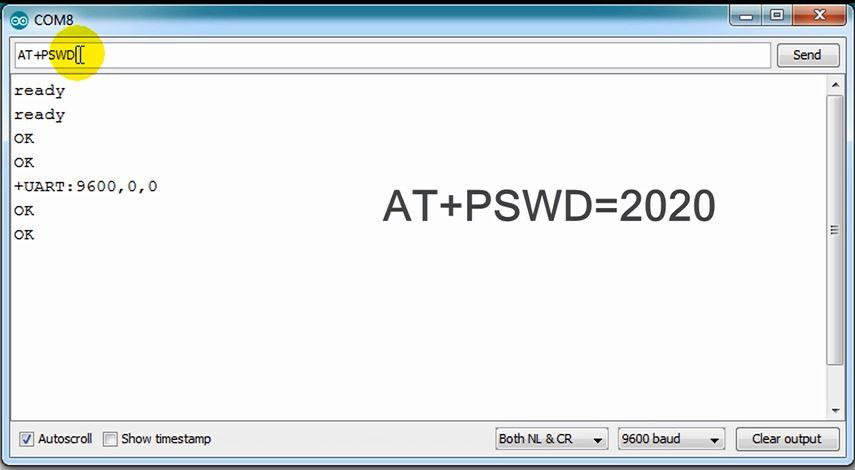
In order to start the settings we run the serial monitor and we set the baud rate to 9600 and both NL & carriage return, now if you send the characters AT through the serial monitor you should get a OK response from the Bluetooth module.
We will start by setting the Baud rate to 9600BPS and to do so we need to write AT+UART=9600, 0, 0 then hit enter, in every successful operation you need to get a OK response from the Bluetooth module
We will change also the Bluetooth name to Device1 so we write AT+NAME=Device1
And we will change the Bluetooth password as well to 2020 so we write AT+PSWD=2020
Many other AT instructions are available regarding the use of the Bluetooth module so all you need to do is downloading the document attached to the link below and read it to get the right AT command that you need.
Following this tutorial you will be able now to customize the Bluetooth of your robots and devices and you can run them like professional.
About my coming tutorials you can suggest some themes in the comment section below,
One last thing, make sure that you are doing electronics every day. See you next time