GPIO: all about the Raspberry Pi 4 and 3 connections
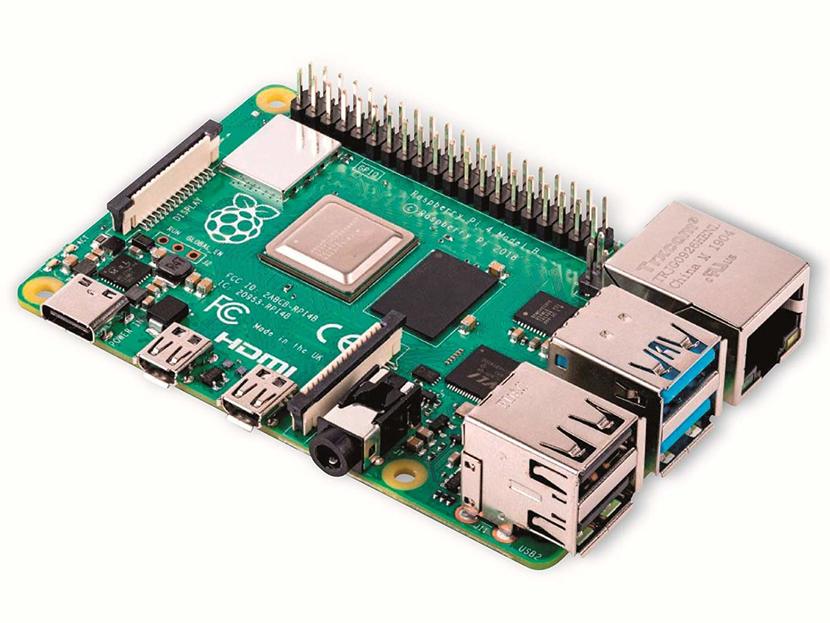
The GPIO pins of the Raspberry Pi 4 board, the 3, and also its predecessors, provide the SBC board with capabilities similar to those that Arduino can have, since with them you can create very interesting electronic projects controlled from the operating system by means of code in different languages, such as Python.
That makes the board more than just a cheap computer. It will allow you to connect a multitude of electronic elements that you can use with Arduino, but that can also be controlled from the Pi. In this guide I will try to give you as much information as possible about these GPIO pins so that you can start taking advantage of them .
Table of Contents
What is GPIO?
GPIO is the acronym for General Purpose Input / Output, that is, General Purpose Input / Output. Different electronic products can have it, such as the chips themselves or certain PCB boards such as this Raspberry Pi. As their name suggests, they are pins that can be configured to perform different functions, hence they are general purpose and not for a specific use.
It will be the user at runtime who can configure these GPIO pins so that they do what he wants. It can be done in different ways, such as with certain codes or scripts from the console or with the Python program, which is one of the simplest and most preferred ways due to the amount of options you have at your disposal.
In this way, the Raspberry Pi not only has a series of ports and interfaces to connect multiple standard devices, but add these GPIO pins so you can add other electronic devices or maker projects that you have created yourself. In the same way that you would with Arduino and its I / O pins for control.
Y not exclusive to Arduino or Raspberry Pi, so do other similar SBC boards and embedded products.
GPIO Features
And between her CARACTERISTICS most outstanding:
- May be configured so much as input as output. They have that duality as it happens to those of Arduino.
- GPIO pins too can be activated and deactivated by code. That is, they can be set to 1 (high voltage level) or 0 (low voltage level).
- Of course they can read binary data, as the ones and zeros, that is, voltage signal or absence of it.
- Output values of Reading and writing.
- The input values can be configured in some cases as events so that they generate some type of action on the board or system. Some embedded systems use them as IRQs. Another case is to configure that when one or more pins are active by certain sensors, perform some action .
- Regarding the voltage and intensity, you must know well the maximum capacities acceptable for the board, in this case the Raspberry Pi 4 or 3. You should not pass them to avoid damaging it.
By the way, when a group of GPIO pins is grouped, as is the case with the Raspberry Pi, the group is known as GPIO port.
The GPIO pins of the Raspberry Pi
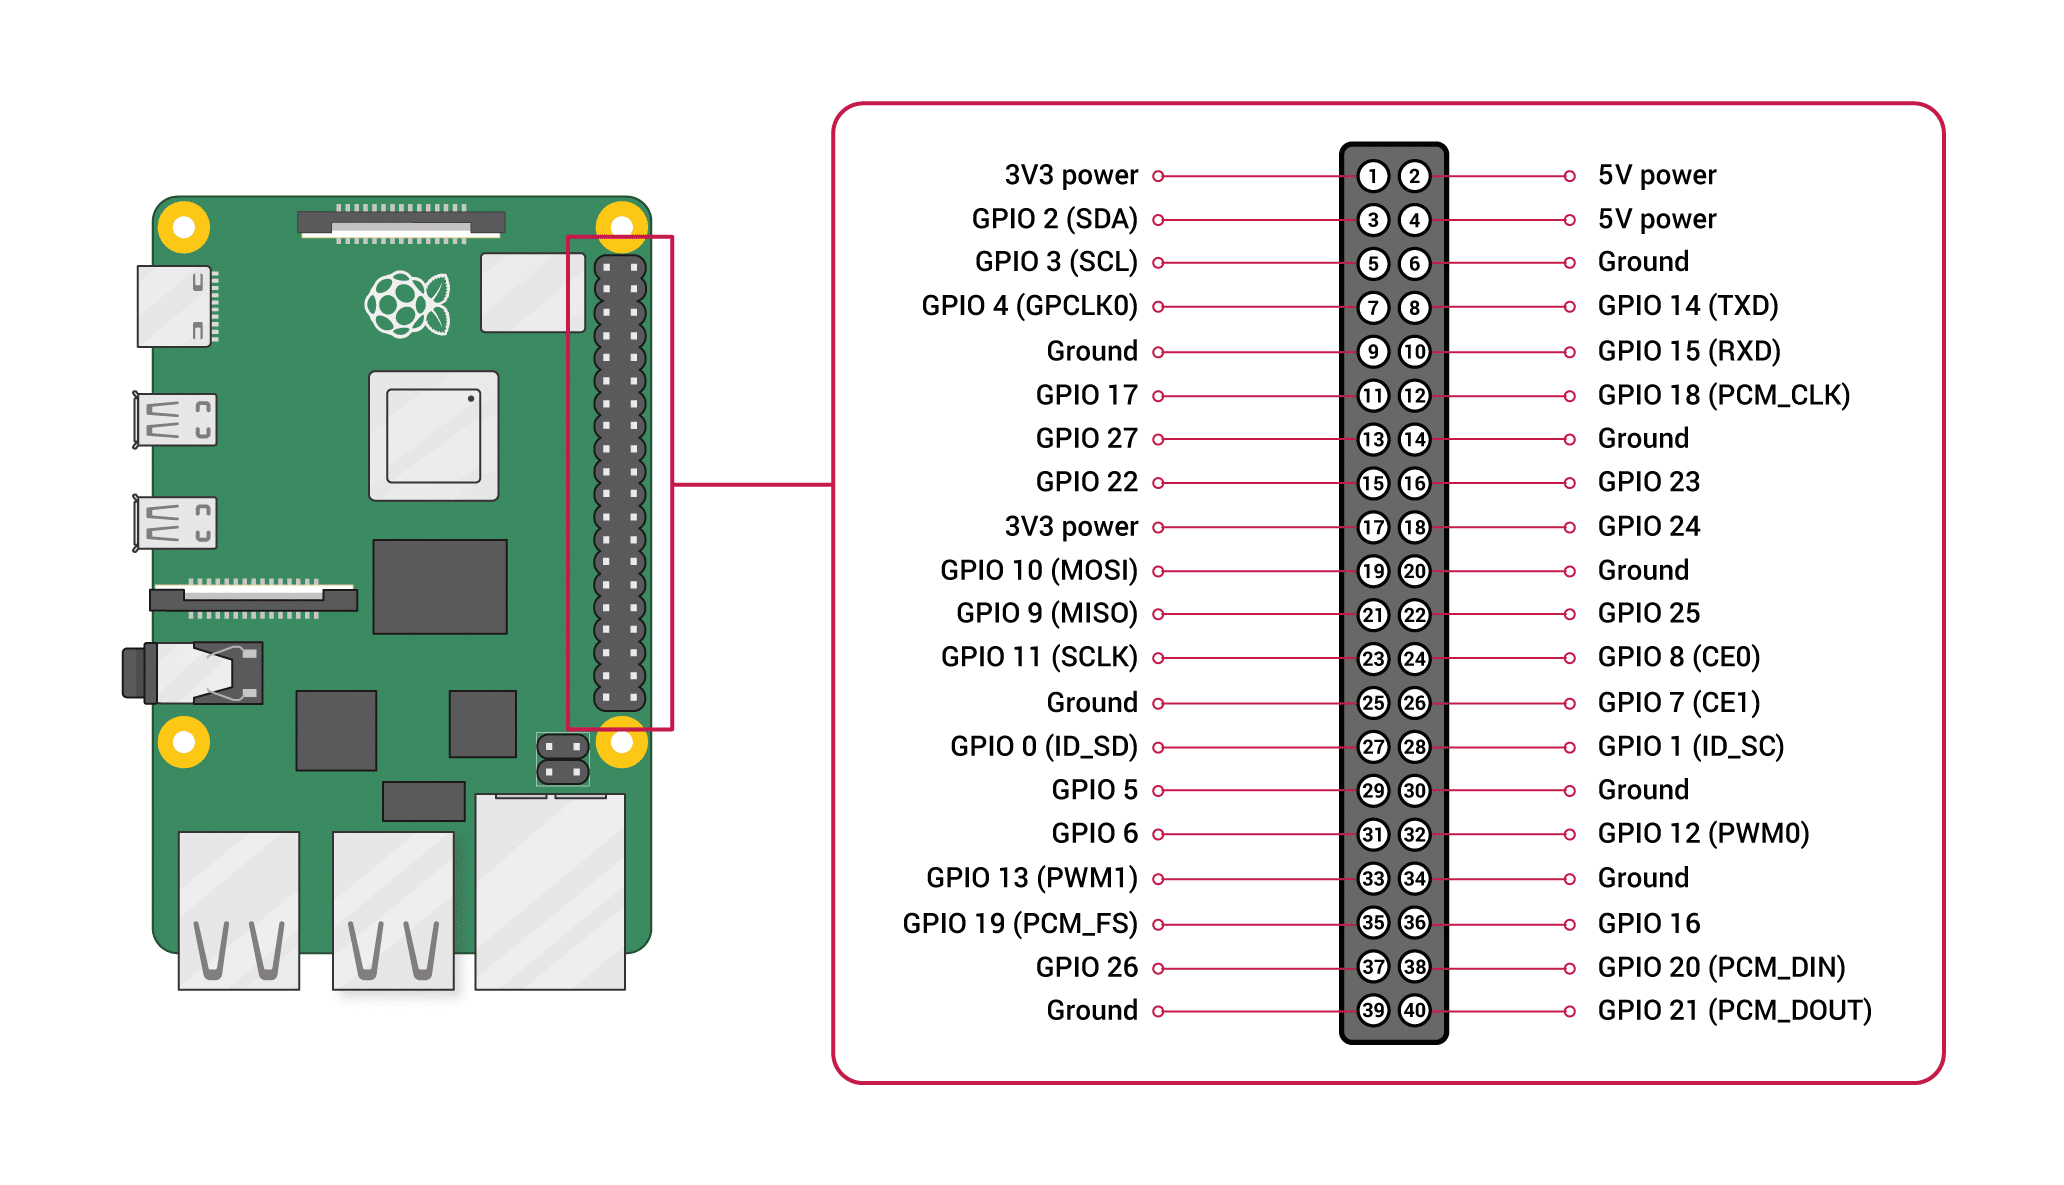
Scheme valid for version 4, 3, Zero
New Raspberry Pi 4 boards and version 3 They are equipped with a large number of GPIO pins. Not all versions offer the same amount, nor are they numbered in the same way, so you have to be careful with this to know well how you should make the connection according to the model and revision you have.
But what is more generic is the types of GPIO that you can find in the port of Raspberry Pi boards. And that will be the first thing I would like to make clear, since that is how you will know the types of pins you can count on for your projects:
- FoodThese pins are used to connect the power lines or wiring for your electronic projects. They correspond to pins similar to those on the Arduino board, and that provide voltages of 5v and 3v3 (3.3v limited to 50mA load). In addition, you will also find the ground ones (GND or Ground). If you do not use external power sources such as batteries, or adapters, these pins can be of great help to power your circuit.
- DNC (Do Not Connect): they are pins that are in some versions and that have no function, but that in the new boards they have been given another purpose. You will only find these in more primitive models of the Pi. In the new 3 and 4 they will be marked as GND in general, being able to integrate in the previous group.
- Configurable pins: They are the normal GPIOs, and they can be programmed by codes as I will explain later to do what you need.
- Special pins: these are some connections that are intended for special connections or interfaces like UART, TXD and RXD serial connections, etc., as it happens with Arduino. You will even find some like SDA, SCL, MOSI, MISO, SCLK, CE0, CE1, etc. They stand out among them:
- PWM, which can regulate the pulse width as we saw in a previous article. On the Raspberry Pi 3 and 4 they are the GPIO12, GPIO13, GPIO18 and GPIO19.
- SPI is another communication interface that I also discussed in another article. In the case of the new 40-pin boards, they are the pins (with different communication channels as you can see):
- SPI0: MOSI (GPIO10), MISO (GPIO9), SCLK (GPIO11), CE0 (GPIO8), CE1 (GPIO7)
- SPI1: MOSI (GPIO20); MISO (GPIO19); SCLK(GPIO21); CE0 (GPIO18); CE1 (GPIO17); CE2 (GPIO16)
- I2C is another connection that I have also explained in this blog. This bus is made up of the data signal (GPIO2) and the clock (GPIO3). In addition to EEPROM Data (GPIO0) and EEPROM Clock (GPIO1).
- Serial, another very practical communication with TX (GPIO14) and RX (GPIO15) pins like the ones you can find on the board Arduino UNO.
Remember that GPIOs are the interface between the Raspberry Pi and the outside world, but they have its limitations, especially electrical. Something that you must take into account so as not to spoil the board is to remember that these GPIO pins are usually unbuffered, that is, without buffer. This means that they do not have protection, so you must monitor the magnitudes of voltage and intensity applied so as not to end up with a useless plate .
GPIO differences between versions
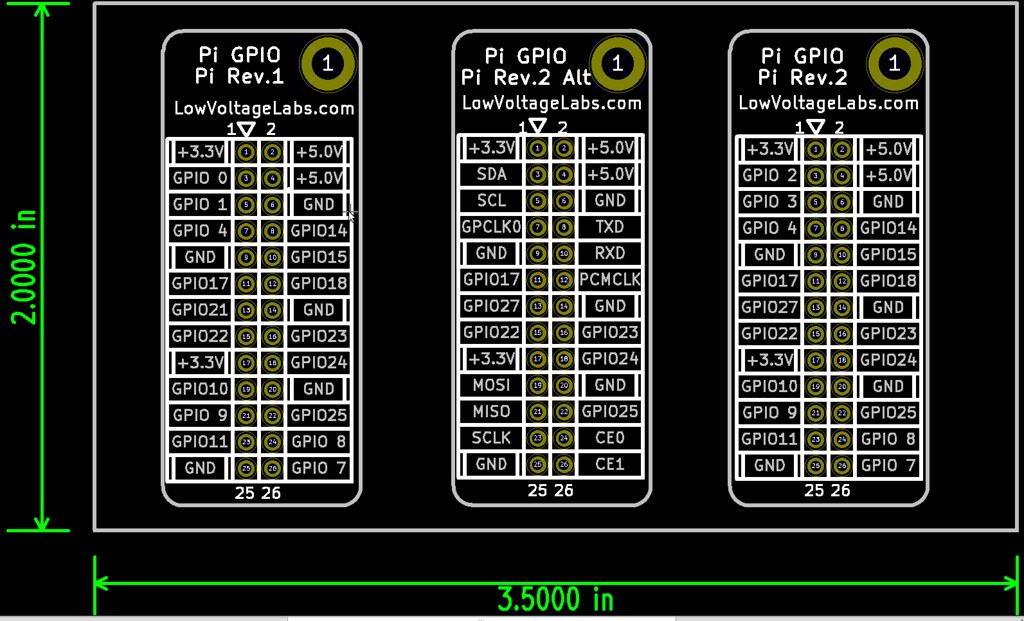
As I said, not all models are the same pinsHere are some diagrams so you can see the differences between models and thus be able to focus on the Raspberry Pi 4 and 3, which are the newest and the one you probably have in your possession. It differs between (all of each group share the same pins):
- Raspberry Pi 1 Model B Rev 1.0, with 26-pin slightly different from Rev2.
- Raspberry Pi 1 Model A and B Rev 2.0, both models with 26-pin.
- Rapsberry Pi Model A +, B +, 2B, 3B, 3B +, Zero and Zero W, and also 4 models. All of them with a 40-pin GPIO header.
What can I plug into the GPIOs?
You can not only connect electronic devices and transistors, humidity / temperature sensors, thermistors, stepper motors, LEDs, etc. You can also connect components or modules created specifically for the Raspberry Pi and that extend the capabilities of the board beyond what is included in the base.
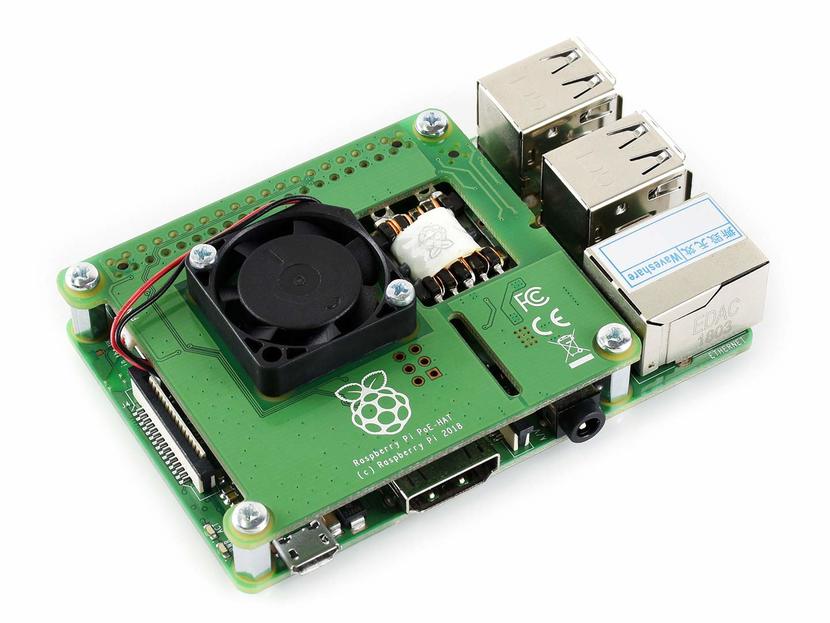
I am referring to the famous hats or hats and plates that you can find in the market. There are many types, from those used to control motors with drivers, to others to create a computing cluster, with LED panel controllable, to add DVB TV capability, LCD screen, etc.
These hats or hats They are mounted on the Raspberry Pi board, matching the GPIOs needed for it to work. Therefore, its assembly is quite simple and fast. Of course, make sure of the plate version compatible with each hat, since the GPIO port is different as you have seen .
I say this in case you have an older plate, since hats are compatible only with the newest. As are the Raspberry Pi Model A +, B +, 2, 3, and 4 models.
Introduction to using GPIO on the Raspberry Pi

Source: Raspberry Pi
To get started, on Raspbian, you can open the console and type the command PinoutWhat it will return to you is an image in the terminal with the GPIO pins available on your board and what each one is for. Something very practical to always have it present at the moment of work so that you do not get confused.
First project: flashing an LED with the GPIOs
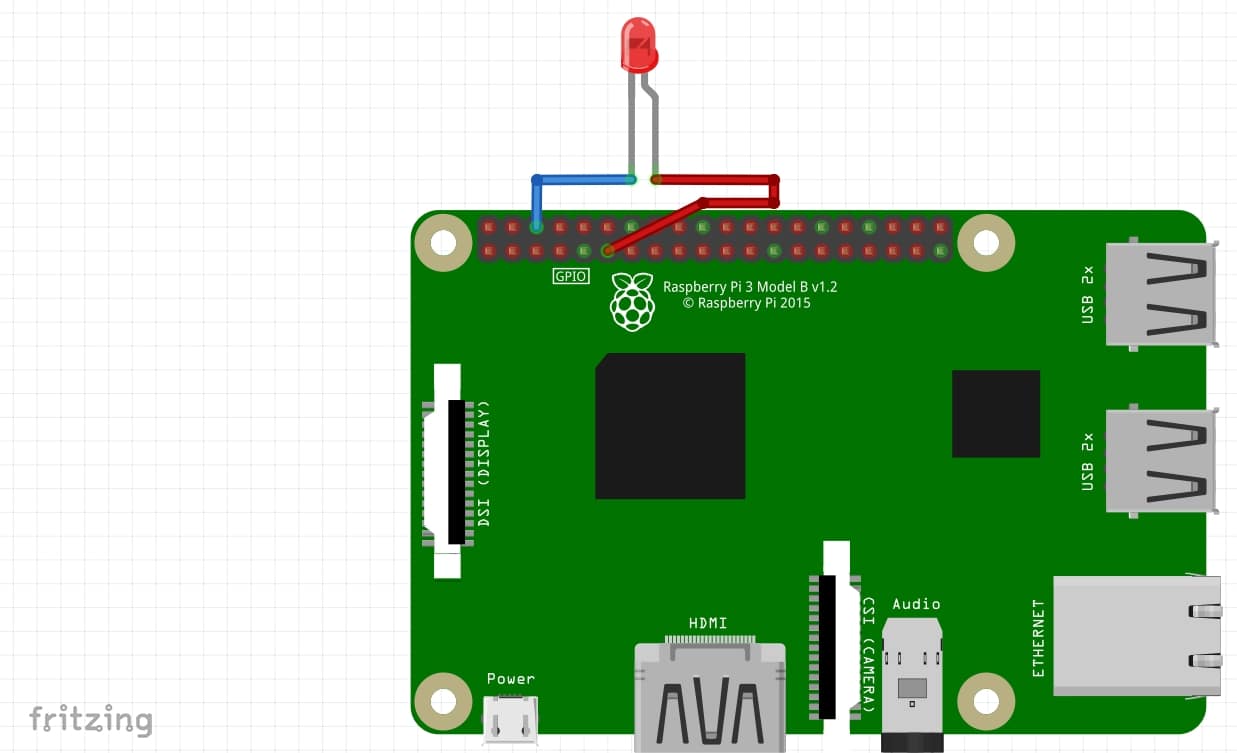
The most basic way to make a kind of «Hello world» with GPIOs is to use a simple LED connected to the pins of the Raspberry Pi so you can see how they work. In this case, I have connected it to GND and the other to pin 17, although you can choose another of the normal pins .
Once connected, you can control them from Raspbian making use of the terminal. In Linux, specific files are used like the ones in the / sys / class / gpio / directory. For example, to create a file with the necessary structure to start working:
Then you can configure as an input (in) or as an output (out) that pin 17 chosen for our example. You can do it very easily with:
In this case as an output, since we want to send an electrical pulse to the LED to turn it on, but if it was a sensor, etc., you could use in. Now for turn on (1) or turn off (0) the LED you can use:
If you want to move on to another project and delete entry created, you can do it this way:
By the way, you can also gather all the necessary commands for your project, like all the previous ones, save them in a file type bash script and then run them in bundles all at once, instead of typing them one by one. This is handy when you repeat the same exercise many times, so you don’t have to rewrite. Just run and go. For example:
Once you finish, you save and then you can give it the appropriate execute and execute permissions the script for the LED to turn on, wait 1.3 seconds and turn off like this in a loop .
Programation advance

Obviously the above works for small electronic projects with few components, but if you want to create something more advanced, instead of the commands, what you can use are programming languages to make different scripts or source codes that automate the operation.
They can be used Different tools to program, with very different languages. The libraries that the community has developed make things much easier for you, such as WiringPi, sysfs, pigpio, etc. The programs can be very varied, from Python, which is the preferred option of many, through Ruby, Java, Perl, BASIC, and even C #.
Officially, the Raspberry Pi offers you many facilities to program your GPIOs, such as:
- Scratch, for those who do not know how to program and want to use the puzzle blocks of this project with which Arduino can also be programmed, etc. Programming with graphic blocks is quite intuitive and very practical for the field of education.
- Python: This simple interpreted programming language allows you to create simple and powerful codes, with a multitude of libraries at your disposal to do almost everything you imagine.
- C / C ++ / C #: are more powerful programming languages to create binaries with which to interact with the GPIOs. You can do it in several ways, using the standard form or kernel interface via the librarylibgpiod, but also through a third-party library such as pygium.
- Processing3, similar to the Arduino.
Choose flexibly the one you like the most or you think is simple.
The content of the article adheres to our principles of editorial ethics. To report an error click here!.
Full path to article: Free hardware » Raspberry Pi » GPIO: all about the Raspberry Pi 4 and 3 connections
GPIO: все о подключениях Raspberry Pi 4 и 3
Контакты GPIO платы Raspberry Pi 4, 3, а также его предшественники, предоставляют SBC возможности, аналогичные тем, которые может иметь Arduino, поскольку с ними вы можете создавать очень интересные электронные проекты, управляемые из операционной системы с помощью кода на разных языках, например Python.
Это делает плату больше, чем просто дешевый компьютер. Это позволит вам подключить множество электронные элементы который вы можете использовать с Arduino, но им также можно управлять с Pi. В этом руководстве я постараюсь дать вам как можно больше информации об этих контактах GPIO, чтобы вы могли начать ими пользоваться .
Что такое GPIO?
GPIO является аббревиатурой от General Purpose Input / Output, то есть General Purpose Input / Output. Он может быть в различных электронных продуктах, таких как сами микросхемы или некоторые печатные платы, такие как Raspberry Pi. Как следует из названия, это контакты, которые можно настроить для выполнения различных функций, поэтому они предназначены для общего назначения, а не для конкретного использования.
Это будет пользователь во время выполнения, который сможет настроить эти контакты GPIO чтобы они делали то, что он хочет. Это можно сделать разными способами, например, с помощью определенных кодов или сценариев из консоли или с помощью программы Python, что является одним из самых простых и наиболее предпочтительных способов из-за количества имеющихся в вашем распоряжении опций.
Таким образом, Raspberry Pi не только имеет серию портов и интерфейсы для подключения нескольких стандартных устройств, но добавьте эти контакты GPIO, чтобы вы могли добавлять другие электронные устройства или создавать проекты, которые вы создали сами. Так же, как и с Arduino и его выводами ввода / вывода для управления.
Y не только для Arduino или Raspberry Pi, как и другие подобные платы SBC и встраиваемые продукты.
Особенности GPIO
И между ЕЕ ХАРАКТЕРИСТИКИ самые выдающиеся:
- Они могут быть настроенным так как вход как выход. У них есть такая двойственность, как у людей Arduino.
- Контакты GPIO тоже можно активировать и деактивировать по коду. То есть они могут быть установлены на 1 (высокий уровень напряжения) или 0 (низкий уровень напряжения).
- Конечно могут читать двоичные данные, как единицы и нули, то есть сигнал напряжения или его отсутствие.
- Выходные значения Чтение и письмо.
- Входные значения могут быть настроены в некоторых случаях как события чтобы они генерировали какое-то действие на доске или в системе. Некоторые встроенные системы используют их как IRQ. Другой случай — настроить, чтобы, когда один или несколько контактов активны определенными датчиками, выполняли какое-то действие .
- Что касается напряжения и интенсивности, вы должны хорошо знать максимальную емкость, приемлемую для платы, в данном случае Raspberry Pi 4 или 3. Вы не должны проходить мимо них, чтобы не повредить ее.
Кстати, когда группа контактов GPIO сгруппирована, как в случае с Raspberry Pi, группа называется Порт GPIO.
Контакты GPIO Raspberry Pi
Схема действительна для версий 4, 3, Zero
Новые Платы Raspberry Pi 4 и версия 3 Они оснащены большим количеством выводов GPIO. Не все версии предлагают одинаковую сумму и не имеют одинаковой нумерации, поэтому вы должны быть осторожны с этим, чтобы хорошо знать, как вы должны выполнять соединение в соответствии с вашей моделью и версией.
Но что более универсально, так это типы GPIO, которые вы можете найти в порте плат Raspberry Pi. И это будет первое, что я хотел бы прояснить, так как именно так вы узнаете типы булавок Вы можете рассчитывать на свои проекты:
- продуктыЭти контакты используются для подключения линий электропередач или проводки для ваших электронных проектов. Они соответствуют контактам, аналогичным выводам на плате Arduino, которые обеспечивают напряжение 5 В и 3 В 3 (3.3 В ограничено нагрузкой 50 мА). Кроме того, вы также найдете заземляющие (GND или Ground). Если вы не используете внешние источники питания, такие как батареи или адаптеры, эти контакты могут оказаться большим подспорьем для питания вашей схемы.
- DNC (не подключаться): это контакты, которые есть в некоторых версиях и не имеют функции, но в новых платах они получили другое назначение. Вы найдете их только в более примитивных моделях Pi. В новых 3 и 4 они будут обычно помечены как GND, чтобы иметь возможность интегрироваться в предыдущую группу.
- Настраиваемые контакты: Это обычные GPIO, и они могут быть запрограммированы кодами, как я объясню позже, чтобы делать то, что вам нужно.
- Специальные штифты: это некоторые соединения, которые предназначены для специальных соединений или интерфейсов, таких как последовательные соединения UART, TXD и RXD и т. д., как это происходит с Arduino. Вы даже найдете такие, как SDA, SCL, MOSI, MISO, SCLK, CE0, CE1 и т. Д. Среди них выделяются:
- ШИМ, который может регулировать ширину импульса, как мы видели в предыдущей статье. На Raspberry Pi 3 и 4 это GPIO12, GPIO13, GPIO18 и GPIO19.
- SPI — это еще один интерфейс связи, который я также обсуждал в другой статье. В случае новых 40-контактных плат это контакты (как видите, с разными каналами связи):
- SPI0: MOSI (GPIO10), MISO (GPIO9), SCLK (GPIO11), CE0 (GPIO8), CE1 (GPIO7)
- SPI1: MOSI (GPIO20); МИСО (GPIO19); СКЛК (GPIO21); CE0 (GPIO18); CE1 (GPIO17); CE2 (GPIO16)
- I2C это еще одна связь, которую я также объяснил в этом блоге. Эта шина состоит из сигнала данных (GPIO2) и часов (GPIO3). Помимо данных EEPROM (GPIO0) и часов EEPROM (GPIO1).
- Последовательный, еще одна очень практичная связь с контактами TX (GPIO14) и RX (GPIO15), подобными тем, которые вы можете найти на плате. Arduino UNO.
Помните, что GPIO — это интерфейс между Raspberry Pi и внешним миром, но у них есть его ограничения, особенно электрические. Что-то, что вы должны принять во внимание, чтобы не испортить плату, — это помнить, что эти контакты GPIO обычно небуферизованы, то есть без буфера. Это означает, что у них нет защиты, поэтому вы должны следить за величинами приложенного напряжения и интенсивности, чтобы не получить бесполезную пластину .
Различия GPIO между версиями
Как я сказал, не все модели одинаковые контактыВот несколько диаграмм, чтобы вы могли видеть различия между моделями и, таким образом, иметь возможность сосредоточиться на Raspberry Pi 4 и 3, которые являются самыми новыми и тем, что у вас, вероятно, есть в вашем распоряжении. Он различается между (все группы имеют одни и те же контакты):
- Raspberry Pi 1 Model B Rev 1.0 с 26-контактным разъемом, немного отличающимся от Rev2.
- Raspberry Pi 1 Model A и B Rev 2.0, обе модели с 26-контактным разъемом.
- Rapsberry Pi Model A +, B +, 2B, 3B, 3B +, Zero и Zero W., а также модели 4. Все они с 40-контактным разъемом GPIO.
Что я могу подключить к GPIO?
Вы можете не только подключать электронные устройства в качестве транзисторы, датчики влажности / температуры, термисторы, шаговые двигатели, светодиоды, так далее. Вы также можете подключать компоненты или модули, созданные специально для Raspberry Pi и расширяющие возможности платы за пределы того, что входит в базовую комплектацию.
Я имею в виду известные шляпы или шляпы и тарелки, которые можно найти на рынке. Есть много типов, от тех, которые используются для управления двигателями с драйверами, до других для создания вычислительный кластер, con Светодиодная панель управляемый, добавить Возможность DVB TV, ЖК-экран, И т.д.
Эти шляпы или шляпы Они установлены на плате Raspberry Pi, сопоставление GPIO, необходимых для его работы. Поэтому его сборка довольно проста и быстра. Конечно, убедитесь, что версия планшета совместима с каждой шляпой, поскольку порт GPIO, как вы видели, отличается .
Я говорю это на случай, если у вас старая тарелка, так как шляпы совместим только с новейшими. Как и модели Raspberry Pi Model A +, B +, 2, 3 и 4.
Введение в использование GPIO на Raspberry Pi
Источник: Raspberry Pi
Для начала в Raspbian вы можете открыть консоль и ввести команда цоколевкаОн вернет изображение в терминале с контактами GPIO, доступными на вашей плате, и назначением каждого из них. Что-то очень практичное, чтобы он всегда был под рукой в момент работы, чтобы вы не запутались.
Первый проект: мигать светодиодом с GPIO
Самый простой способ сделать своего рода Привет, мир с GPIO заключается в использовании простого светодиода, подключенного к контактам Raspberry Pi, чтобы вы могли видеть, как они работают. В этом случае я подключил его к GND, а другой к контакту 17, хотя вы можете выбрать другой из обычных контактов .
После подключения вы можете контролировать их из Raspbian используя терминал. В Linux используются определенные файлы, такие как файлы в каталоге / sys / class / gpio /. Например, чтобы создать файл с необходимой структурой для начала работы:
Тогда ты можешь настроить как вход (вход) или как выход (выход) тот вывод 17 выбран для нашего примера. Вы можете сделать это очень легко с помощью:
В этом случае в качестве выхода, поскольку мы хотим отправить электрический импульс на светодиод, чтобы включить его, но если бы это был датчик и т. Д., Вы могли бы использовать in. Теперь для включить (1) или выключить (0) светодиод, который можно использовать:
Если вы хотите перейти к другому проекту и удалить запись Создано, вы можете сделать это следующим образом:
Кстати, вы также можете собрать все необходимые команды для своего проекта, как и все предыдущие, сохранить их в виде файла bash скрипт а затем запускать их в пакетах сразу, вместо того, чтобы вводить их по одному. Это удобно, когда вы повторяете одно и то же упражнение много раз, поэтому вам не придется переписывать. Просто беги и уходи. Например:
Как только вы закончите, вы сохраните, а затем вы можете дать ему соответствующие разрешения на выполнение и выполнение. сценарий чтобы светодиод загорелся, подождите 1.3 секунды и погаснет вот так в цикле .
Прогресс программы
Очевидно, что вышеперечисленное работает для небольших электронных проектов с небольшим количеством компонентов, но если вы хотите создать что-то более продвинутое, вместо команд, вы можете использовать следующие: языки программирования создавать различные сценарии или исходные коды, автоматизирующие работу.
Их можно использовать разные инструменты программировать, с очень разными языками. Библиотеки, разработанные сообществом, значительно упрощают вам задачу, например WiringPi, sysfs, pigpio и т. Д. Программы могут быть самыми разными, от Python, который является предпочтительным вариантом для многих, до Ruby, Java, Perl, BASIC и даже C #.
Официально Raspberry Pi предлагает вам много объектов для программирования ваших GPIO, таких как:
- Scratch, для тех, кто не умеет программировать и хочет использовать блоки головоломки этого проекта, с помощью которых также можно программировать Arduino, и т. д. Программирование с использованием графических блоков довольно интуитивно понятно и очень практично для сферы образования.
- Питон: Этот простой интерпретируемый язык программирования позволяет создавать простые и мощные коды с множеством библиотек в вашем распоряжении, чтобы делать почти все, что вы думаете.
- C / C ++ / C #: более мощные языки программирования для создания двоичных файлов для взаимодействия с GPIO. Сделать это можно несколькими способами, используя стандартную форму или интерфейс ядра через библиотеку.libgpiod, но также через стороннюю библиотеку, такую как свинья.
- Обработка3, аналогично Arduino.
Гибкий выбор тот, который вам нравится больше всего или который вы думаете, прост.
Содержание статьи соответствует нашим принципам редакционная этика. Чтобы сообщить об ошибке, нажмите здесь.
Полный путь к статье: Бесплатное оборудование » Raspberry Pi » GPIO: все о подключениях Raspberry Pi 4 и 3