Interfacing 3.5 inch Touch Screen TFT LCD with Raspberry Pi
Raspberry Pi is a Palm Size computer that comes in very handy when prototyping stuff that requires high computational power. It is being extensively used for IOT hardware development and robotics application and much more memory hunger applications. In most of the projects involving the Pi it would be extremely useful if the Pi had a display through which we can monitor the vitals of our project.
The pi itself has a HDMI output which can be directly connected to a Monitor, but in projects where space is a constrain we need smaller displays. So in this tutorial we will learn how we can interface the popular 3.5 inch Touch Screen TFT LCD screen from waveshare with Raspberry pi. At the end of this tutorial you will have a fully functional LCD display with touch screen on top of your Pi ready to be used for your future projects.
The technical specification of the 3.5” TFT LCD screen is shown below.
| LCD Type | TFT |
| Size | 3.5 |
| Resolution | 320*480 Pixels |
| Interface | SPI |
| Display Controller | XPT2046 |
| Touch Type | Resistive |
| Backlight | LED |
| Aspect Ratio | 8:5 |
| Colours | 65536 |
| Supports | Camera, Mouse and Keyboard |
Materials Required
- Raspberry Pi
- 3.5” TFT LCD
- Internet connection
Pre-Requisites
It is assumed that your Raspberry Pi is already flashed with an operating system and is able to connect to the internet. If not, follow the Getting started with Raspberry Pi tutorial before proceeding.
It is also assumed that you have access to the terminal window of your raspberry pi. In this tutorial we will be using Putty in SSH mode to connect to the Raspberry Pi. You can use any method but you should somehow be able to have access to your Pi’s terminal window.
Connecting your Raspberry Pi with TFT LCD screen
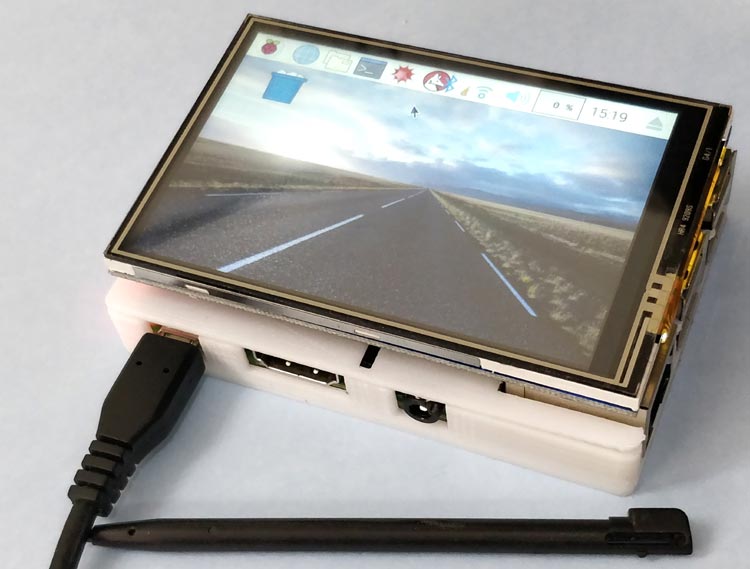
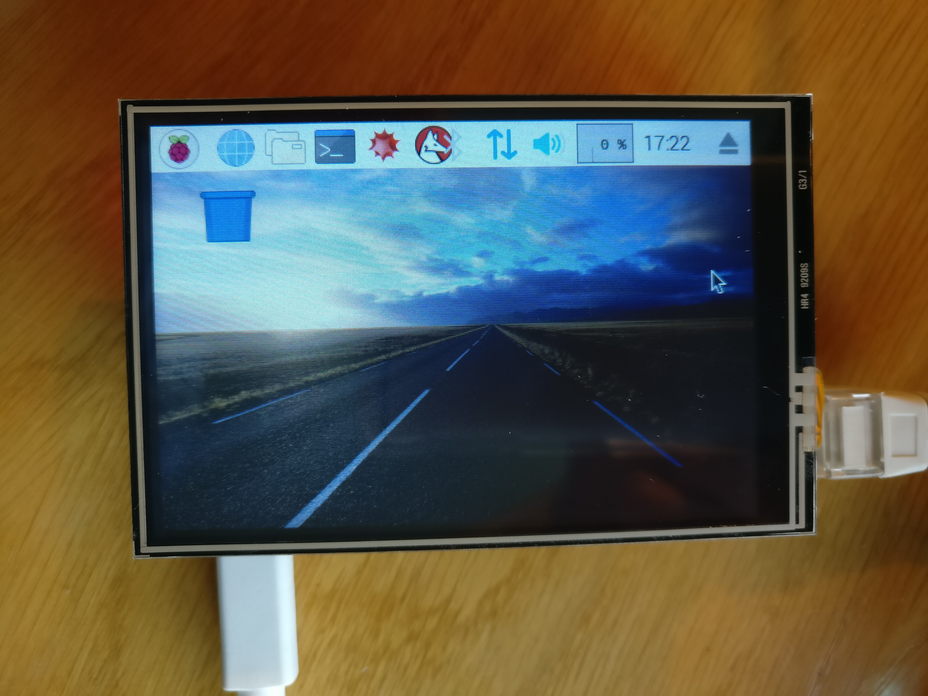
Connecting your 3.5” TFT LCD screen with Raspberry pi is a cake walk. The LCD has a strip of female header pins which will fit snug into the male header pins. You just have to align the pins and press the LCD on top of the Pi to make the connection. Once fixed properly you Pi and LCD will look something like this below. Note that I have used a casing for my Pi so ignore the white box.
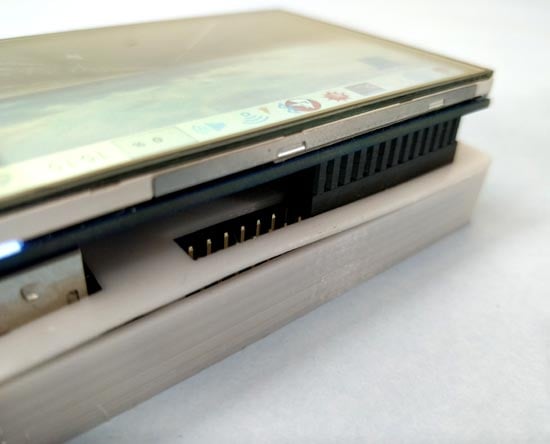
For people who are curious to know what these pins are! It is used to establish a SPI communication between the Raspberry Pi and LCD and also to power the LCD from the 5V and 3.3V pin of the raspberry Pi. Apart from that it also has some pins dedicated for the touch screen to work. Totally there are 26 pins, the symbol and description of the pins are shown below
Setting up an LCD screen on the Raspberry Pi, 2019 edition

I recently bought a 3.5″ TFT touchscreen display for my Raspberry Pi. The display connects via the GPIO pins and fits neatly onto the form factor of the Raspberry Pi 3. The idea was to add a GUI application onto the Pi, which had until now been acting as a headless web and application server.
The installation of the hardware was straightforward, but setting up the Pi to display onto the new LCD didn’t go so well. It turns out this LCD, and many similar ones, ask you to enable the LCD via scripts in the LCD-show project. On my first attempt, I simply ran the relevant script ( LCD35-show ) as requested, but I ended up not being able to connect to my WiFi anymore!
I found out the scripts mess with a number of system files, overwriting configurations that are integral to the operation of the Pi. The overwritten files are based on the ones provided by Raspbian, so ideally not much should be changing. However, the new files are based on older versions of Raspbian. Additionally, the scripts do much more than they need to.
As a second attempt, I read through the script and applied the changes manually based on my understanding of what was needed to enable the LCD. Below are my notes taken during the process.
Enabling the 3.5″ display
Each of the following steps is based on a set of commands in the original script. For reference, here’s the LCD35-show script I used, in the state it was in at the time of writing. The files to copy over are in the same repository, so start by cloning the directory onto your Raspberry Pi:
Copy over boot overlays
In the original script, the same file is copied over under two different names. In the next step (“Enable interfaces”), the .dtbo file is referenced, albeit without the file extension, so only that file should be required.
The file does not exist in the /boot/overlays directory, so it’s safe to copy it over.
Enable interfaces
A particular boot config file is copied over. The changes are minimal, and to avoid making unexpected changes, the changes should be made manually.
Using raspi-config , enable the following interfaces:
- SPI
- I²C (may not be needed, see below)
- Serial (may not be needed, see below)
Edit: Reddit user farptr points out that SPI is the one used for driving the display, and the I²C interface is used for the touchscreen. I experimented with the interfaces, and in my case, only SPI was required for both the display and touchscreen functionality. I recommend turning these interfaces on one by one in to see which ones your display needs.
Uncomment the line that says:
Finally, enable the overlay from the previous step by adding the following line at the end. I like to add a comment to remind myself of where the overlay comes from and why it needs to be applied:
As a side note, the dtoverlay line can include a rotation parameter. It turns out the default value is 90°, and since I wanted to use display upside down, I changed the rotation to 270°:
At this point, you can verify no further changes need to be made by diffing the now altered config.txt with the reference one that was supposed to be copied over:
There will still be some differences, but they are only in the ordering of lines and in comments. (And possibly the rotation parameter if you included one.)
Update cmdline.txt
This file is used to pass arguments to the kernel prior to initialization. The original script uses the presence of partition #7 on the SD card ( /dev/mmcblk0p7 ) to determine if we’re running NOOBs or not. If we’re not, we’d be copying over the standard cmdline.txt file, and if we are, the following section still applies.
We don’t actually want all of the changes, so we’ll make the following changes:
- Add the following options (all on the same line):
fbcon=map:10 fbcon=font:ProFont6x11
I’m not sure what exactly the first option does, but it’s the main change required to show the console on the LCD. Perhaps the font-related option is not necessary, but again, I don’t know.
In particular, we don’t want to make the following changes:
- Leave the console=serial0,115200 option as is. The reference file changes serial0 to ttyAMA0 . The Raspberry PI has two UARTs, and ttyAMA0 refers to one of them. However, the primary UART differs based on the Raspberry Pi model (namely based on if the model comes with built-in Bluetooth and WiFi). serial0 can be used to reference the primary one for the current model.
- Leave the root option as is. The reference file specifies /dev/mmcblk0p2 as the root partition, but newer versions of Raspbian refer to the root partition by a UUID. In fact, this is the difference between the non-NOOBS and NOOBS version of the reference file, so simply avoiding this change means you don’t have to worry about which distribution you’re using.
- Don’t remove the fsck.repair=yes option. This is unrelated to the LCD, which is why we won’t bother removing the option.
- Don’t add the logo.nologo option. Again, this is unrelated to the LCD, so if you want to keep the default behavior, there’s no need to remove the logo.
Reboot
At this point, the TFT LCD is set up. If you just want a display for the console, you can reboot.
If you want to set up the touchscreen with X, read on instead of rebooting.
Installing X
I had installed Raspbian minimal because I didn’t need a GUI before. However, the LCD-show scripts assume you have X installed. As we can see above, the LCD actually works without X.
The touchscreen works as well, and it’s even possible to display a GUI without X, but it’s not trivial to do so. The easier option is to install a full desktop environment, then build a regular GUI application. I’ll write up an article about building touch-enabled GUI applications without X in the future.
The most straightforward route is of course to install a Raspbian image with the PIXEL desktop already installed. But, if you already installed the minimal image, install the following packages:
To make it easier to work with the desktop environment, you can set the Pi to boot up in desktop mode, and even auto-login. This can be done via raspi-config , under «Boot Options» > «Desktop / CLI».
To change which user the system logs in as, change the lightdm config:
Edit the autologin-user line to reference the user you wish to automatically log in as.
Enabling the touchscreen via X
Copy over Xorg configurations
The original script cleaned up and recreated the /etc/X11/xorg.conf.d directory, which did not exist. Thus:
- The 40-libinput.conf file didn’t exist, so it didn’t need to be deleted.
- The two files being copied into the directory didn’t initially exist, so nothing needs to be backed up.
The modified commands to run, therefore, are:
Set up Xorg evdev input drivers
In the original script, we check the following:
Does uname -n (network node hostname) return «raspberrypi»? This is incorrectly used to check if we’re running a «Raspberry Pi kernel» (whatever that means). The reason this is wrong is because the user may have changed the hostname. If the hostname doesn’t match, nothing is done. We’ll assume a match, regardless of the hostname.
Next, we check the kernel version using the following:
On my machine, uname -v returns:
Resulting in a version of 1159 .
Finally, if the version is greater than or equal to 970 , we need to install the Xorg evdev input driver, allowing for multiple input devices. This is what will enable using the touchscreen as a second input device.
After installing the package, we duplicate one of the Xorg config files related to evdev into the same directory, just with a different number prefix! I’m not sure why this is needed…
Reboot
And finally, reboot!
Unnecessary changes
One of the changes in the reference script is to copy over a file into /etc/inittab . This file was used to configure the older sysvinit system, which has since been replaced by systemd.
Not only will this file have no effect anymore, but no part of it is necessary at this point. Simply ignore this part of the script.
Switching back to HDMI
First, remove the dtoverlay=tft35a line from /boot/config.txt .
Next, in /usr/share/X11/xorg.conf.d/99-fbturbo.conf , switch from /dev/fb1 to /dev/fb0 on the following line:
This is only needed if you set up the X-related functionality above.
With the screen set up, it’s nice that I don’t need to be close to a monitor to work with my Raspberry Pi. Since then, I’ve been experimenting with ways to create a GUI application with as few dependencies as possible. I will document that process as I learn more.
Adventures with SPI TFT screens for the Raspberry Pi
The following is a grab bag of notes from an afternoon of playing around with a Elegoo 3.5” 480×320 SPI TFT touch screen
TL:DR
Skip these rubbish screens, they’re a massive pain to set up and have very poor refresh rates (sub 8 FPS)
If you’re a masochist and want to learn more, read on…
Background
These little TFT screens use SPI and are controlled via the fbtft framebuffer driver that is part of the linux kernel.
This article is written testing the screen on a Raspberry Pi 2 loaded with Raspbian 2017-09-07-raspbian-stretch.zip
Raspbian setup
Provided driver ( LCD-show )
The screen comes with a link to a prebuilt raspbian image setup for use, however I wanted the latest Raspbian release and didn’t want to reflash my SD card. The screen also provided a driver folder with a bunch of tar archives called LCD-show-XXXXXX.tar.gz and a README specifying the compatibility of each version of LCD-show with Raspbian versions:
| LCD-show version | Min Raspbian version | Max Raspbian version |
|---|---|---|
| Unmarked | ? | 2015-05-05 Wheezy |
| 150602 | ? | 2015-05-05 Wheezy |
| 151020 | 2015-05-05 Wheezy | 2015-09-24 Jessie |
| 160620 | 2016-05-10 Jessie | Latest (?) |
| 160701 | 2016-05-10 Jessie (?) | Latest (?) |
An additional version 160701 was provided but not documented, I assume this is the latest and should be used with the latest version of Raspbian.
Un-tarring the latest LCD-show yields a bunch of files:
Here’s the README:
So what’s in these LCDXX-show scripts? Here’s LCD35-show for setting up a 3.5” TFT.
Hooray, it’s a really shitty shell script! Got changes in your config.txt ? Kiss goodbye to them! How about cmdline.txt ? Gone as well! Fuck you, puny user.
Does it work? No. The script reboots the pi and comes up with a white screen. What now? Googling LCDShow brings up the LCDShow repository, let’s try the latest (commit e6fd2c6abb2195a2b08c856ddeee2ba4c07d7c1f). Hooray, success!
Refresh rate is appalling, as can be seen in the video below.
Let’s dig deeper and find out how it works.
Here’s the working version of LCD35-show
- Overlay
- X11 config
- Kernel options
- inittab
- config.txt
Let’s find out what they do.
First the overlays… What is an overlay? Googling round leads to the overlays directory in the Raspberry Pi firmware github repo which has a README explaining that overlays are device tree overlays and have something to do with loading modules, they supersede module loading from /etc/modules . Here’s the device tree spiel:
Device Tree makes it possible to support many hardware configurations with a single kernel and without the need to explicitly load or blacklist kernel modules. Note that this isn’t a “pure” Device Tree configuration (c.f. MACH_BCM2835) — some on-board devices are still configured by the board support code, but the intention is to eventually reach that goal.
On Raspberry Pi, Device Tree usage is controlled from /boot/config.txt. By default, the Raspberry Pi kernel boots with device tree enabled. You can completely disable DT usage (for now) by adding: device_tree= to your config.txt which should cause your Pi to revert to the old way of doing things after a reboot.
Are overlays plain text? vi /boot/overlays/tft35a.dtbo … nope. But they’ve got a decent amount of ASCII in them: strings /boot/overlays/tft35a.dtbo lists all the ASCII strings in the file, not hugely useful or informative. Moving on.
Back to the Raspberry Pi docs:
Overlays are loaded using the “dtoverlay” directive. As an example, consider the popular lirc-rpi module, the Linux Infrared Remote Control driver. In the pre-DT world this would be loaded from /etc/modules, with an explicit “modprobe lirc-rpi” command, or programmatically by lircd. With DT enabled, this becomes a line in config.txt: dtoverlay=lirc-rpi . This causes the file /boot/overlays/lirc-rpi.dtbo to be loaded. By default it will use GPIOs 17 (out) and 18 (in), but this can be modified using DT parameters: dtoverlay=lirc-rpi,gpio_out_pin=17,gpio_in_pin=13 .
Parameters always have default values, although in some cases (e.g. “w1-gpio”) it is necessary to provided multiple overlays in order to get the desired behaviour. See the list of overlays below for a description of the parameters and their defaults.
So what did LCD35-show do to the config.txt , what overlays did it enable? Well if I’d had the old config.txt before the script overwrote it I could diff it, sigh. How do I get the default config.txt ? Googling doesn’t yield much–I’ll mount the boot partition from the original 2017-09-07-raspbian-stretch.img that I wrote to the SD card:
Ta da! Here’s the original in case anyone needs it