Distance Measurement using Ultrasonic Sensor and Arduino with LCD display | Distance Meter
Hello friends! Welcome back to ElectroDuino. This blog is base on Distance Measurement using Ultrasonic Sensor and Arduino with LCD display | Distance Meter. Here we will discuss Introduction to Distance Measurement using Ultrasonic Sensor and Arduino /Distance Meter, Project Concept, Block Diagram, components required, circuit diagram, working principle, and Arduino code.
Introduction
A distance measurement system or Distance Meter is an electronic device that can measure distance without actual contact and easily used at several places, like water level measurement, distance measurement, etc. This device is use an ultrasonic sensor to measure the distance. It can measure any object distance from it in the range of 2 – 400 cm. We can see the measuring distance on the display. The measure distance value is in Cm and Inch unit.
Project Concept
The key components of the project are the Ultrasonic Sensor, Arduino microcontroller, LCD Display, buzzer, and LED. The ultrasonic sensor is a distance measurement device which is measure distance by generating and receiving sound wave. Here it is used to measure distance. The Arduino microcontroller controls the whole system. The LCD display is used to print the measuring distance. The buzzer and LED are used as an indicator. The Arduino reads the data from the Sensor and prints the measuring distance on the display. If any object is existing at out of the detection range of the ultrasonic sensor then the buzzer and LED are turn on.
Block Diagram of Distance Measurement using Ultrasonic Sensor and Arduino with LCD Display
Components Required
| Components Name | Quantity |
| Arduino Nano | 1 |
| Ultrasonic Sensor | 1 |
| 16×2 LCD Display | 1 |
| 10k Potentiometer | 1 |
| Buzzer | 1 |
| Red LED | 1 |
| 220 ohm Resistor | 2 |
| Toggle or Slide switch | 1 |
| 9-volt Battery with Battery Connector | 1 |
Circuit Diagram of Distance Measurement using Ultrasonic Sensor and Arduino with LCD display
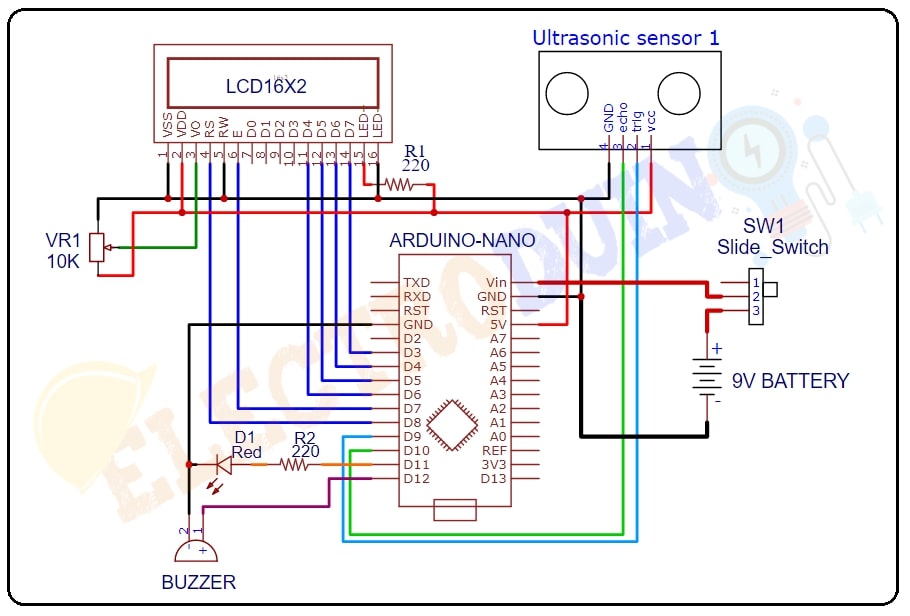 Circuit Diagram Distance Measurement using Ultrasonic Sensor and Arduino with LCD display
Circuit Wiring
Working Principle of Distance Measurement using Ultrasonic Sensor and Arduino with LCD display After connecting all the components according to the circuit diagram and uploading the code on Arduino, now turn on the power supply. At the same time, the ultrasonic sensor starts emitting sound waves from the transmitter part. When any object comes in front of the sensor then the sound wave reflects back from the object surface to the sensor receiver part. Now the ultrasonic sensor sens the reflected sound wave and the sensor echo pin produce a high pulse output. This output pulse duration is equal to the time difference between the transmitted sound wave and the received sound wave. Then the Arduino read the high pulse output from the sensor echo pin. This way Arduino calculates the time duration and measure the distance. s = (v x t)/2 Where s = distance between the sensor and object. v = speed of sound in Air (0.034cm/µs or 340 m/s) . t = the sound waves take time to reflect back from the object surface. We need to divide the distance value by 2 because time will be double as the waves travel and reflect back from the object. Then Arduino prints the distance value on the LCD display in the Cm and Inch unit. The ultrasonic sensor can measure distance in the range of 2 cm to 400 cm. When the object present outside of this distance range, this time buzzer and LED will turn on and indicate the object is present outside of the distance range. Arduino Code/* #define trigpin 9 // Define sensor trig pin is connected to Pin 9 //Define variables void setup() lcd.begin(16,2); void loop() distanceCm=time*340/20000; // Distance value in CM // Print Distance value on LCD Disply in CM unit // when distance greater than 400 cm or less than 2cm digitalWrite(buzzerpin,HIGH); // buzzer ON Измерение расстояний с помощью Arduino и ультразвукового датчикаУльтразвуковые датчики в настоящее время находят широкое применение для измерений расстояния, измерения уровня воды и других подобных задач. С их помощью можно эффективно и точно измерять небольшие расстояния. В этом проекте мы будем использовать ультразвуковой датчик для определения расстояния от датчика до препятствия. Принцип измерения расстояния с помощью ультразвукового датчика основан на эффекте эхо (ECHO). Когда звуковая волна излучается в окружающее пространство то, если она встречает на своем пути препятствие, она отражается от него и возвращается обратно к источнику в виде эхо. Все, что нам нужно сделать в этом случае, это определить время, за которое звуковая волна достигнет препятствия и вернется обратно. Поскольку скорость звука нам известна, то после небольших вычислений мы сможем на основе этого измеренного времени определить расстояние до препятствия.
Необходимые компоненты
Принцип работы ультразвукового датчика HC-SR04
Ультразвуковой датчик HC-SR04 в нашем проекте используется для измерения расстояний в диапазоне 2-400 см с точностью 3 мм. Датчик состоит из ультразвукового передатчика, ультразвукового приемника и схемы управления. Основные принципы работы ультразвукового датчика состоят в следующем:
Расстояние затем можно рассчитать по следующей формуле: Distance= (Time x Speed of Sound in Air (340 m/s))/2 где Time – измеренное датчиком время; Временные диаграммыКак уже указывалось, измерение расстояний осуществляется на основе эхо. Вначале передается импульс длительностью 10 мкс чтобы запустить модуль в работу. После этого модуль автоматически передает 8 импульсов с частотой 40 кГц (то есть ультразвуковая частота) и проверяет эхо – то есть не вернулись ли эти импульсы обратно, отразившись от препятствия. Если импульсы вернулись обратно, то расстояние до препятствия можно рассчитать по следующей формуле: Distance= (time x speed)/2 В этой формуле мы разделили произведение скорости и времени на 2 потому что измеренное время равно сумме времен распространения звуковой волны до препятствия и обратно. То есть время, чтобы звук достиг препятствия, равно половине времени, измеренного датчиком. Временные диаграммы работы модуля приведены на следующем рисунке:
Работа схемыСхема устройства для измерения расстояний с помощью Arduino и ультразвукового датчика представлена на следующем рисунке.
Сначала нам необходимо запустить ультразвуковой датчик в работу, подав на его вход сигнал длительностью 10 мкс. Затем мы должны подождать когда будет осуществлен прием сигналов эхо (то есть отраженных от препятствия). Arduino считывает время между запуском модуля в работу и приемом эхо. Мы знаем что скорость звука в воздухе составляет примерно 340 м/с, поэтому мы можем рассчитать расстояние до препятствия по следующей формуле: Distance= (travel time/2) * speed of sound где speed of sound (скорость звука) составляет примерно 340 м/с. Затем на ЖК дисплее 16×2 производится отображение измеренного расстояния. Исходный код программыВ представленном участке кода мы производим измерение времени с помощью функции pulseIn(pin). Затем после выполнения необходимых вычислений мы показываем результат на ЖК дисплее 16×2. Adblockdetector |


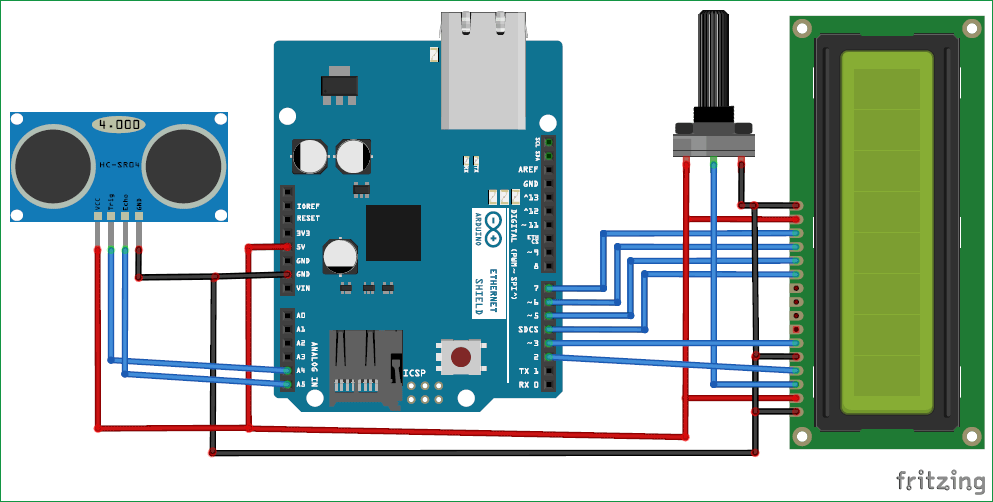 На представленной схеме контакты модуля с ультразвуковым датчиком с названиями “trigger” и “echo” напрямую подсоединены к контактам 18(A4) и 19(A5) платы Arduino. Жидкокристаллический (ЖК) дисплей 16×2 подсоединен к Arduino в 4-битном режиме. Управляющие контакты RS, RW и En напрямую подсоединены к контактам 2, GND и 3 Arduino. Контакты для передачи данных D4-D7 подсоединены к контактам 4, 5, 6, 7 Arduino.