Ethernet Shield W5500 для подключения к сети Ethernet и Internet

Общие сведения:
Ethernet Shield W5500 — плата расширения, которая позволяет осуществить удалённое подключение плат Arduino к сети Ethernet, а следовательно и к сети Интернет (при наличии подключения).
Видео:
Спецификация:
- Напряжение питания: 5В;
- Интерфейс: SPI;
- Сетевые протоколы: TCP, UDP;
- Сетевые интерфейсы: 10Мбит / 100Мбит;
- Размер внутреннего буфера: 32 кБайт;
- Режимы работы: дуплекс / полудуплекс;
- Светодиодная индикация;
Подключение:
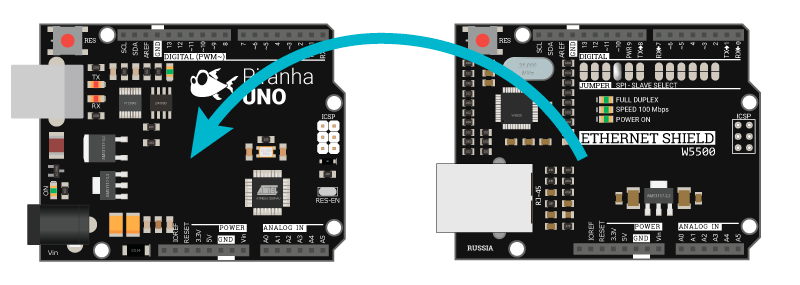
Ethernet Shield W5500 совместим с различными микроконтроллерами Arduino, его можно установить на Arduino UNO, Leonardo, Mega.
Ethernet Shield W5500 устанавливается сверху на управляющую плату.
Подробнее о Ethernet Shield:
Ethernet Shield W5500 может стать вашим пропуском как просто в локальную или глобальную сеть, так и в мир интернета вещей, за счёт того, что позволит работать с большим количеством плат Arduino, которые вы можете расположить где только пожелаете.
Данный Shield может похвастаться сразу несколькими удачными техническими решениями, о которых мы и поговорим ниже.
Регулятор напряжения
Наличие данного регулятора позволит обеспечить стабильным питанием чип W5500, установленный на плате расширения. Обычно данный чип питают напрямую от вывода напряжения 3.3В на плате Arduino, но при просадке напряжения на самой Arduino чип, расположенный на Shield’у может начать работать не корректно. При питании чипа через регулятор такое точно не произойдёт, так как на вход регулятора подаётся напряжение 5В, которое уже преобразуется в сильные стабильные 3.3В.
Колодка SPI
Shield работает по шине SPI, а значит использует зарезервированные на этот случай выводы Arduino (для каждой платы — свои). Однако, все платы Arduino имеют специальную колодку с подписью ICSP, на которую выведены запараллеленные выводы шины SPI.
Ethernet Shield W5500 также имеет отдельную колодку, куда вынесены эти выводы, за счёт этого он легко устанавливается на большую часть плат Arduino/Piranha: UNO, ULTRA, MEGA, LEONARDO. Достаточно просто установить плату расширения сверху и всё, можно работать!
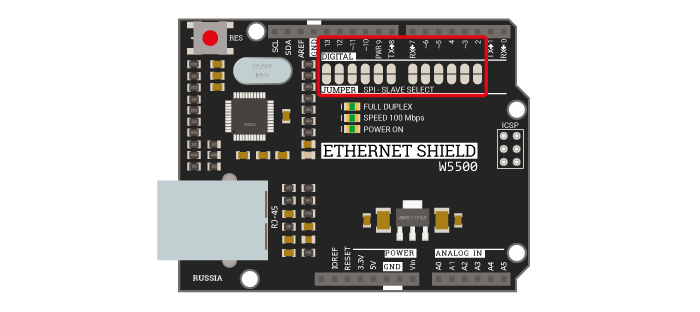
Перемычки
Выводы, которые выделены под шину SPI, зарезервированы на управляющих платах следующим образом:
- для Arduino UNO/ULTRA: MOSI — 11, MISO — 12, SCK — 13, SS — 10;
- для Arduino MEGA: MISO — 50, MOSI — 51, SCK — 52, SS — 53;
Однако, плата расширения Ethernet Shield позволяет изменить вывод SS на любой свободный цифровой вывод. Для этого на корпусе платы есть перемычки, на которых запаяна перемычка напротив 10 вывода. При необходимости (другое оборудование уже подключено к шине SPI либо к выводу 10) можно эту перемычку разомкнуть, а напротив нужного вывода запаять, тем самым изменив вывод SS (Select Slave) на нужный вам.
MAC адрес
MAC адрес (Media Access Control, управление доступом к среде) — уникальный шести байтовый идентификатор устройств сети Ethernet.
Библиотека Arduino IDE позволяет устанавливать любой MAC адрес для Ethernet Shield W5500. Хотя главное требование чтобы в локальной сети он был уникален, сетевое оборудование может не распознавать Ethernet Shield если старший байт MAC адреса неправильно настроен. В примерах ниже используется следующий MAC адрес:
| 0xDE | 0xAD | 0xBE | 0xEF | 0xFE | 0xED |
|---|---|---|---|---|---|
| Старший байт | — | — | — | — | Младший байт |
В случае, если необходимо настаивать несколько устройств в сети рекомендуется менять младший байт.
Примеры:
Проверка наличия Ethernet-соединения
Вывод IP-адреса, назначенного модулю
**На заметку: **В случае если на маршрутизаторе выключен DHCP или Вы хотите задать статическей адрес Shield’у, необходимо знать IP адрес маршрутизатора и маску подсети. В нашем случае адрес маршрутизатора 192.168.0.1 и маска подсети 255.255.255.0, это означает что Shield’у можно задать адреса в диапазоне от 192.168.0.2 до 192.168.0.254
RoboCore/Ethernet_W5500
Use Git or checkout with SVN using the web URL.
Work fast with our official CLI. Learn more.
Launching GitHub Desktop
If nothing happens, download GitHub Desktop and try again.
Launching GitHub Desktop
If nothing happens, download GitHub Desktop and try again.
Launching Xcode
If nothing happens, download Xcode and try again.
Launching Visual Studio Code
Your codespace will open once ready.
There was a problem preparing your codespace, please try again.
Latest commit
Git stats
Files
Failed to load latest commit information.
README.md
Ethernet W5500 Library
Ethernet W5500 library is made for various Open Source Hardware Platform and support WIZnet’s W5100, W5200 and W5500 chip. The Ethernet library lets you connect to the Internet or a local network.
- RoboCore Ethernet W5500 Shield (using W5500)
- ioShield, WIZ550io (using W5500)
- W5200 Ethernet Shield, WIZ820io (using W5200)
- Arduino Ethernet Shield (using W5100)
1. Install Ethernet W5500 library
Arduino IDE 1.0.x
Download all files and overwrite onto the «\libraries\Ethernet» folder in your project in sketch.
Arduino IDE 1.5.x
Download all files and replace the «\libraries\Ethernet\src» folder in your Arduino IDE. This will update the «utility» folder also under «\libraries\Ethernet\src».
2. Select device: W5100, W5200 or W5500
In the W5100.h file (\libraries\Ethernet\utility\w5100.h), uncomment the device(shield) you want to use.
By default, «WIZ550io_WITH_MACADDRESS» is commented and if you uncomment it, you can use the MAC address stored in the WIZ550io.
How to use the WIZ Ethernet library and evaluate existing Ethernet example.
All other steps are the same as the steps from the Arduino Ethernet Shield. You can find examples in the Arduino IDE, go to Files->Examples->Ethernet, open any example, then copy it to your sketch file (gr_sketch.cpp) and change configuration values properly. After that, you can check if it is work well. For example, if you choose ‘WebServer’, you should change IP Address first and compile and download it. Then you can access web server page through your web browser of your PC or something.
- Initial Release : 14 August 2013
- Adding function to read / write W5500 PHY configuration register : 4 December 2013
- Support the Arduino Due (Arduino IDE 1.5.x). Now it support 42Mhz SPI clock ! (by Jinbuhm Kim): 28 Feb. 2014
- Separate the folder for Arduino IDE 1.0.x & Arduino IDE 1.5.x
- 10/07/15
- Forked from Wiznet;
- Fixed memory leak in Ethernet.begin() (for multiple calls);
- 17/07/15
- Renamed to Ethernet_v2 (to avoid conflict with standard Ethernet library);
- Added library for IDE 1.6.5 (library folder has the same structure as 1.0.x but the files from 1.5.x must be used because of change in ).
- 27/11/15
- Fixed bug in DNS library that wouldn’t recognize correct DNS;
- Added getRemoteIP() method to the EthernetClient class.
- 22/02/18
- Renamed to Ethernet_W5500 (to avoid conflict with the standard Ethernet library);
About
Ethernet W5500 library for the W5500 Ethernet controller.
W5500 Ethernet Shield v1.0

The W5500 Ethernet Shield v1.0 can provide your projects with internet connectivity. W5500 enables users to have the Internet connectivity in their applications by using the single chip, in which TCP/IP stack, 10 / 100 Ethernet MAC and PHY embedded. The shield also has two Grove connectors and a microSD card socket to support projects which require storing large amounts of data from Grove sensor. The RJ45 port (where the Ethernet cable is connected to) is low enough to allow you to stack more shields on top of this one if needed.
Features
- Supports Hardwired TCP/IP ProtocolsВ : TCP, UDP, ICMP, IPv4, ARP, IGMP, PPPoE
- Supports 8 independent sockets simultaneously
- Supports Power down mode
- Supports Wake on LAN over UDP
- Supports High Speed Serial Peripheral Interface(SPI MODE 0, 3)
- Internal 32Kbytes Memory for TX/RX Buffers
- 10BaseT/100BaseTX Ethernet PHY embedded
- Supports Auto Negotiation (Full and half duplex, 10 and 100* based )
- Not supports IP Fragmentation
- 3.3V operation with 5V I/O signal tolerance
- LED outputs (Full/Half duplex, Link, Speed, Active)
- Micro-SD card socket
- Grove connectors for I2C and UART
Hardware Overview

Hardware Configuration
- RJ45: Ethernet Port;
- IC W5500: a hardwired TCP/IP Ethernet Controller;
- Reset Button: Reset Ethernet shieldВ ;
- SD Card Socket: support Micro SD card in FAT16 or FAT32; maximum storage is 2GB.
- I2C Interface
- UART Interface
Pins usage on Arduino
- D4пјљ SD card chip Selection
- D10пјљ W5200 Chip Selection
- D11пјљ SPI MOSI
- D12пјљ SPI MISO
- D13пјљ SPI SCK
Both W5500 and SD card communicate with Arduino via SPI bus. Pin 10 and pin 4 are chip Selection pins for W5500 and SD slot. They cannot be used as general I/O.
Usage
We will show you an example.This example can upload data to webpage and store your sensor data to SD Card.
Hardware
Part List:
| Name | Function | Qty |
|---|---|---|
| W5500 Ethernet Shield | Provide Ethernet connectivity | 1 |
| Seeeduino V4.2 | Controller | 1 |
| Grove-Temp&Humi Sensor | Sensor | 1 |
| Base Shield V2 | Base Shield | 1 |
| Micro SD Card | Store data | 1 |
Procedure:
- Mount W5500 Ethernet Shield v1.0 on your Arduino, mount Base Shield V2 on Ethernet Shield, and connect Grove-Temp&Humi sensor to Base Shield D5 Grove port, attach the SD card.
- Connect the Ethernet shield to network with a standard Ethernet cable;
- Connect Arduino to PC via USB cable;

Software
- Please follow how to install an arduino library procedures to install library.
Click on below button to download W5500 Ethernet Shield libraries. 
Install the library to your Arduino IDE when it is downloaded.
Results
Now, we will show result.
- Put your SD card into the computer,you will see some temperature and humidity information.
- What’s more, we can see information from web.

Isn’t it very easy? You can begin your project.
Schematic Online Viewer
Resources
Tech Support
Please submit any technical issue into our forum.
nopnop2002/Arduino-STM32-Ethernet
Use Git or checkout with SVN using the web URL.
Work fast with our official CLI. Learn more.
Launching GitHub Desktop
If nothing happens, download GitHub Desktop and try again.
Launching GitHub Desktop
If nothing happens, download GitHub Desktop and try again.
Launching Xcode
If nothing happens, download Xcode and try again.
Launching Visual Studio Code
Your codespace will open once ready.
There was a problem preparing your codespace, please try again.
Latest commit
Git stats
Files
Failed to load latest commit information.
README.md
Arduino stm32 example for W5x00 ethernet modules.
This project uses this library.
PlatformIO will automatically install the required libraries according to the ini file.
Great!
Platform IO installation
- STM32F103 Development Board
- W5100/W5200/W5500 Ethernet Module
About $5 for aliexpress/eBay.
W5100 is for 5V only.
W5500 can be used at both 3.3V / 5V. - ST-LINK/V2 or ST-LINK/V2.1 Module
About $5 for aliexpress/eBay.
You can use NECLEO board as ST-LINK/V2.1 - USB-TTL Converter
For Serial monitoring. - External Voltage Regurator
BluePill or BlackPill board cannot supply too much current.
It is more stable when supplied from an external power source.
AMS1117 is often used.
Selecting the Ethernet type controller (W5100, W5200 or W5500)
It is automatically selected inside the library.
| PHY | STM32 | |
|---|---|---|
| MOSI | PA7 | |
| MISO | PA6 | |
| SCLK | PA5 | |
| SS | PA4 | *1 |
| RST | RESET | *2 |
| 3.3V | 3.3V | *3 |
| GND | GND | *3 |
(*1)
You can specify any pin in platformio.ini.
(*2)
Pull up when there is no RESET pin.
(*3)
BluePill or BlackPill board cannot supply too much current. It is more stable when supplied from an external power source.