Used for communication between the Arduino board and a computer or other devices. All Arduino boards have at least one serial port (also known as a UART or USART), and some have several.
Board
USB CDC name
Serial pins
Serial1 pins
Serial2 pins
Serial3 pins
Leonardo, Micro, YГєn
Connected to USB
Connected to NINA
SerialUSB (Native USB Port only)
Connected to Programming Port
SerialUSB (Native USB Port only)
On Uno, Nano, Mini, and Mega, pins 0 and 1 are used for communication with the computer. Connecting anything to these pins can interfere with that communication, including causing failed uploads to the board.
You can use the Arduino environment’s built-in serial monitor to communicate with an Arduino board. Click the serial monitor button in the toolbar and select the same baud rate used in the call to begin() .
Serial communication on pins TX/RX uses TTL logic levels (5V or 3.3V depending on the board). Don’t connect these pins directly to an RS232 serial port; they operate at +/- 12V and can damage your Arduino board.
To use these extra serial ports to communicate with your personal computer, you will need an additional USB-to-serial adaptor, as they are not connected to the Mega’s USB-to-serial adaptor. To use them to communicate with an external TTL serial device, connect the TX pin to your device’s RX pin, the RX to your device’s TX pin, and the ground of your Mega to your device’s ground.
Arduino библиотека Serial
Библиотека Serial — это стандартная библиотека, которая подключается в скетчи автоматически. Она используется для передачи данных через последовательный порт Arduino. В большинстве плат ардуино доступен 1 интерфейс Serial. Последовательный порт работает с двумя цифровыми пинами Ардуино 0-ой (RX) и 1-ый (TX). В Arduino Mega таких интерфейсов 3. Для доступа к интерфейсу связи необходимо использовать ключевой слово Serial (Serial1 и Serial2 для Arduino Mega).
Теперь рассмотрим доступные функции библиотеки Serial:
if(Serial)
Условие с проверкой готовности порта к работе. Используется такая конструкция довольно редко, потому что обычно интерфейс доступен.
available()
Проверяет число байтов доступных для считывания. Данная функция показывает какое количество данных уже пришло и хранится в буфере обмена. Размер буфера последовательного порта 64 байта.
Синтаксис
Параметры
Возвращаемые значения
Число байт доступных для чтения
availableForWrite()
Проверяет число байтов доступных для записи в буфер обмена, без блокировки функции записи.
Синтаксис
Параметры
Возвращаемые значения
Число байт доступных для записи
begin()
Данная функция устанавливает соединение на определенной скорости.
Синтаксис
Параметры
speed — Обязательный параметр. Скорость бит в секунду (бод). Доступные значения: 300, 600, 1200, 2400, 4800, 9600, 14400, 19200, 28800, 38400, 57600 или 115200
Отключает соединение через последовательный порт и освобождает пины RX и TX.
Синтаксис
Параметры
Возвращаемые значения
Считывает данные из буфера обмена до тех пор пока не найдет заданную строку.
Синтаксис
Параметры
needle — Обязательный параметр. Строка которую нужно найти
Возвращаемые значения
true — Если строка найдена.
false — Если строка не найдена.
findUntil()
Считывает данные из буфера обмена до тех пор пока не найдет заданную строку или терминальную строку.
Синтаксис
Параметры
needle — Обязательный параметр. Строка которую нужно найти
terminal — Обязательный параметр. Терминальная строка которую нужно найти
Возвращаемые значения
true — Если строка найдена.
false — Если строка не найдена.
flush()
Очищает буфер обмена последовательного порта
Синтаксис
Параметры
Возвращаемые значения
parseFloat()
Возвращает первое найденное в буфере обмена число с плавающей точкой. Все остальные символы игнорируются.
Синтаксис
Параметры
Возвращаемые значения
Число с плавающей точкой (float)
parseInt()
Возвращает первое найденное в буфере обмена целое число. Все остальные символы игнорируются.
Синтаксис
Параметры
skipChar — необязательный параметр. Символ который будет пропускаться при поиске
Возвращаемые значения
Целое число (long) или 0, если не найдено цифр.
Возвращает первый байт данных из буфера.
Синтаксис
Параметры
Возвращаемые значения
Первый байт входящих последовательных данных (int). Если данных нет то вернет «-1»
print()
Функция отправляет данные в последовательный порт в виде ASCII-текста.
Синтаксис
Параметры
val — обязательный параметр. Данные, которые необходимо отправить.
format — Необязательный параметр. Форматирует отправляемые данные. Может принимать следующие значения: BIN — Двоичный формат. OCT — Восьмеричный формат. DEC — Десятичный формат HEX — Шестнадцатиричный формат. 0 — Округление числа до целых. 2 — Округление число до сотых.
Возвращаемые значения
Количество записанных байтов (long)
println()
Отправляет данные в виде ASCII-текста в последовательный порт с символом конца строки (\r) и символом новой строки (\n)
Синтаксис
Параметры
val — обязательный параметр. Данные, которые необходимо отправить.
format — Необязательный параметр. Форматирует отправляемые данные. Может принимать следующие значения: BIN — Двоичный формат. OCT — Восьмеричный формат. DEC — Десятичный формат HEX — Шестнадцатиричный формат. 0 — Округление числа до целых. 2 — Округление число до сотых.
Возвращаемые значения
Количество записанных байтов (long)
Считывает данные из последовательного порта.
Синтаксис
Параметры
Возвращаемые значения
Первый доступный байт (int).
readBytes()
Считывает символы из последовательного порта в буфер. Завершает свою работу, если сосчитает данные заданной длины или если выйдет время. Время указывается при помощи функции serial.setTimeout().
Возвращаемое значение — количество символов, помещенных в буфер. Если функция вернет значение «0», это значит, что нужных данных найдено не было.
Синтаксис
Параметры
buffer — буфер, в который будут сохраняться входящие байты (char[] или byte[])
length — количество считанных байтов (int)
Возвращаемые значения
readBytesUntil()
Считывает символы из буфера последовательного порта в массив. Завершает свою работу, если обнаружит терминальный символ, если сосчитает данные заданной длины или если выйдет время. Время указывается с помощью функции Serial.setTimeout().
Синтаксис
Параметры
character — символ, который нужно найти (char)
buffer — буфер, в который будут сохранены входящие байты (char[] или byte[])
length — количество байтов, которые нужно сосчитать (int)
Возвращаемые значения
readString()
Считывает данные из буфера последовательного порта в строку. Завершает свою работу, если выйдет время. Время указывается в функции Serial.setTimeout().
Синтаксис
Параметры
Возвращаемые значения
Строка с данными, считанными из буфера последовательного порта.
readStringUntil()
Считывает символы из буфера последовательного порта в строку. Завершает свою работу, если наткнется на терминальный символ или если выйдет время. Время указывается в функции Serial.setTimeout().
Синтаксис
Параметры
terminalChar— искомый символ (char)
Возвращаемые значения
Строка, считанная из буфера последовательного порта (до символа, завершающего работу функции).
setTimeout()
Устанавливает время (в миллисекундах), в течение которого функции Serial.readBytesUntil(), Serial.readBytes(), Serial.parseInt() и Serial.parseFloat() должны будут ждать данных, входящих через последовательный порт.
Синтаксис
Параметры
time — время ожидания в миллисекундах (long).
Возвращаемые значения
write()
Передает через последовательный порт данные в двоичном виде. Данные передаются как байт или как серия байтов. Если вам нужно отправить символы, представляющие цифры какого-либо числа, используйте функцию print().
Синтаксис
Параметры
val — значение, строка или буфер для отправки.
len — размер буфера
Возвращаемые значения
Байт или количество отправленных байтов
serialEvent
Автоматически вызывается, когда есть доступные данные. Для захвата этих данных нужно воспользоваться функцией Serial.read().
Синтаксис
Параметры
statements — любые корректные функции, позволяющие делать что-то с поступившими данными.
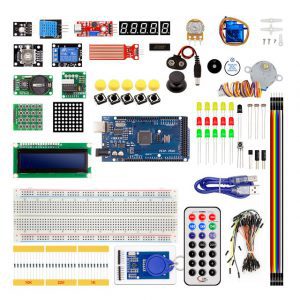
Железо
Это расширенный стартовый набор. В комплект входит Arduino Mega R3, макетные платы, множество датчиков, управляемые механизмы и необходимые радиоэлектронные компоненты. Полный список.
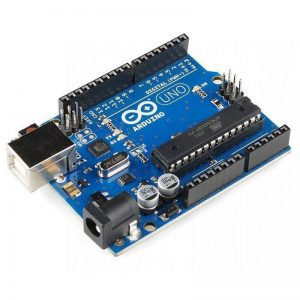
Arduino Uno — плата на базе микроконтроллера ATmega328P с частотой 16 МГц. На плате есть все необходимое для удобной и быстрой работы.
Макетная плата на 830 точек и ничего лишнего.
Using the Serial Monitor tool
AUTHOR: Karl Söderby
LAST REVISION: 10/05/2022, 01:00 PM
The Serial Monitor is an essential tool when creating projects with Arduino. It can be used as a debugging tool, testing out concepts or to communicate directly with the Arduino board.
The Arduino IDE 2.0 has the Serial Monitor tool integrated with the editor, which means that no external window is opened when using the Serial Monitor. This means that you can have multiple windows open, each with its own Serial Monitor.
You can download the editor from the Arduino Software page.
You can also follow the downloading and installing the Arduino IDE 2.0 tutorial for more detailed guide on how to install the editor.
Requirements
Arduino IDE 2.0 installed.
Arduino board.
Core installed for the board used.
Notable Changes
Integrated Monitor
One major change that was introduced with the Arduino IDE 2.0 is the integrated Serial Monitor. The older versions of the editor features an external window that matches the port/board that we select.
The Arduino IDE 2.0 works a bit differently. Instead of opening an external window for the Serial Monitor, it shows up where the console log is located, as an additional tab. To understand how this works, let’s take a look at how the old editor works:
Serial Monitor on the older version.
Now, let’s take a look at the IDE 2.0. Notice how the Serial Monitor is located at the bottom of the editor:
Serial Monitor on the new version.
The Serial Monitor settings are also located here, such as adjusting the baud rate and sending messages.
Advantages
A major advantage with having the Serial Monitor integrated with the editor is the possibility to have multiple monitors open simultaneously. In the old editor, when changing the port/board, it changed across all windows. In addition, we were limited to one Serial Monitor window, an obstacle that the IDE 2.0 removes.
You will find an example with more information on how to use this feature, further down this tutorial under the Using multiple Serial Monitors simultaneously section.
Different Send Trigger
In the Arduino IDE 1.x Serial Monitor, data can be sent to the board by entering it in the field at the top of the window and then clicking the Send button or pressing the Enter key. In the Arduino IDE 2.0 Serial Monitor you must instead use the Ctrl + Enter keyboard shortcut ( Command + Enter for macOS users).
Using the Serial Monitor Tool
The Serial Monitor tool is a really great tool for debugging and establishing communication between a computer and an Arduino. To use it is really easy, but there are some things that we need to do first.
1. First we need to open the Arduino IDE 2.0.
An empty Arduino IDE sketch window.
2. Now, we need to create a sketch that includes some configurations needed, so that our board can communicate with our computer. Mainly, we need to set a baud rate, which is done by writing . Here, the represents the baud rate, which is the maximum bits per seconds that can be transferred. The sketch that we need to use can be found in the snippet below:
3. This will print , every one second to the Serial Monitor. Let’s select the board we want to use, and upload the sketch to the board.
Select the board and upload the sketch.
4. When it has finished uploading, click on the Serial Monitor button, located at the top right corner of the IDE. This will launch the Serial Monitor in the bottom of the IDE, replacing the console section.
Open the Serial Monitor, and viewing the output.
The text is now printed every one second. Congratulations, you have now successfully sent a message from your Arduino, to your computer.
Using Multiple Serial Monitors Simultaneously
A really cool feature with the Arduino IDE 2.0 is that the Serial Monitor is linked to the sketch windows you have open. For example, if we have two sketch windows, named sketch_1 and sketch_2, we can select the port and board for each window, and have two Serial Monitors running at the same time.
This is really useful when working with various communication / connectivity projects, where we want to know what’s going on both boards at the same time. If you have two Arduino boards, you can try out this feature using the instructions below.
1. First, we need to open a new file, through File > New.
Open a new sketch.
2. Now, we need to choose another board. In this example, we are using an Arduino Nano 33 IoT. If you have connected it to your computer and installed the necessary core for it, it will show up in the board list.
List of available boards.
3. For the new sketch, let’s use the same sketch we uploaded to the other board, but replace the , with something else. In this example, we used , as you can see in the code snippet below:
4. Upload the code to the board, and open the Serial Monitor. We should now see being printed every one second. If we put the two sketch windows side by side, we can see how they are printing at the same time.
Two Serial Monitors running simultaneously.
Congratulations, you can now check what is going on with two boards simultaneously!
Note: Using several sketch windows and Serial Monitor at the same time can be quite heavy on your machine.
More Tutorials
You can find more tutorials in the Arduino IDE 2 documentation page.

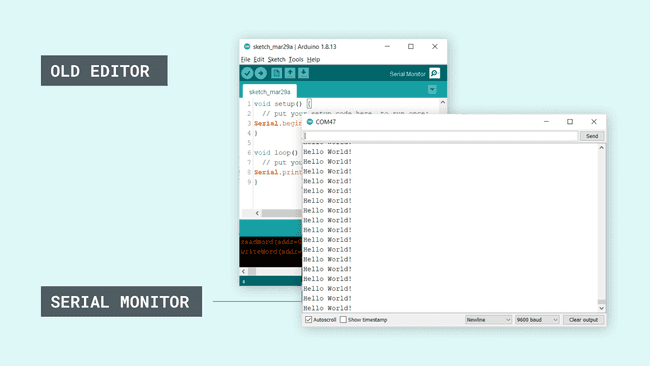 Serial Monitor on the older version.
 Serial Monitor on the new version.
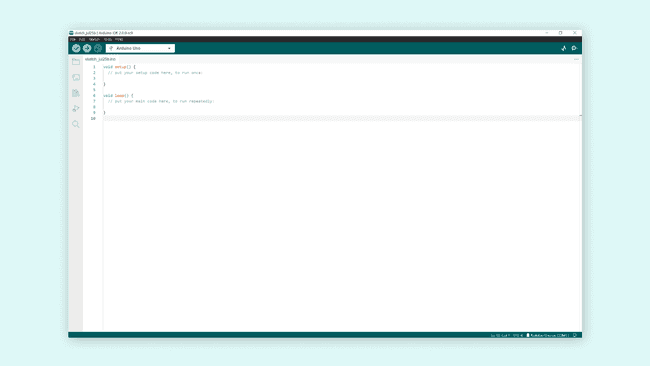 An empty Arduino IDE sketch window.
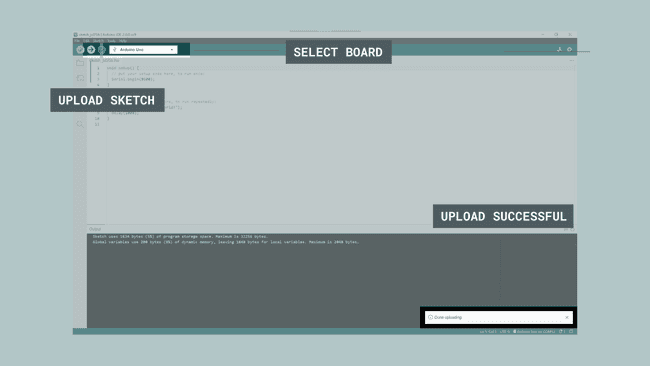 Select the board and upload the sketch.
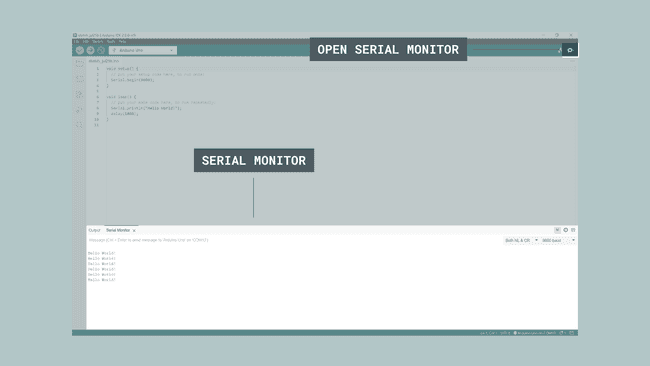 Open the Serial Monitor, and viewing the output.
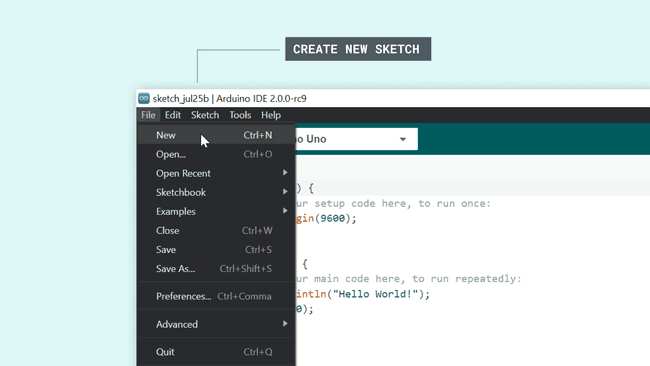 Open a new sketch.
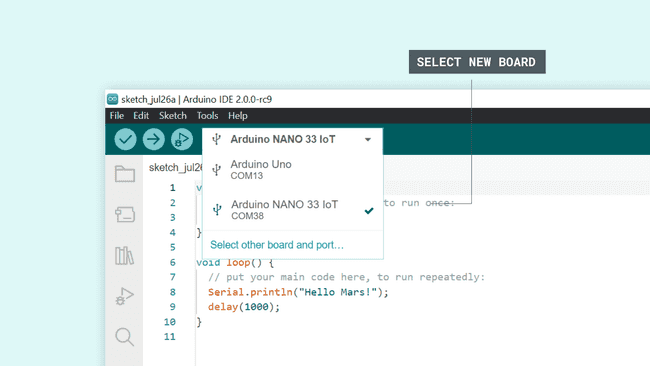 List of available boards.
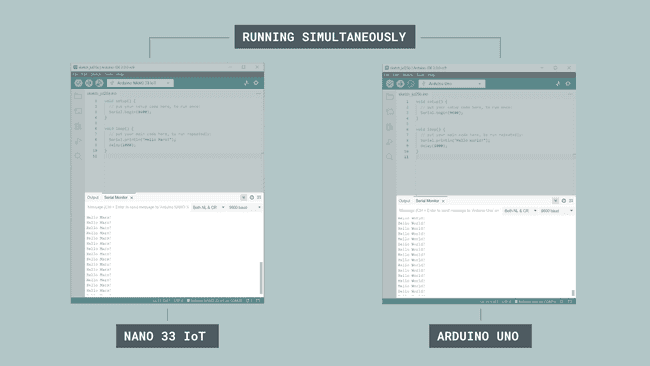 Two Serial Monitors running simultaneously.