Пьезоизлучатель
 Внешний вид
  Fritzing
  Условное обозначение на схеме
Пьезоизлучатель может называться по разному — пищалка, зумер, piezo buzzer или speaker. Суть одна — издать звук.
Обычно в наборах идут два вида пищалок — активный и пассивный. Они похожи и новичка ставят в тупик. Давайте разбираться.
Активный зуммер имеет сверху наклейку с таинственной надписью «Remove seal after washing», которую Гугл-переводчик переводит весьма странно — «снять пломбу после мытья», ещё больше запутывая пользователя. Не обращайте внимания на надпись, это просто технический момент. Во время изготовления детали требуется промывка от флюса, но чтобы не повредить вещь, заклеивают отверстие сверху. Но не торопитесь отклеивать и выбрасывать наклейку, она вам пригодится.

Активный зумер может работать самостоятельно, достаточно просто подать питание. При подключении следут следить за полярностью. На наклейке есть значок плюса (+), но доверять наклейке не стоит, может кто-то не очень аккуратно её наклеил. Лучше посмотрите на ножки. Как правило, одна ножка длиннее другой. Длинная ножка — плюс, короткая — минус. Соедините длинную ножку к питанию 5В, а короткую к земле. Вы сразу услышите противный звук. Именно по этой причине я советовал вам не отклеивать наклейку. Если вы теперь удалите наклейку, то громкость звука станет намного выше. Заклейте немедленно обратно!
Пассивный зумер внешне похож, но всё-таки отличается немного. Сравните их по размерам, а также посмотрите на их снизу. Разница видна. При подключении как из прошлого примера с активным динамиком, вы ничего не услышите. Просто подать питание не достаточно, нужно использовать программные методы, которые есть в составе В Arduino.

Также встречаются в модульном исполнении, например, KY-006 (пассивный) или KY-012 (активный). У модуля три вывода, средний не используется, вывод S соединяется с цифровым выводом платы, а вывод — с GND.
 KY-006
  KY-012
Переходим к программной части. Активный зумер пищит громче и отчётливее, пассивный немного грубовато.
Самый простой способ — подать напряжение на нужный вывод.
При запуске услышим щелчки.
Для более интересных звуков используется функция tone().
Одну ноту играть не интересно. Пусть будет массив из десяти нот.
Если управлять не только нотами, но и их продолжительностью, то можно писать мелодии. Говорят, следующая мелодия воспроизводит «Имперский марш» из «Звёздных войн».
02.Digital: toneMelody (Играем мелодию)
Рассмотрим пример из меню File | Examples | 2.Digital | toneMelody. Обратите внимание, что программа состоит из двух вкладок toneMelody и pitches.h. Файл pitches.h содержит константы для проигрывания звуков различной тональности. Сам файл находится в одной папке с скетчем.
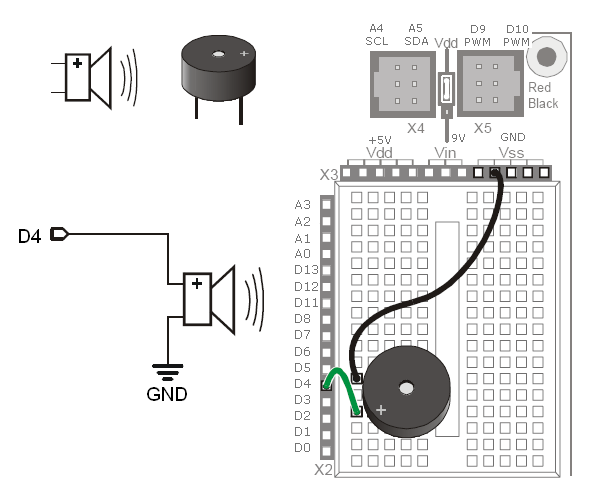
После того, как мы наигрались со светом при помощи светодиодов, пора поиграть со звуком. Для примера нам понадобится пьезоизлучатель, макетная плата и три провода.
Собирается конструкция очень просто — от вывода 8 ведём провод к одному контакту пищалки, а второй контакт присоединяем к GND.

Запустите скетч. Вы услышите мелодию, которая прозвучит один раз. Если вы хотите послушать её ещё раз, то нажмите на кнопку Reset на вашей плате.
В первой строчке мы подключаем заголовочный файл pitches.h при помощи оператора #include. Далее создаётся массив из нот, а также массив из продолжительности проигрывания ноты. Потом идёт цикл, где для каждой ноты вычисляется его продолжительность и вызывается функция tone(), которая и воспроизводит нужный звук. Обратите внимание, что весь код находится в методе setup(), поэтому программа выполняется один раз.
Вот так мы быстро познакомились с новым устройством — пьезоизлучателем, а также научились извлекать мелодию.
Melody
Нашёл ещё один пример с пищалкой.
Пример использует вывод 8.
02.Digital: tonePitchFollower
Ещё один простой пример File | Examples | 02.Digital | tonePitchFollower для извлечения звуков, который зависит от освещённости — вы можете проводить рукой над датчиком освещённости, создавая тем самым разные значения, которые передаются на динамик. В примере упоминается 9-омный динамик, но мы можем использовать и свой пьезоизлучатель.
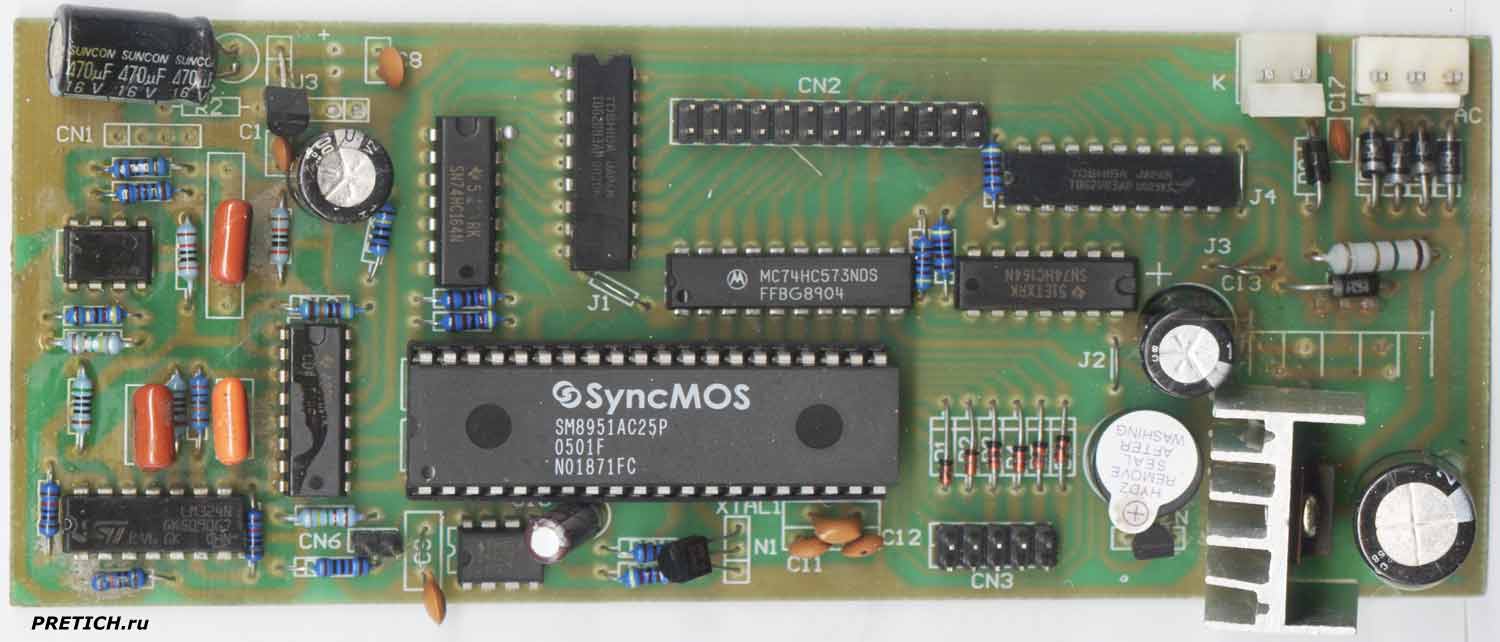
Плата от чего неведомо. программатор?
Валяется у меня эта плата уже давно. пора бы, и выбросить, но прежде я ее опишу, может быть кому-нибудь это и будет полезным.
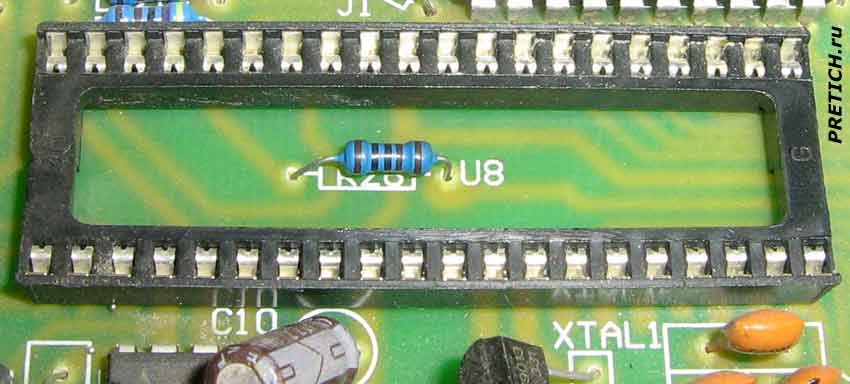
На плате никаких маркировок нет. Есть одна надпись — XTAL1, из которой можно сделать предположение, что эта плата часть какого-то программатора.
+ Щелкните по рисунку, чтобы увеличить!
Итак, плата одностороннего стеклотекстолита, размерами 156 х 66 мм. На плате десять микросхем. Два белых разъема двух и трехпиновые. Вероятно питание. Так как за ними идет диодный мост, затем большой электролитический конденсатор 2200 мкФ на 16 вольт. Алюминиевый радиатор и к нему AN78M09 — это прецизионный стабилизатор положительного напряжения. За радиатором пластмассовый цилиндр с наклейкой — HYDZ REMOVE SEAL AFTER WASHING, это видимо такая наклейка, которая отваливается, если устройство намокнет и значит — фигу вам, а не гарантийный ремонт. Наклеена она на спикерфон, или пищалка, буззер. Если мы его разберем, то выясним, что HYDZ использовали не банальный пьезоэлектрический источник звука, а активный электромагнитный: металлическая тонка мембрана, кольцевой магнит, в центре которого на ферритовый стержень намотана медная обмотка. Отодрав все это, в основании можно обнаружить встроенный, залитый эпоксидной смолой, генератор частоты.
На плате мы видим такие микросхема:
SyncMos SM8951AC25P — это 8-битный микроконтроллер. Эту микросхему выпускают в трех разных типах корпусов, в данном случае самый больший — 40L PDIP. Микросхема имеет 40 ножек, и она ими вставляется в кроватку.
SN74HC164N — восьмиразрядный последовательный сдвиговый регистр с параллельным выходом — на плате две такие микросхемы.
Еще две микросхемы производства TOSHIBA имеющие маркировку TD62083AP — 8-канальный ключ Дарлингтона
MC74HC573NDS — high speed octal D-type latches utilize advanced silicon-gate, с логотипом Motorola
Микросхема с маркировкой 43DHN1K CD4151BE и логотипом Texas Instruments — информации по чипу не найдено.
LM324N 4-канальный операционный усилитель, производства STMicroelectronics
ATMEL 24C02 и это микросхема EEPROM памяти
Еще одна восьминогая микросхема 44cc1YM OP07CP — операционный усилитель со сверхнизким напряжением смещения нуля
На плате два транзистора S9013, и один регулятор напряжения MD7150
На плате видим три группы штыревых разъема, что куда идет — мне неведомо.

+ Щелкните по рисунку, чтобы увеличить!
На обратной стороне платы только дорожки, покрытые зеленым лаком. Элементов нет, нет и никаких маркировок.
На этом описание этой непонятной платы электроники, по моим предположениям — программатора, я заканчиваю.
Михаил Дмитриенко, специально для PRETICH.ru
2016 г.
Fee from what one knows . programmer?
Lying I have this board for a long time . it’s time to, and throw it away, but before I describe it, maybe someone it will be useful.
On the board, there are no markings. There is one inscription — XTAL1, from which you can make the assumption that this fee is part of a programmer.
So one-sided fiberglass board, dimensions 156 x 66 mm. The board of ten chips. Two white connector and two trehpinovye. Probably the food . Because of them is a diode bridge, then a big electrolytic capacitor 2200 uF 16 Volts. Aluminum Radiator and it AN78M09 — a precision regulator positive voltage. For radiator plastic cylinder with a sticker — HYDZ REMOVE SEAL AFTER WASHING, it seems such a sticker that falls off, if the unit gets wet, and then — you will not care, and not a warranty repair. Stick it on the speakerphone, or beeper, buzzer. If we analyze it, then find out what HYDZ used not trivial piezoelectric sound source and an active electromagnetic: a metal thin membrane ring magnet, centered on a ferrite core wound copper coil . tore it all, at the bottom you can find a built-in, filled epoxy resin, a frequency generator.
On the board, we see such a chip:
SyncMos SM8951AC25P — an 8-bit microcontroller. This chip is available in three different types of buildings, in this case the biggest — 40L PDIP. The chip has 40 feet, and it is inserted into their bed.
SN74HC164N — eight-bit serial shift register with a parallel output — on board two such chips.
Two TOSHIBA chip production have marked TD62083AP — 8-channel key Darlington
MC74HC573NDS — high speed octal D-type latches utilize advanced silicon-gate, with the Motorola logo
The device marked 43DHN1K CD4151BE logo and Texas Instruments — information on the chip is not found .
LM324N 4-channel operational amplifier STMicroelectronics production
ATMEL 24C02 and this chip EEPROM memory
Another Octopus chip 44cc1YM OP07CP — operational amplifier with ultra low offset voltage
On two transistors S9013 motherboard, and one voltage regulator MD7150
The board can see three groups of pin connector that goes where — unknown to me .
On the reverse side of the board only track, covered with green paint. Elements no, no and no markings .
This description of this strange electronics board, in my assumptions — programmer, I finish.
Michael Dmitrienko, especially for PRETICH.ru

| Комментарии |
| Нет комментариев. |
| Добавить комментарий |
| Пожалуйста, авторизуйтесь для добавления комментария. |
| Реклама |
| Авторизация |