Установка библиотек в Arduino IDE
Общие сведения:
Многие скетчи (программы) работают с библиотеками. Библиотека облегчает работу с определённым модулем или одним из типов модулей. Например, если Вы хотите вывести текст на LCD дисплей без подключения библиотеки, то Вам нужно передать ему несколько байт команд и данных, что займет несколько строк кода, а главное, что Вам нужно знать тип микроконтроллера под управлением которого работает LCD дисплей, назначение команд которыми он управляется, знать архитектуру его памяти, адреса и назначение регистров, для чего потребуется найти и перечитать его datasheet. В то время как при написании кода с использованием библиотеки (например LiquidCrystal_I2C.h) Вы сможете вывести текст на дисплей вызвав всего одну функцию библиотеки: lcd.print(«my text»);
Перед тем как начать пользоваться методами и функциями библиотеки, её нужно скачать (загрузить на Ваш компьютер), установить (разместить в нужной папке) и подключить (вставить текст «#include » в скетч).
Скачивание библиотеки:
Если в наших уроках, описаниях или примерах используется библиотека, то мы указываем ссылку на скачивание этой библиотеки. Все наши библиотеки находятся в zip архиве, но не спешите доставать файлы из архива, это может не понадобиться, т.к. Arduino IDE сама может распаковывать архивы и размещать библиотеки в нужных папках (см. дальше).
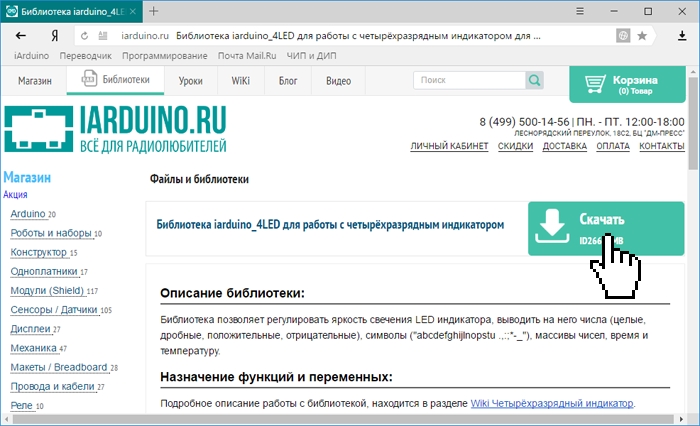
Если Вы скачали архив библиотеки с сайта не указывая путь для сохранения файла, то скаченный (загруженный) Вами файл скорее всего находится в папке: Этот компьютер > Загрузки.
Установка библиотеки:
После того как Вы скачали (загрузили) библиотеку на свой компьютер, её нужно установить. Установить библиотеку можно вручную или сделать это средствами Arduino IDE:
Установка библиотеки средствами Arduino IDE:
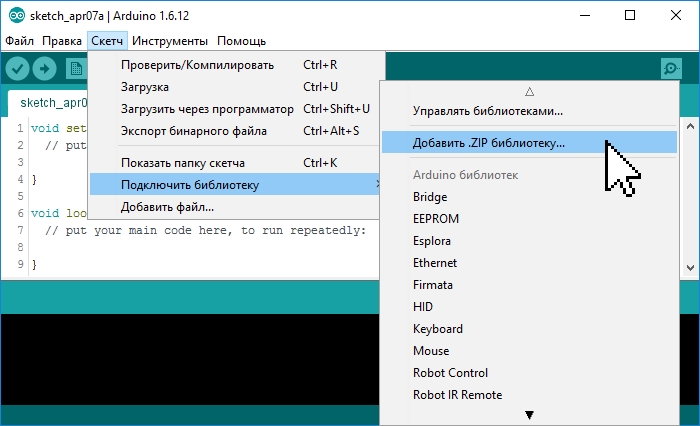
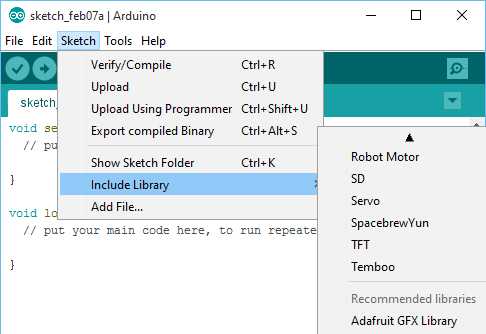
Войдите в меню: Скетч > Подключить библиотеку > Добавить .ZIP библиотеку. .
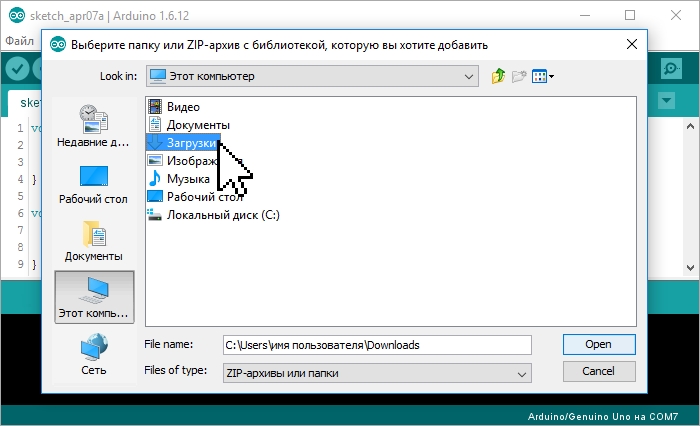
В появившемся окне нажмите на иконку «Этот компьютер» и выберите папку «Загрузки». Если при скачивании ZIP архива с сайта, Вы указывали путь для сохранения файла, то вместо папки «Загрузки» укажите путь к файлу.
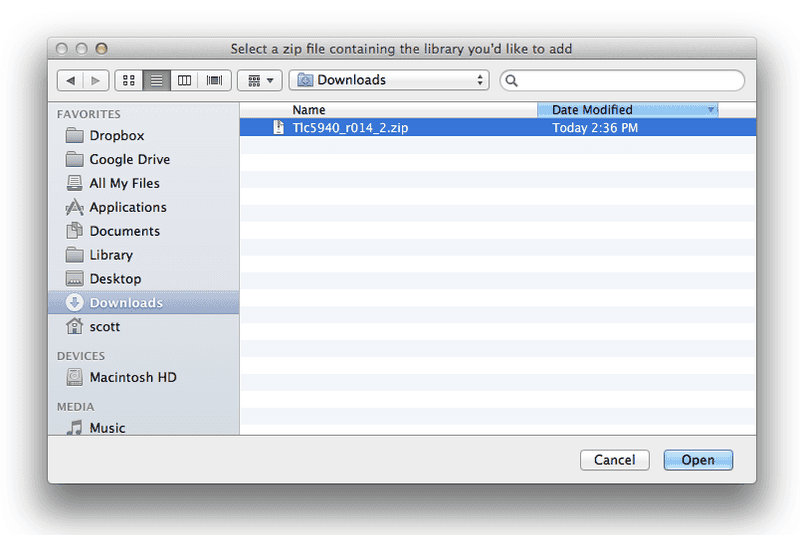
Выберите ZIP файл библиотеки, который Вы скачали. Название файла может не соответствовать названию библиотеки. После чего нажмите на кнопку «Открыть» (Open).
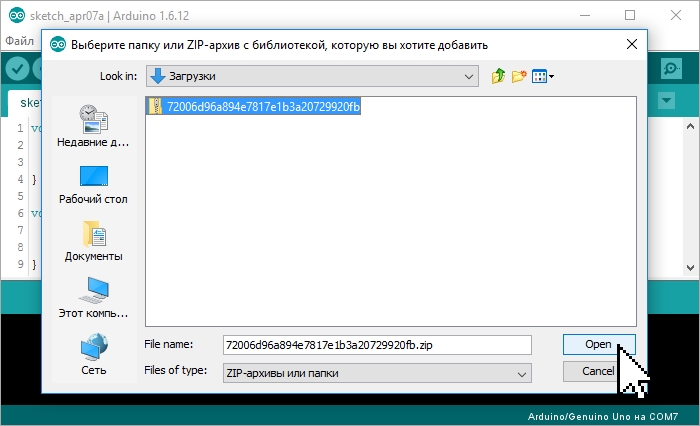
На этом установка библиотеки завершена, можно приступить к её подключению в скетч.
Установка библиотеки вручную:
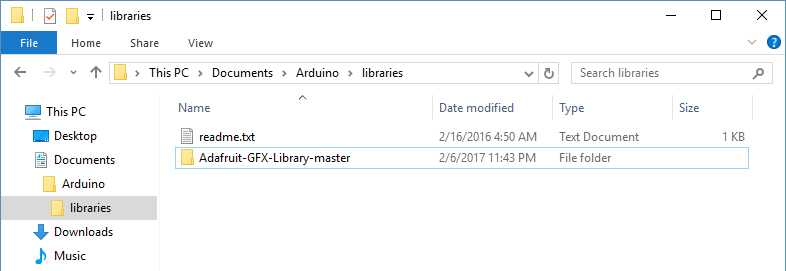
Распакуйте скаченный Вами ZIP архив и поместите папку (имя папки обычно совпадает с названием библиотеки) из данного архива в папку: Этот компьютер > Документы > Arduino > libraries.
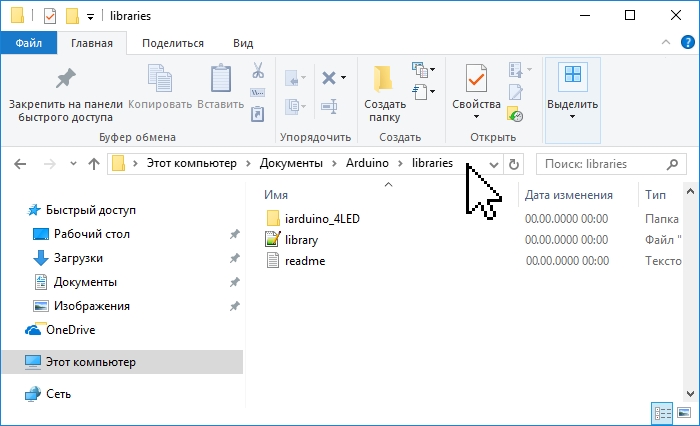
Если во время копирования Arduino IDE была запущена (открыта), то нужно закрыть все окна этой программы, после чего запустить (открыть) Arduino IDE и можно приступать к подключению библиотеки в скетч.
Примечание: папка libraries есть не только по указанному выше пути, но и в папке программы Arduino IDE (где находится файл arduino .exe). Скопировав библиотеку в эту папку, она тоже установится, но Мы не рекомендуем это делать. Дело в том, что программа Arduino IDE постоянно развивается и количество её версий постоянно растёт. Если Вы захотите установить новую версию Arduino IDE, то библиотеки находящиеся в папке Этот компьютер > Документы > Arduino > libraries, будут доступны и в старой, и в новой (установленной) версии Arduino IDE, а библиотеки находящиеся в папке libraries программы Arduino IDE старой версии (которая была установлена ранее) будут доступны только в ней (пока Вы их не скопируете в новую).
Подключение библиотеки:
Для того чтобы подключить библиотеку, нужно написать всего одну строку в начале скетча: «#include «, например:
Некоторые библиотеки работают используя методы и функции других библиотек, тогда нужно подключать две библиотеки, сначала подключается та, методы и функции которой использует вторая, например:
Для работы с большинством библиотек, нужно создать объект (экземпляр класса библиотеки), через который будут доступны их функции и методы, например:
Вместо lcd можно написать любое слово или сочетание букв и цифр, это название объекта через который можно обращаться к методам и функциям библиотеки. Если Вместо lcd Вы написали myLCD, то и ко всем методам и функциям библиотеки LiquidCrystal_I2C, нужно обращаться через указанное Вами имя объекта, например: myLCD.print(«my text»);
Примеры из библиотек:
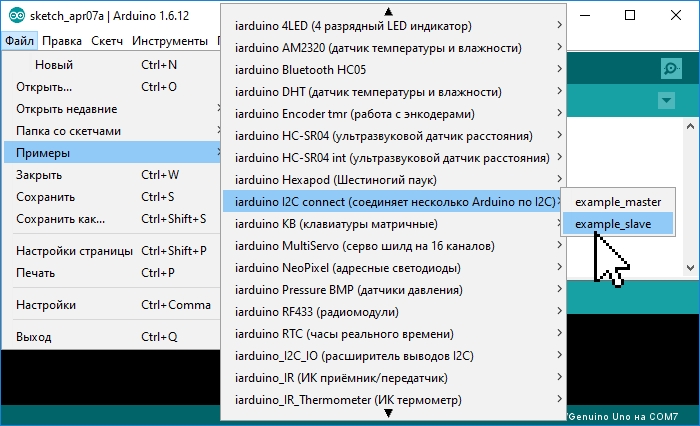
Большинство библиотек содержат примеры. Это небольшие скетчи (программы) которые раскрывают функционал библиотеки. Наиболее удобный способ просмотра примеров, с помощью средств Arduino IDE. Выберите пункт меню: Файл > Примеры, откроется список с названиями библиотек у которых есть примеры. Наведите курсор на название библиотеки и Вы увидите список примеров содержащихся в ней, клик на примере приведёт к появлению нового окна Arduino IDE со скетчем примера.
Альтернативный способ просмотра примеров заключается в запуске файлов скетчей из папки:
путь > libraries > название библиотеки > examples > название примера.
Поиск библиотек:
Библиотеки можно искать самостоятельно, а можно воспользоваться функционалом Arduino IDE.
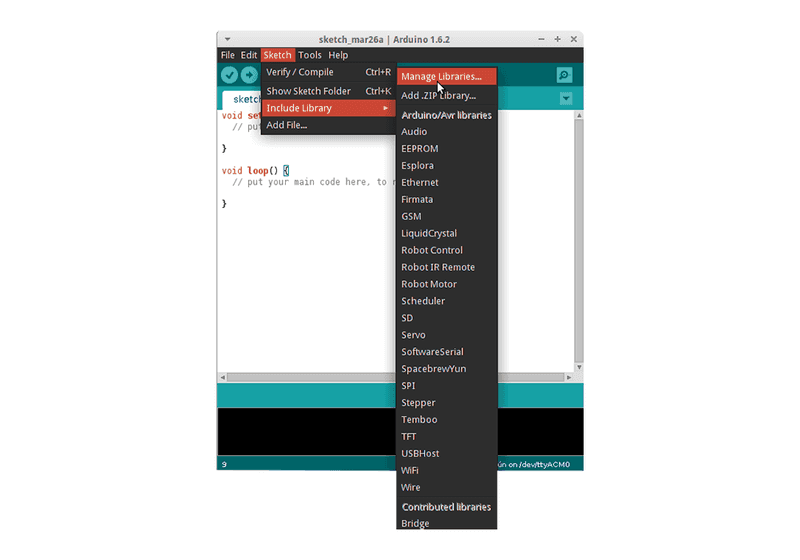
Выберите пункт меню: Скетч > Подключить библиотеку > Управлять библиотеками. .
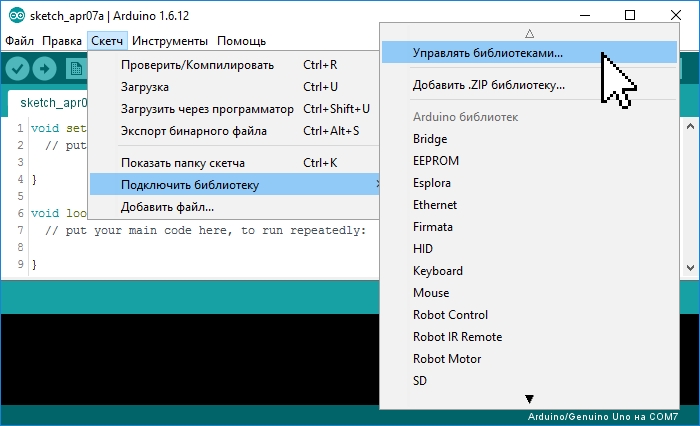
Откроется «Менеджер библиотек», в котором можно найти интересующую Вас библиотеку введя её название в строку поиска, дополнительно можно установить пункты «Тип» и «Тема».
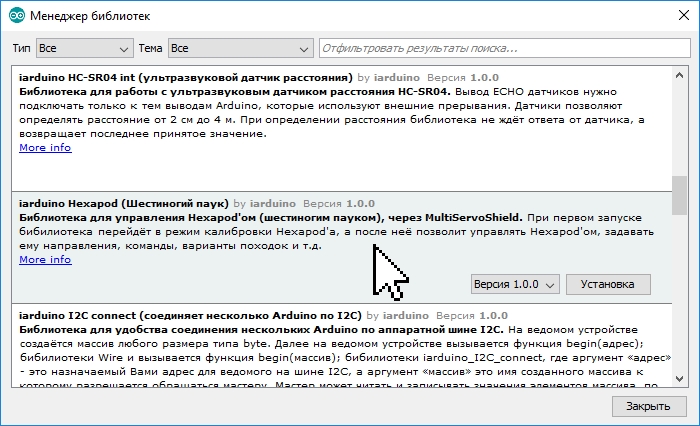
Нажатие на описании библиотеки приведёт к появлению вкладки «Версия» и кнопки «Установка». После нажатия на кнопку «Установка» можно приступать к подключению библиотеки в скетч «#include «.
Installing Additional Arduino Libraries
Once you are comfortable with the Arduino software and using the built-in functions, you may want to extend the ability of your Arduino with additional libraries.
What are Libraries?
Libraries are a collection of code that makes it easy for you to connect to a sensor, display, module, etc. For example, the built-in LiquidCrystal library makes it easy to talk to character LCD displays. There are hundreds of additional libraries available on the Internet for download. The built-in libraries and some of these additional libraries are listed in the reference. To use the additional libraries, you will need to install them.
How to Install a Library
Using the Library Manager
To install a new library into your Arduino IDE you can use the Library Manager (available from IDE version 1.6.2). Open the IDE and click to the «Sketch» menu and then Include Library > Manage Libraries.
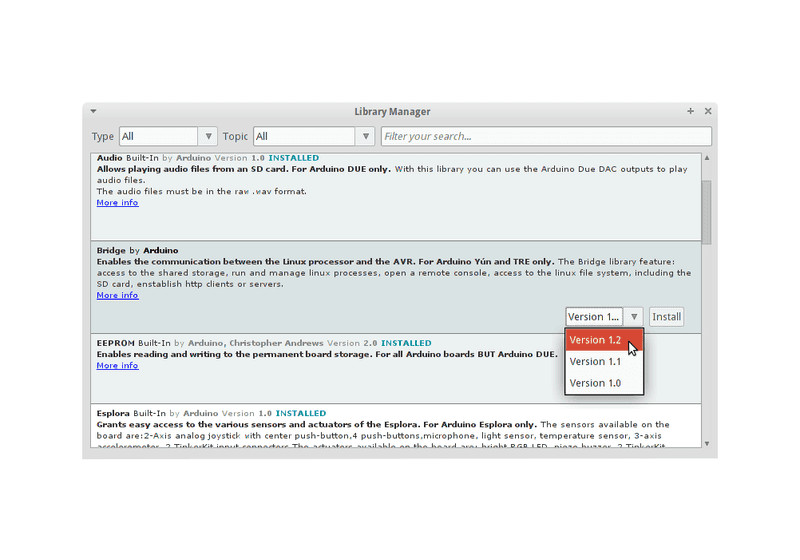
Then the Library Manager will open and you will find a list of libraries that are already installed or ready for installation. In this example we will install the Bridge library. Scroll the list to find it, click on it, then select the version of the library you want to install. Sometimes only one version of the library is available. If the version selection menu does not appear, don’t worry: it is normal.
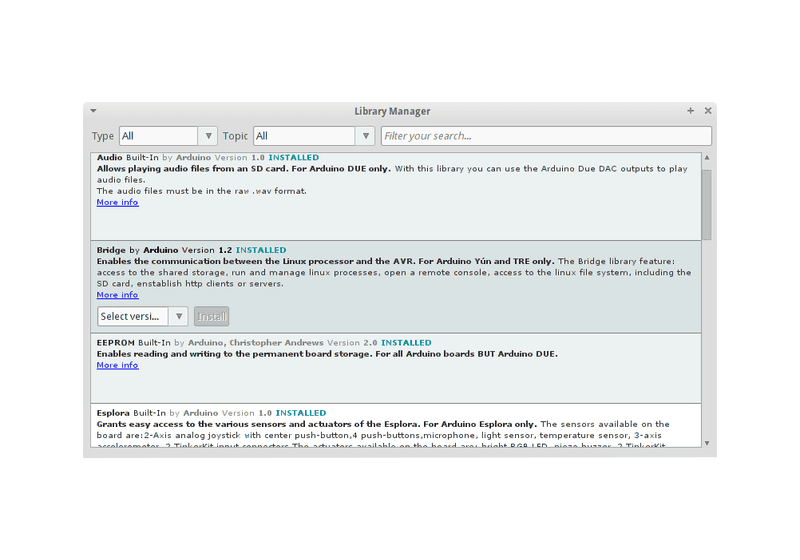
Finally click on install and wait for the IDE to install the new library. Downloading may take time depending on your connection speed. Once it has finished, an Installed tag should appear next to the Bridge library. You can close the library manager.
You can now find the new library available in the Sketch > Include Library menu. If you want to add your own library to Library Manager, follow these instructions.
Importing a .zip Library
Libraries are often distributed as a ZIP file or folder. The name of the folder is the name of the library. Inside the folder will be a .cpp file, a .h file and often a keywords.txt file, examples folder, and other files required by the library. Starting with version 1.0.5, you can install 3rd party libraries in the IDE. Do not unzip the downloaded library, leave it as is.
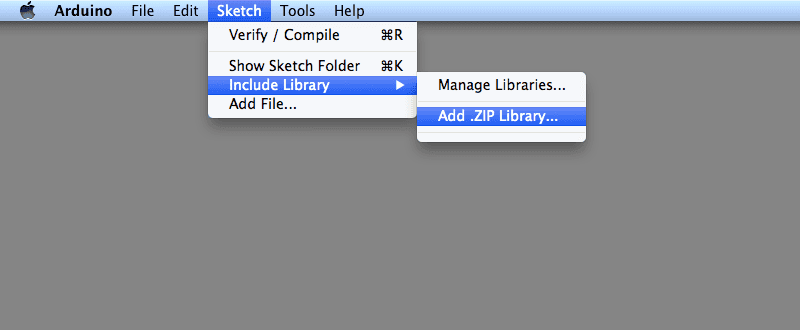
In the Arduino IDE, navigate to Sketch > Include Library > Add .ZIP Library. At the top of the drop down list, select the option to «Add .ZIP Library».
You will be prompted to select the library you would like to add. Navigate to the .zip file’s location and open it.
Return to the Sketch > Include Library menu. menu. You should now see the library at the bottom of the drop-down menu. It is ready to be used in your sketch. The zip file will have been expanded in the libraries folder in your Arduino sketches directory.
NB: the Library will be available to use in sketches, but with older IDE versions examples for the library will not be exposed in the File > Examples until after the IDE has restarted.
Manual installation
When you want to add a library manually, you need to download it as a ZIP file, expand it and put in the proper directory. The ZIP file contains all you need, including usage examples if the author has provided them. The library manager is designed to install this ZIP file automatically as explained in the former chapter, but there are cases where you may want to perform the installation process manually and put the library in the libraries folder of your sketchbook by yourself.
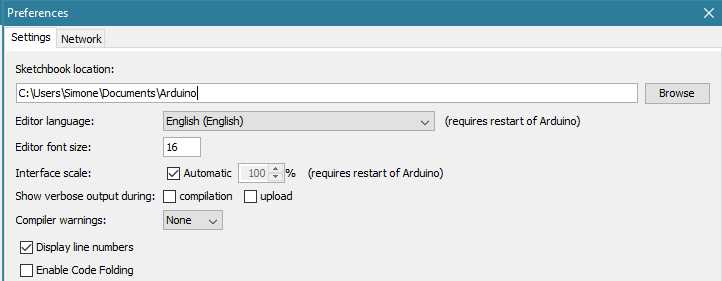
You can find or change the location of your sketchbook folder at File > Preferences > Sketchbook location.
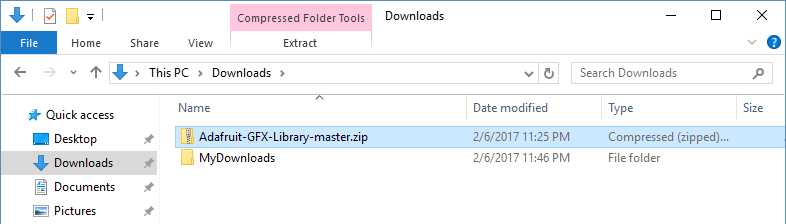
Go to the directory where you have downloaded the ZIP file of the library
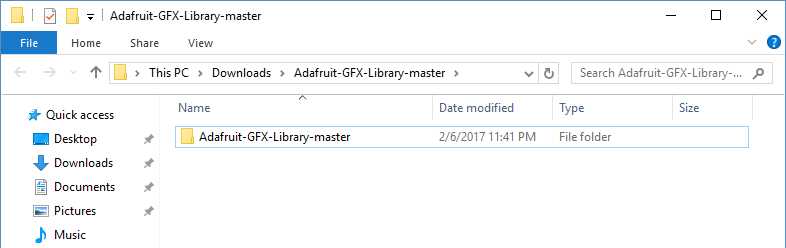
Extract the ZIP file with all its folder structure in a temporary folder, then select the main folder, that should have the library name
Copy it in the «libraries» folder inside your sketchbook.
Start the Arduino Software (IDE), go to Sketch > Include Library. Verify that the library you just added is available in the list.
Please note: Arduino libraries are managed in three different places: inside the IDE installation folder, inside the core folder and in the libraries folder inside your sketchbook. The way libraries are chosen during compilation is designed to allow the update of libraries present in the distribution. This means that placing a library in the «libraries» folder in your sketchbook overrides the other libraries versions.
The same happens for the libraries present in additional cores installations. It is also important to note that the version of the library you put in your sketchbook may be lower than the one in the distribution or core folders, nevertheless it will be the one used during compilation. When you select a specific core for your board, the libraries present in the core’s folder are used instead of the same libraries present in the IDE distribution folder.
Last, but not least important is the way the Arduino Software (IDE) upgrades itself: all the files in Programs/Arduino (or the folder where you installed the IDE) are deleted and a new folder is created with fresh content. This is why we recommend that you only install libraries to the sketchbook folder so they are not deleted during the Arduino IDE update process.
This tutorial based on text by Limor Fried.
Installing Additional Arduino Libraries
Once you are comfortable with the Arduino software and using the built-in functions, you may want to extend the ability of your Arduino with additional libraries.
What are Libraries?
Libraries are a collection of code that makes it easy for you to connect to a sensor, display, module, etc. For example, the built-in LiquidCrystal library makes it easy to talk to character LCD displays. There are hundreds of additional libraries available on the Internet for download. The built-in libraries and some of these additional libraries are listed in the reference. To use the additional libraries, you will need to install them.
How to Install a Library
Using the Library Manager
To install a new library into your Arduino IDE you can use the Library Manager (available from IDE version 1.6.2). Open the IDE and click to the «Sketch» menu and then Include Library > Manage Libraries.
Then the Library Manager will open and you will find a list of libraries that are already installed or ready for installation. In this example we will install the Bridge library. Scroll the list to find it, click on it, then select the version of the library you want to install. Sometimes only one version of the library is available. If the version selection menu does not appear, don’t worry: it is normal.
Finally click on install and wait for the IDE to install the new library. Downloading may take time depending on your connection speed. Once it has finished, an Installed tag should appear next to the Bridge library. You can close the library manager.
You can now find the new library available in the Sketch > Include Library menu. If you want to add your own library to Library Manager, follow these instructions.
Importing a .zip Library
Libraries are often distributed as a ZIP file or folder. The name of the folder is the name of the library. Inside the folder will be a .cpp file, a .h file and often a keywords.txt file, examples folder, and other files required by the library. Starting with version 1.0.5, you can install 3rd party libraries in the IDE. Do not unzip the downloaded library, leave it as is.
In the Arduino IDE, navigate to Sketch > Include Library > Add .ZIP Library. At the top of the drop down list, select the option to «Add .ZIP Library».
You will be prompted to select the library you would like to add. Navigate to the .zip file’s location and open it.
Return to the Sketch > Include Library menu. menu. You should now see the library at the bottom of the drop-down menu. It is ready to be used in your sketch. The zip file will have been expanded in the libraries folder in your Arduino sketches directory.
NB: the Library will be available to use in sketches, but with older IDE versions examples for the library will not be exposed in the File > Examples until after the IDE has restarted.
Manual installation
When you want to add a library manually, you need to download it as a ZIP file, expand it and put in the proper directory. The ZIP file contains all you need, including usage examples if the author has provided them. The library manager is designed to install this ZIP file automatically as explained in the former chapter, but there are cases where you may want to perform the installation process manually and put the library in the libraries folder of your sketchbook by yourself.
You can find or change the location of your sketchbook folder at File > Preferences > Sketchbook location.
Go to the directory where you have downloaded the ZIP file of the library
Extract the ZIP file with all its folder structure in a temporary folder, then select the main folder, that should have the library name
Copy it in the «libraries» folder inside your sketchbook.
Start the Arduino Software (IDE), go to Sketch > Include Library. Verify that the library you just added is available in the list.
Please note: Arduino libraries are managed in three different places: inside the IDE installation folder, inside the core folder and in the libraries folder inside your sketchbook. The way libraries are chosen during compilation is designed to allow the update of libraries present in the distribution. This means that placing a library in the «libraries» folder in your sketchbook overrides the other libraries versions.
The same happens for the libraries present in additional cores installations. It is also important to note that the version of the library you put in your sketchbook may be lower than the one in the distribution or core folders, nevertheless it will be the one used during compilation. When you select a specific core for your board, the libraries present in the core’s folder are used instead of the same libraries present in the IDE distribution folder.
Last, but not least important is the way the Arduino Software (IDE) upgrades itself: all the files in Programs/Arduino (or the folder where you installed the IDE) are deleted and a new folder is created with fresh content. This is why we recommend that you only install libraries to the sketchbook folder so they are not deleted during the Arduino IDE update process.
This tutorial based on text by Limor Fried.