Arduino button counter
I was using Arduino but I encountered problems with my code. I want a button to illuminate certain lights, and every time you press it, the lights will illuminate in a different pattern. Right now, the code does not keep track of how many times the button has been pressed. I would really appreciate any help!
2 Answers 2
In my opinion, the problem is that you don’t have a clear idea of what you want to do :-)
The first error is logical: you cannot count the number of button presses, because when you have pressed the button once, the program returns «one», and executes the pattern one. The next time you press the button, the program returns «one» again, and so on. So, you have to change your logic (for example, when you press the first time, execute pattern one, when you press the second time, execute the pattern two).
The second error is the handling of the button press. Assuming that your button is pressed if it returns zero (we say «active low»), probably your program will count a few dozens of times before you release it. The cause of this is in the fact you don’t have «debounced» it.
The «bouncing» effect is that your Arduino is faster than you, and if you press a button for a tenth of a second, Arduino loops several times finding the button pressed and counting many «presses».
To avoid this, when you find it pressed (buttonstate = 0), you must perform the illumination task, and wait until buttonstate becomes != 0. Also you must move the instruction «buttonstate = digitalRead(buttonPin);» within the loop() function in order to read continuously the status of the button.
I «dumped» some ideas to make it work; try to write it better, and if there are problems, ask again.
State Change Detection (Edge Detection) for pushbuttons
LAST REVISION: 10/05/2022, 01:00 PM
Once you’ve got a pushbutton working, you often want to do some action based on how many times the button is pushed. To do this, you need to know when the button changes state from off to on, and count how many times this change of state happens. This is called state change detection or edge detection. In this tutorial we learn how to check the state change, we send a message to the Serial Monitor with the relevant information and we count four state changes to turn on and off an LED.
Hardware Required
momentary button or switch
10k ohm resistor
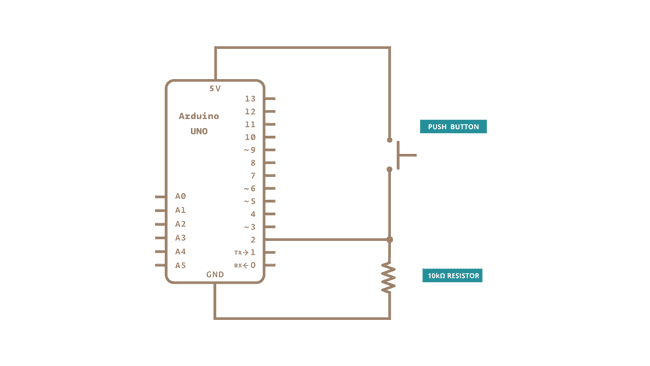
Circuit

Connect three wires to the board. The first goes from one leg of the pushbutton through a pull-down resistor (here 10k ohm) to ground. The second goes from the corresponding leg of the pushbutton to the 5 volt supply. The third connects to a digital I/O pin (here pin 2) which reads the button’s state.
When the pushbutton is open (unpressed) there is no connection between the two legs of the pushbutton, so the pin is connected to ground (through the pull-down resistor) and we read a LOW. When the button is closed (pressed), it makes a connection between its two legs, connecting the pin to voltage, so that we read a HIGH. (The pin is still connected to ground, but the resistor resists the flow of current, so the path of least resistance is to +5V.)
If you disconnect the digital I/O pin from everything, the LED may blink erratically. This is because the input is «floating» — that is, not connected to either voltage or ground. It will more or less randomly return either HIGH or LOW. That’s why you need a pull-down resistor in the circuit.
Schematic
The sketch below continually reads the button’s state. It then compares the button’s state to its state the last time through the main loop. If the current button state is different from the last button state and the current button state is high, then the button changed from off to on. The sketch then increments a button push counter.
The sketch also checks the button push counter’s value, and if it’s an even multiple of four, it turns the LED on pin 13 ON. Otherwise, it turns it off.
Learn more
You can find more basic tutorials in the built-in examples section.
You can also explore the language reference, a detailed collection of the Arduino programming language.
Arduino Push Button Counter Code LCD Circuit and working
by admin · Published September 20, 2020 · Updated March 15, 2021
A counter is a device that counts the number of times when a particular event occurs.
Here we count the number of times the push switch has been pressed. The Arduino detects a transition of input from a LOW state to the HIGH state during switch press; that is the value of counting variable increments for a positive edge triggering.
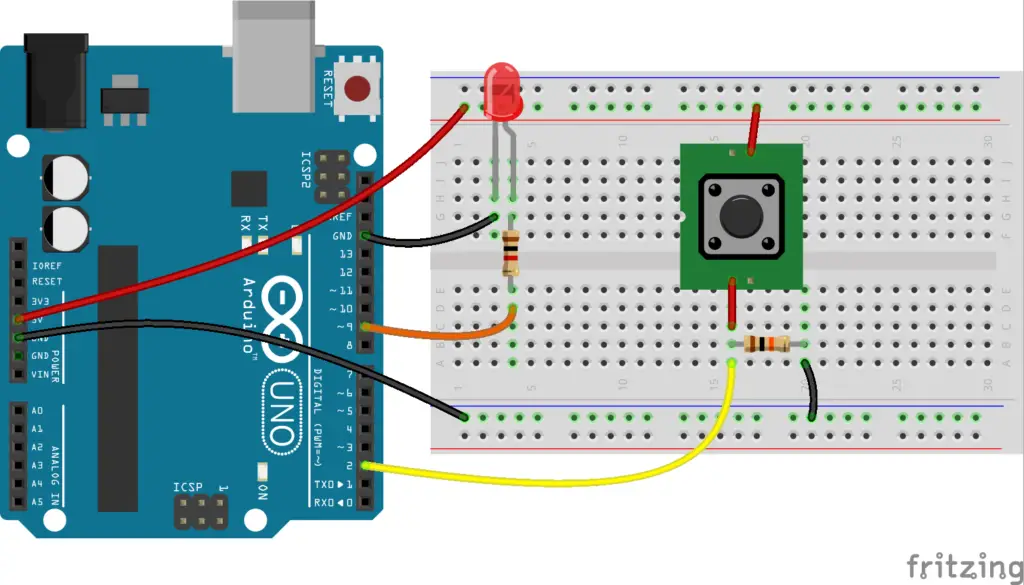
In the circuit, the push switch is connected to a digital pin of the Arduino; here at pin 9. When the push switch has pressed the LED ON for half a seconds and then OFF, it is provided just for an indication that the switch press has been detected or the value has been incremented by one.
The counter is designed for a positive edge trigger, hence it only increments the count variable on a positive edge irrespective of how long the switch is held ON. In order to do that we have added a variable called “prestate”. The counter value increments only when two conditions are satisfied, that is the input state is high and the value of prestate is 0. Once the switch is pressed, along with incrementing and flashing the LED the value of prestate also set to 1; as you can see in the code area inside the if condition.
As long as the switch is held ON the prestate remains 1 and it sets to 0 only when the switch is released. So the code allows us to increment the variable only for positive edges of the input. This logic is similar to a toggle switch which ON and OFF the output for alternative switch ON of the same input; usually a toggle switch responds for a positive edge trigger.
Arduino counter code
If we use code as given below, without a variable to detect the previous state then the counter value keeps incrementing as long as the switch is held ON.
Push button up down counter Arduino
The arrangement is similar to above, the only difference is an additional input switch and a few lines of code to add the decrement function to the counter. Here, one switch press increments the value whereas the seconds switch decrements the value.
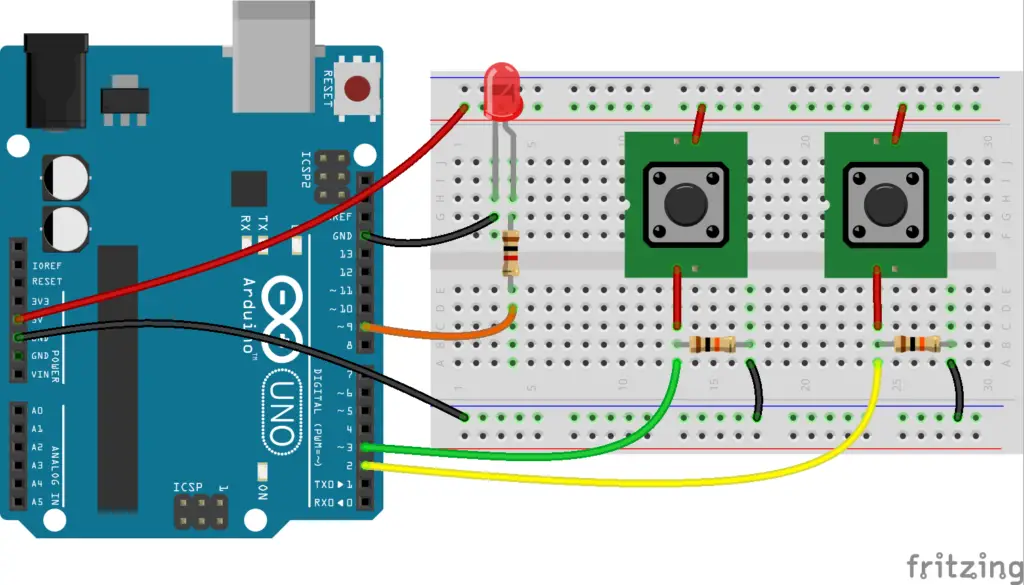
Here in the code, when we press the first switch the first “if” condition becomes true as the input at pin2 is high and the prestate is 0. Once the switch is held on the variable prestate is 1 and stops further counting. Even if we press the second switch it doesn’t decrement the variable as the prestate is still 1 and its value doesn’t change to 0 unless both switches are released.
So in order to increment or decrement both the inputs must be at a low state before applying the high state at any of the inputs.
Code for increment and decrement counter
Up Down Counter with LCD display
In the above codes, the counter value was displayed on the serial monitor, the same can displayed on an LCD display.
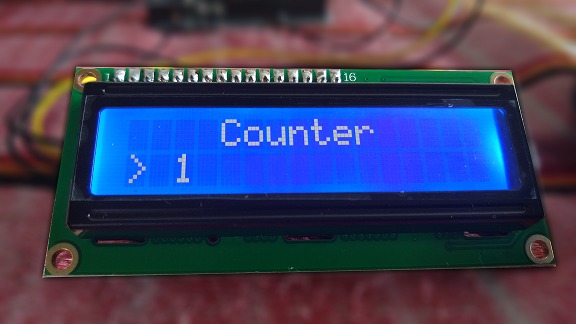
The below code is for an LCD interface with the Arduino using an I2C module, refer to the Arduino LCD interface to use an LCD display with or without an I2C adapter.
Dash Electro
Find fresh tutorials related to Arduino, Raspberry Pi, 555 Timer and many more microcontrollers. Learn something new everyday!
Monday, 15 December 2014
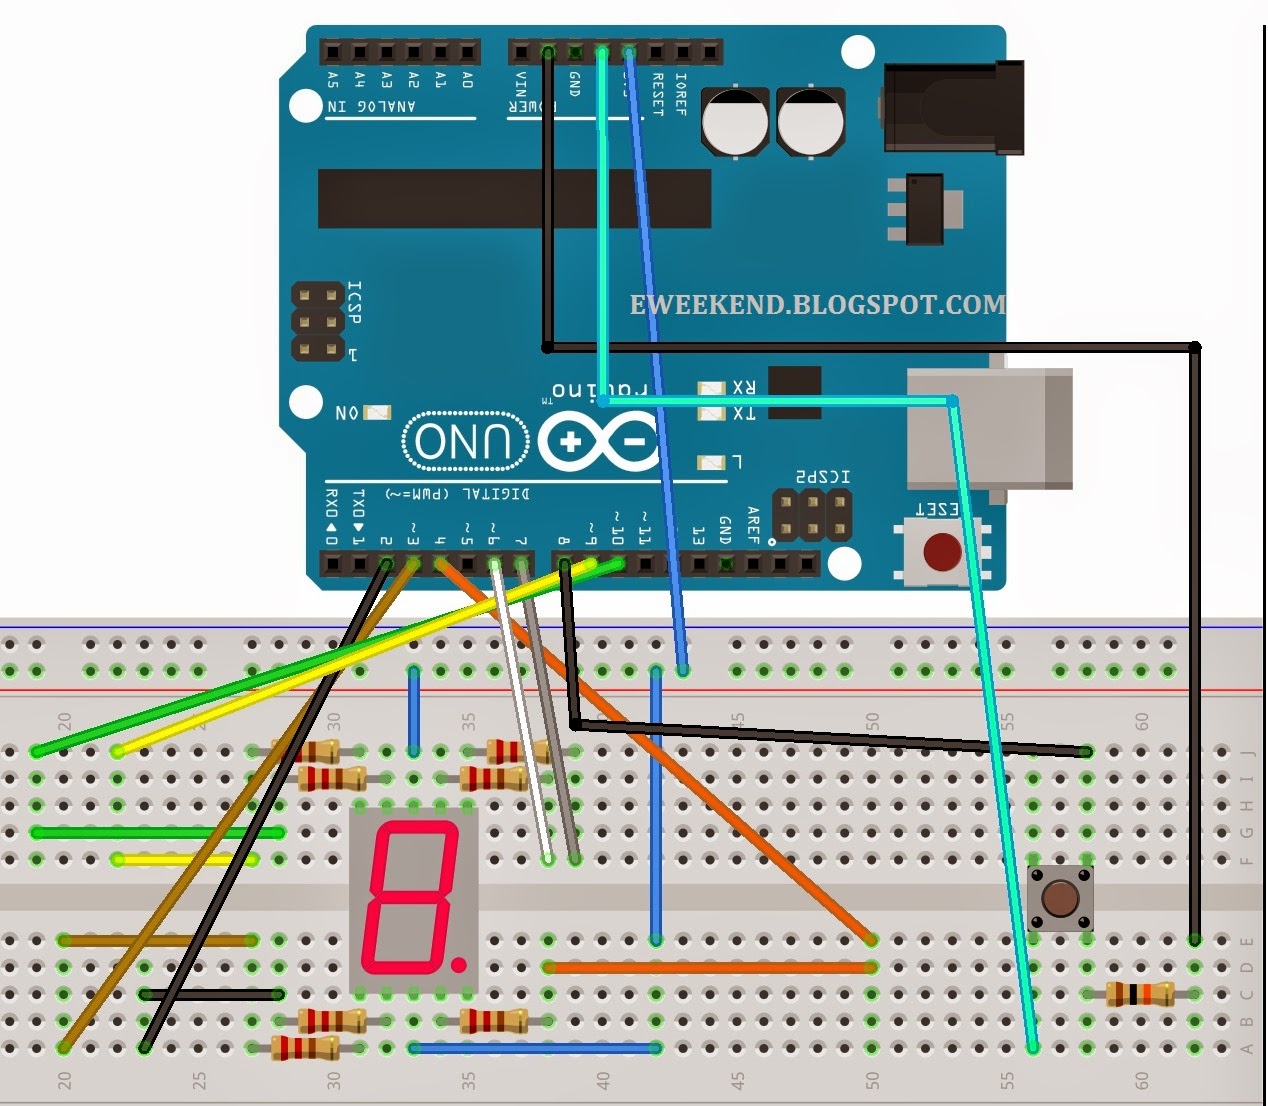
Button Counter using 7 segment display [ARDUINO]

Last project clearly demonstrated how easily you can program the Arduino to display the required number or character on the 7 segment display. This one, is a clever application of the concept.
What it does?
This project simply uses a push button and one 7 segment display to show the number of times the given button was pressed. After it reaches 9, it will automatically go back to 0 and cycle again.
How it works?
This works on a very simple note. The push button changes the variable in the code and assigns a value to it. The code then matches a simple condition which changes the output values and displays the required number.
Materials Required:
1. Arduino UNO
2. 1 Tactile Push Button
3. Breadboard
4. Jumper cables
5. One 10KOhm resistor
6. Seven 330 resistors
Procedure:
1. Wire up the components as shown in the picture below. (Click on it to enlarge)
2. Upload the code
3. Test the button!
Video: COMING SOON! So, here ends the simple yet important demonstration of the seven segment display which we shall use in future projects wherever needed. So, stay tuned and check out the site next weekend! Bye and comment below for any doubts.
lendres/ButtonSuite-Arduino
Use Git or checkout with SVN using the web URL.
Work fast with our official CLI. Learn more.
Launching GitHub Desktop
If nothing happens, download GitHub Desktop and try again.
Launching GitHub Desktop
If nothing happens, download GitHub Desktop and try again.
Launching Xcode
If nothing happens, download Xcode and try again.
Launching Visual Studio Code
Your codespace will open once ready.
There was a problem preparing your codespace, please try again.
Latest commit
Git stats
Files
Failed to load latest commit information.
README.md
A library for using a simple mechanical push (momentary) button as a momentary button, a latching button, a counter, an enumerator, and more. The library allows a mechanical momentary button to be used as a virtual button with different functionality. The library implements the behavior of a momentary button, a latching button, a counter, an enumerator, and more. It also makes it very easy to develop buttons with your own custom behavior. The Bounce2 library is used to add debouncing functionality.
Note that because some input devices like optical sensors or limit switches are functionally equivilent to tactile buttons, they can also be used with this library.
Types of Buttons
This library contains two categories of button types. The first category is two state buttons; these are either on or off. The second category provides incrementing buttons that can perform different types of counting. These two categories of buttons are described here. See «Software Design» below for information about how the source code implements these behaviors.
Two State Buttons
These are binary state buttons and can only be on or off.
This is standard push (momentary) button. It returns true when the button is pressed (held down) and false when it is not.
Turns a push button (momentary button) into a toggle button (latching button). Pressing the button alternates between on (true) and off (false). This is a virtual latching switch controled by a mechanical momentary button.
This button class captures each individual button press as discrete events. It does not matter how long the button is pressed down or released. Only the transition between pressed and released is captured. It can capture either the press event or the release event.
Always returns that the button is on. Useful if you want to temporarily disable user input.
Always returns that the button is off. Useful if you want to temporarily disable user input.
These buttons provide different types of counting behavior.
Turns a push button (momentary button) into a counter. The counter is incremented each time the button is pushed. The counter continues to increment until it is reset either by the user (with a long press) or programically.
Turns a push button (momentary button) into a button used to cycle through states (for example, an enumeration). Pressing the button causes the value to increment. Once the maximum value is reached, the value automatically resets to the initial value. The value can also be reset to the initial value programmically or by the user (with a long press).
Visit the Wiki to learn how the software is designed.
About the Library
The purpose of Version 2 was to greatly simplify the interface as well as the internal structure of the software. Some of the more esoteric functionality was removed and some functionality was separated into different classes. This meant backwards compatibility could not be maintained, however, the benefit is a much cleaner and easier to understand library.
This library requires the following librarys to run:
For information on installing Arduino libaries, see: Arduino Libraries
We use SemVer for versioning.
This project is licensed under the MIT License — see the LICENSE file for details.
About
A set of button classes to create different behavior for momentary buttons.