46 camera projects
![]()
Want to build your own TinyML image recognition application? This blog contains all the necessary details for you to get started
Tutorial : TinyML with OV7670 Camera module!
Project tutorial by Vishwa
Track your face using OpenCV’s facial recognition.
Face Tracker Using OpenCV and Arduino
Project showcase by Shubham Santosh
- 82,360 views
- 58 comments
- 147 respects
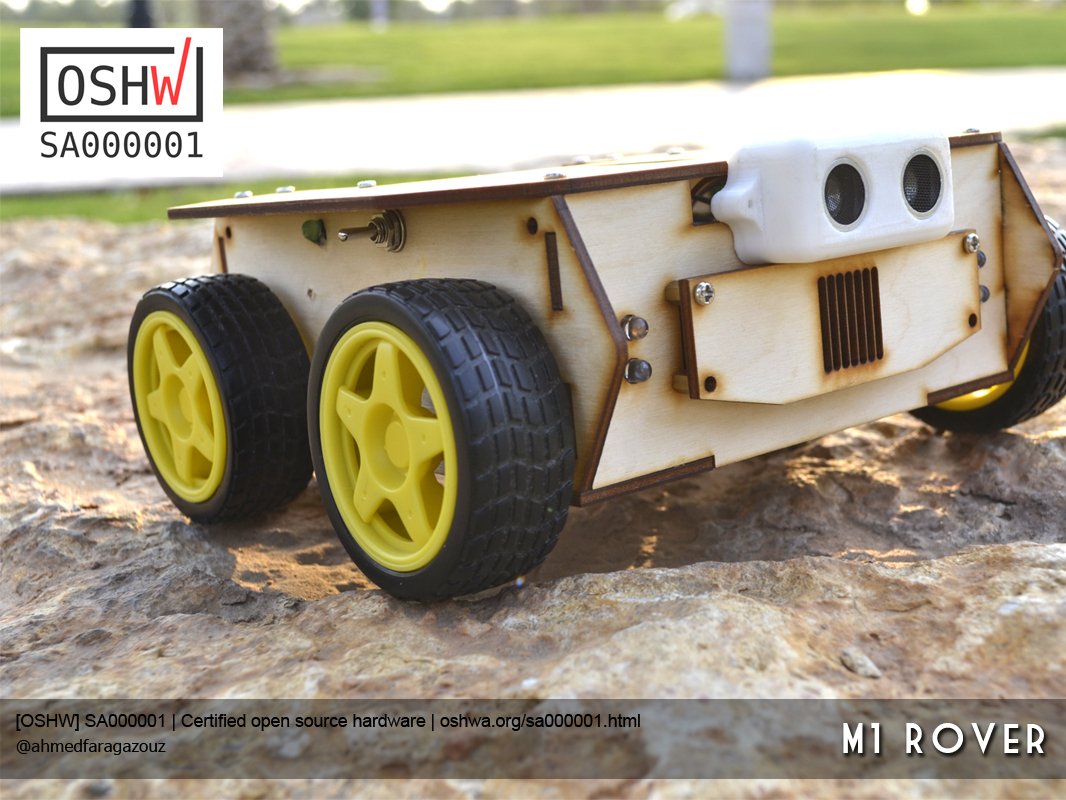
An unmanned ground vehicle, compatible with multi micro control. [OSHW] SA000001 | Certified open source hardware | oshwa.org/sa000001.html
M1 Rover
Project tutorial by AhmedAzouz
- 37,072 views
- 36 comments
- 93 respects
_MzKqM0Xpdh.jpg)
Do you want to tighten your security? Want to know who is entering your room and capture their picture with an old smartphone and Arduino?
Android Motion Detector Camera with Arduino/MCU
Project tutorial by Walid Mafuj
- 49,573 views
- 28 comments
- 50 respects
![]()
When it sees you, it won’t stop following!
Face Tracking Camera
- 45,099 views
- 22 comments
- 112 respects
KureBas V2.0 has manual mode and obstacle avoiding mode. He has a gripper, WiFi camera and new application that’s produced for him.
Table Cleaner Voice Controlled Arduino Robot + WiFi Camera
- 26,010 views
- 20 comments
- 55 respects
![]()
A security system using the Arduino Bluetooth Camera and ultrasonic to detect that a stranger has entered house and capture a photo of him.
Security System Using Arduino Bluetooth Camera
Project tutorial by amrmostaafaa
- 36,624 views
- 18 comments
- 46 respects
![]()
Two ways to control the camera cradle, you can put a flashlight, laser, ToF modules.
Control Dual Axis FPV Camera Cradle with Joystick Module
Project tutorial by SurtrTech
- 41,979 views
- 17 comments
- 85 respects
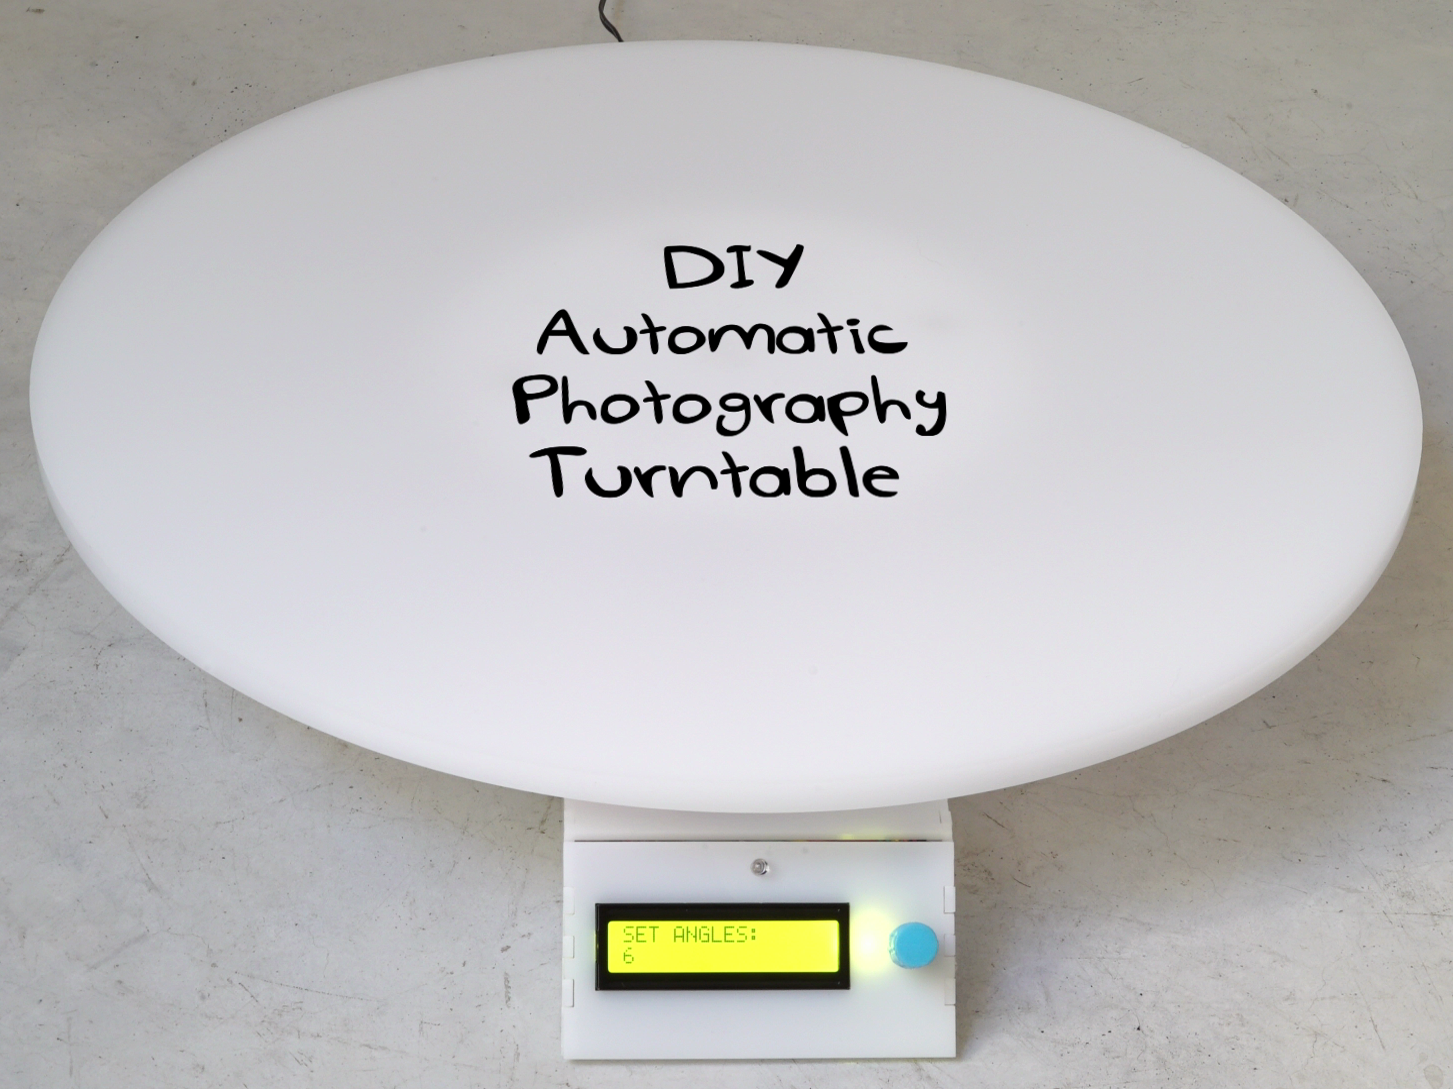
An automatic DIY photography turntable for all the techie photographers out there.
Automatic 360° Photography Turntable
- 33,038 views
- 17 comments
- 72 respects
This robotic arm can be controlled with computer mouse or it can make decisions by itself with Matlab vision system.
Robotic Arm: Arduino + Matlab
Project showcase by Konrad Witt
- 25,539 views
- 11 comments
- 46 respects

This project will capture an image and upload it to twitter when motion is sensed!
My Motion Activated Security Cam project
- 25,547 views
- 11 comments
- 18 respects
Interactive snake enclosure that is temperature and humidity controlled and uses lat-long to mimic natural light cycles, with an online cam.
Automated Snake Enclosure with Camera
Project showcase by hagakure
- 13,466 views
- 11 comments
- 26 respects
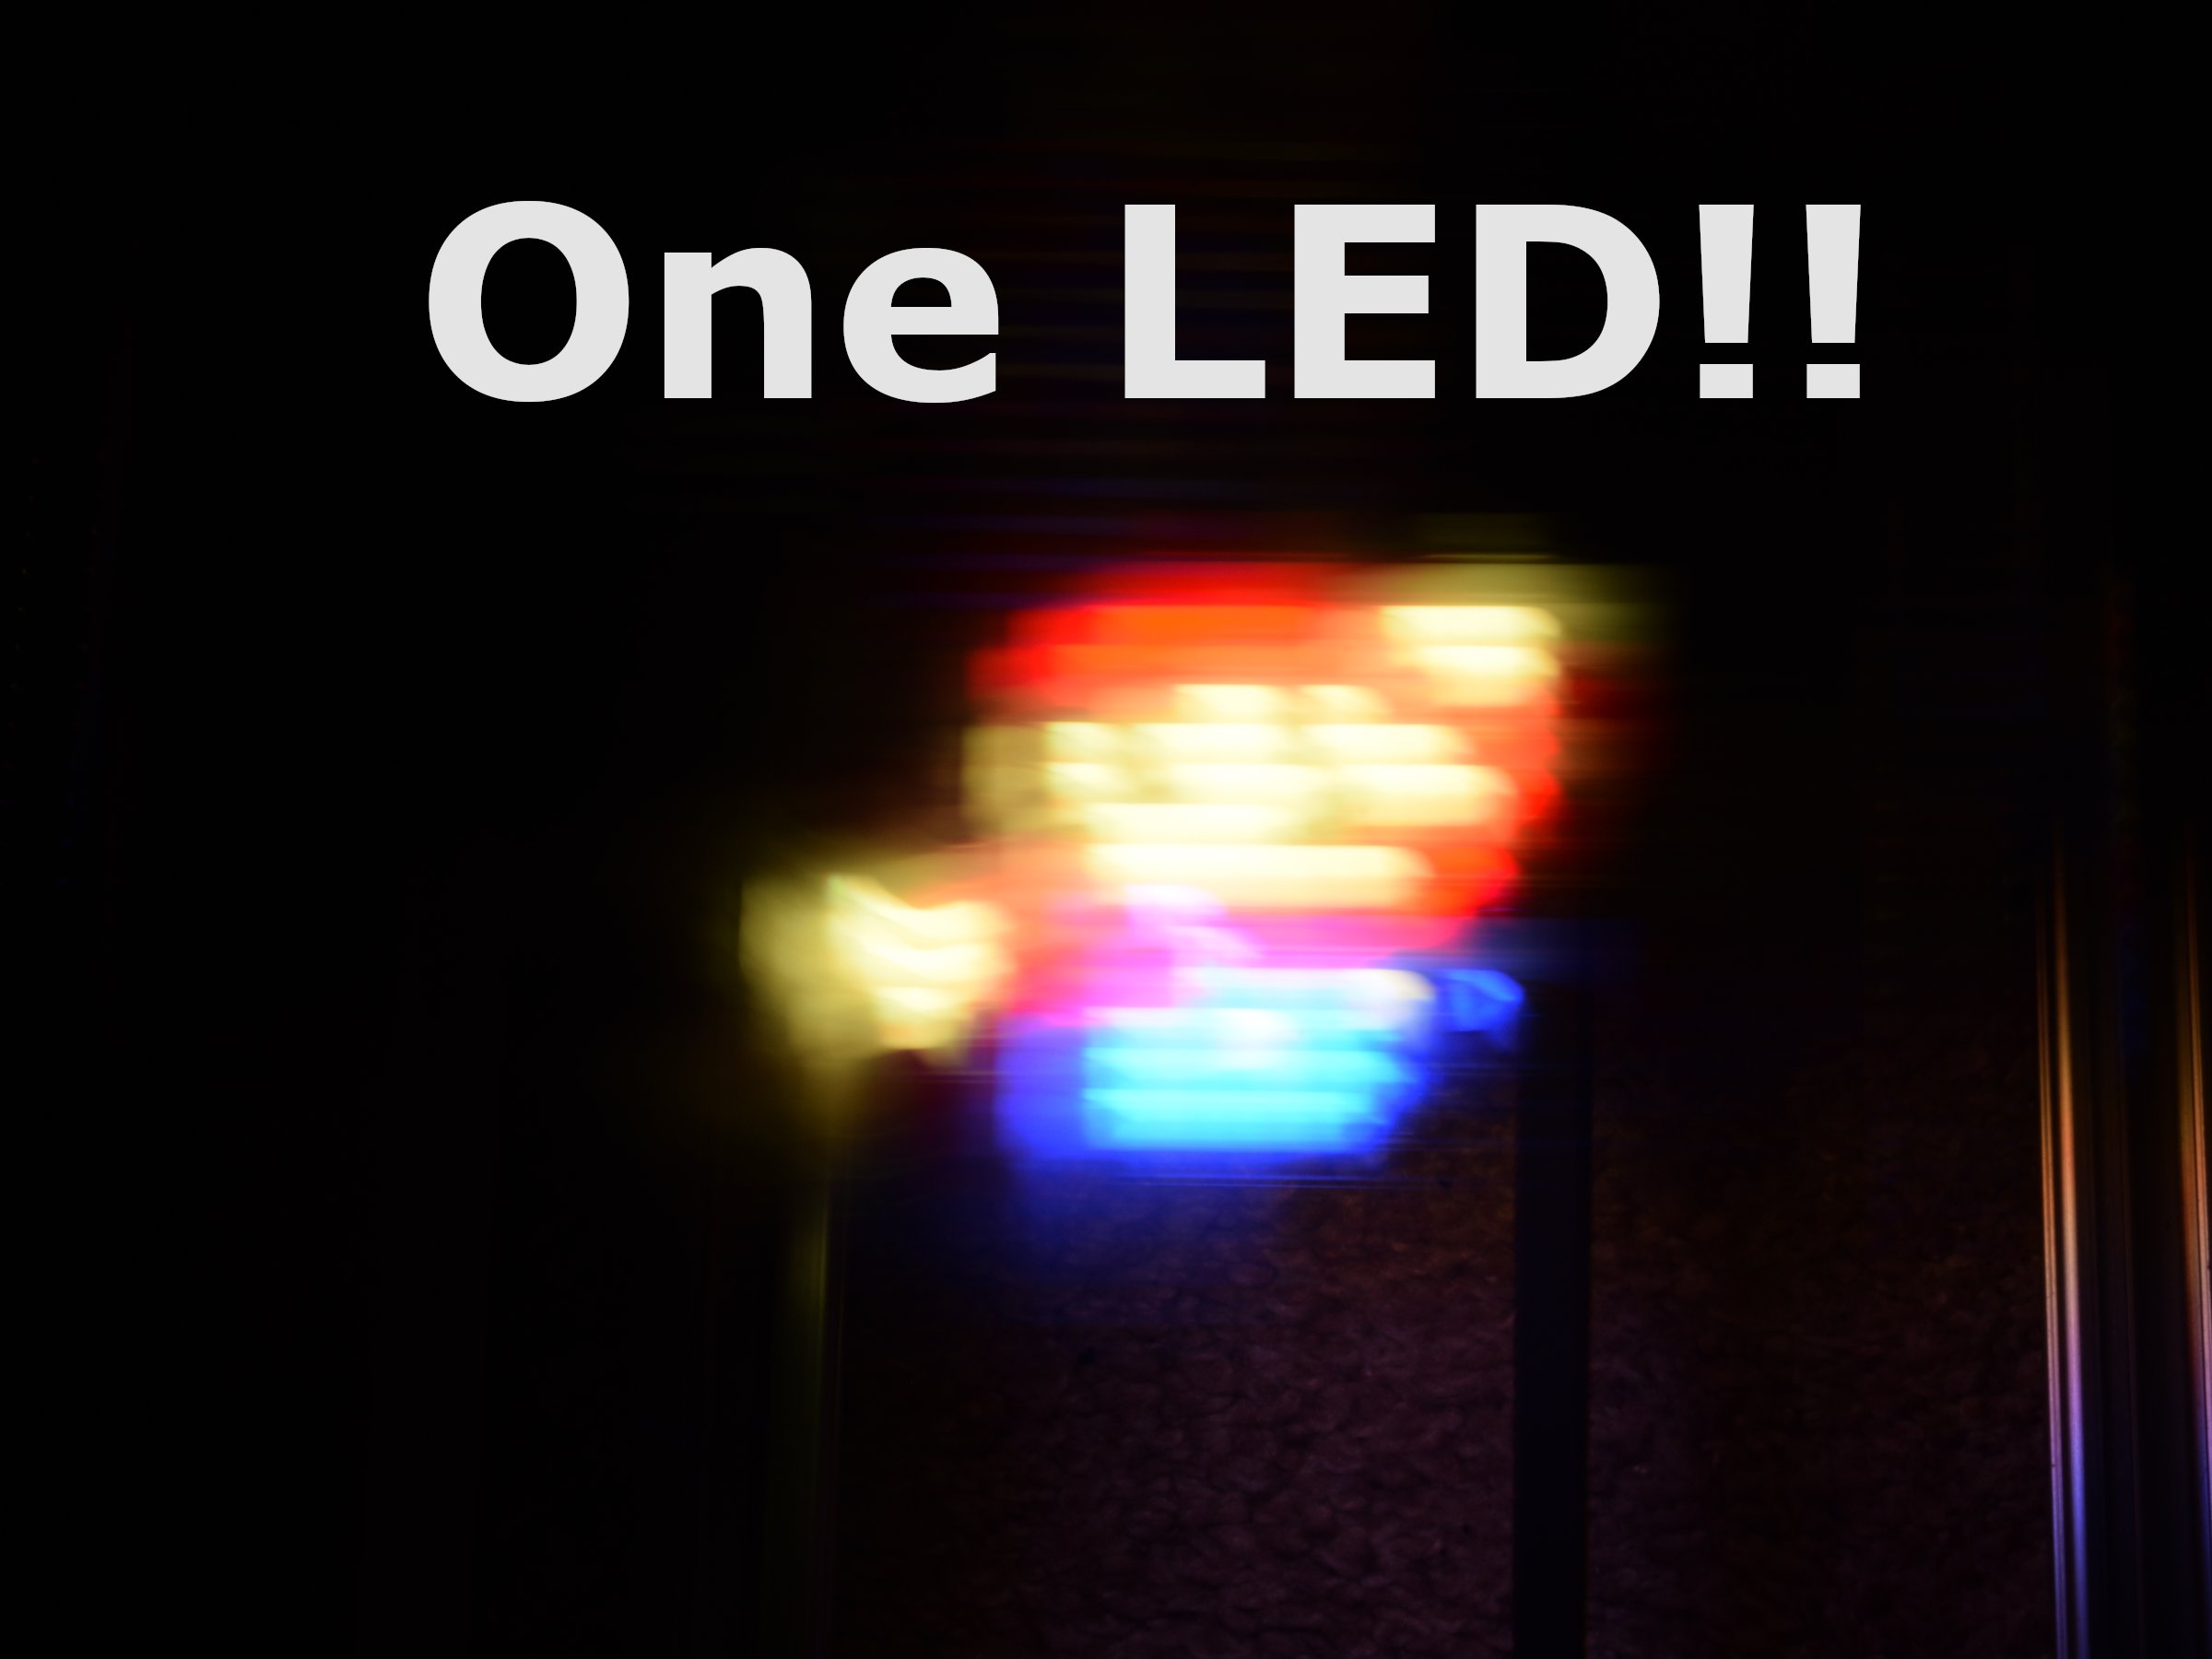
Use the concepts in light painting to create a machine that can recreate bitmaps with a long-exposure camera using a single LED.
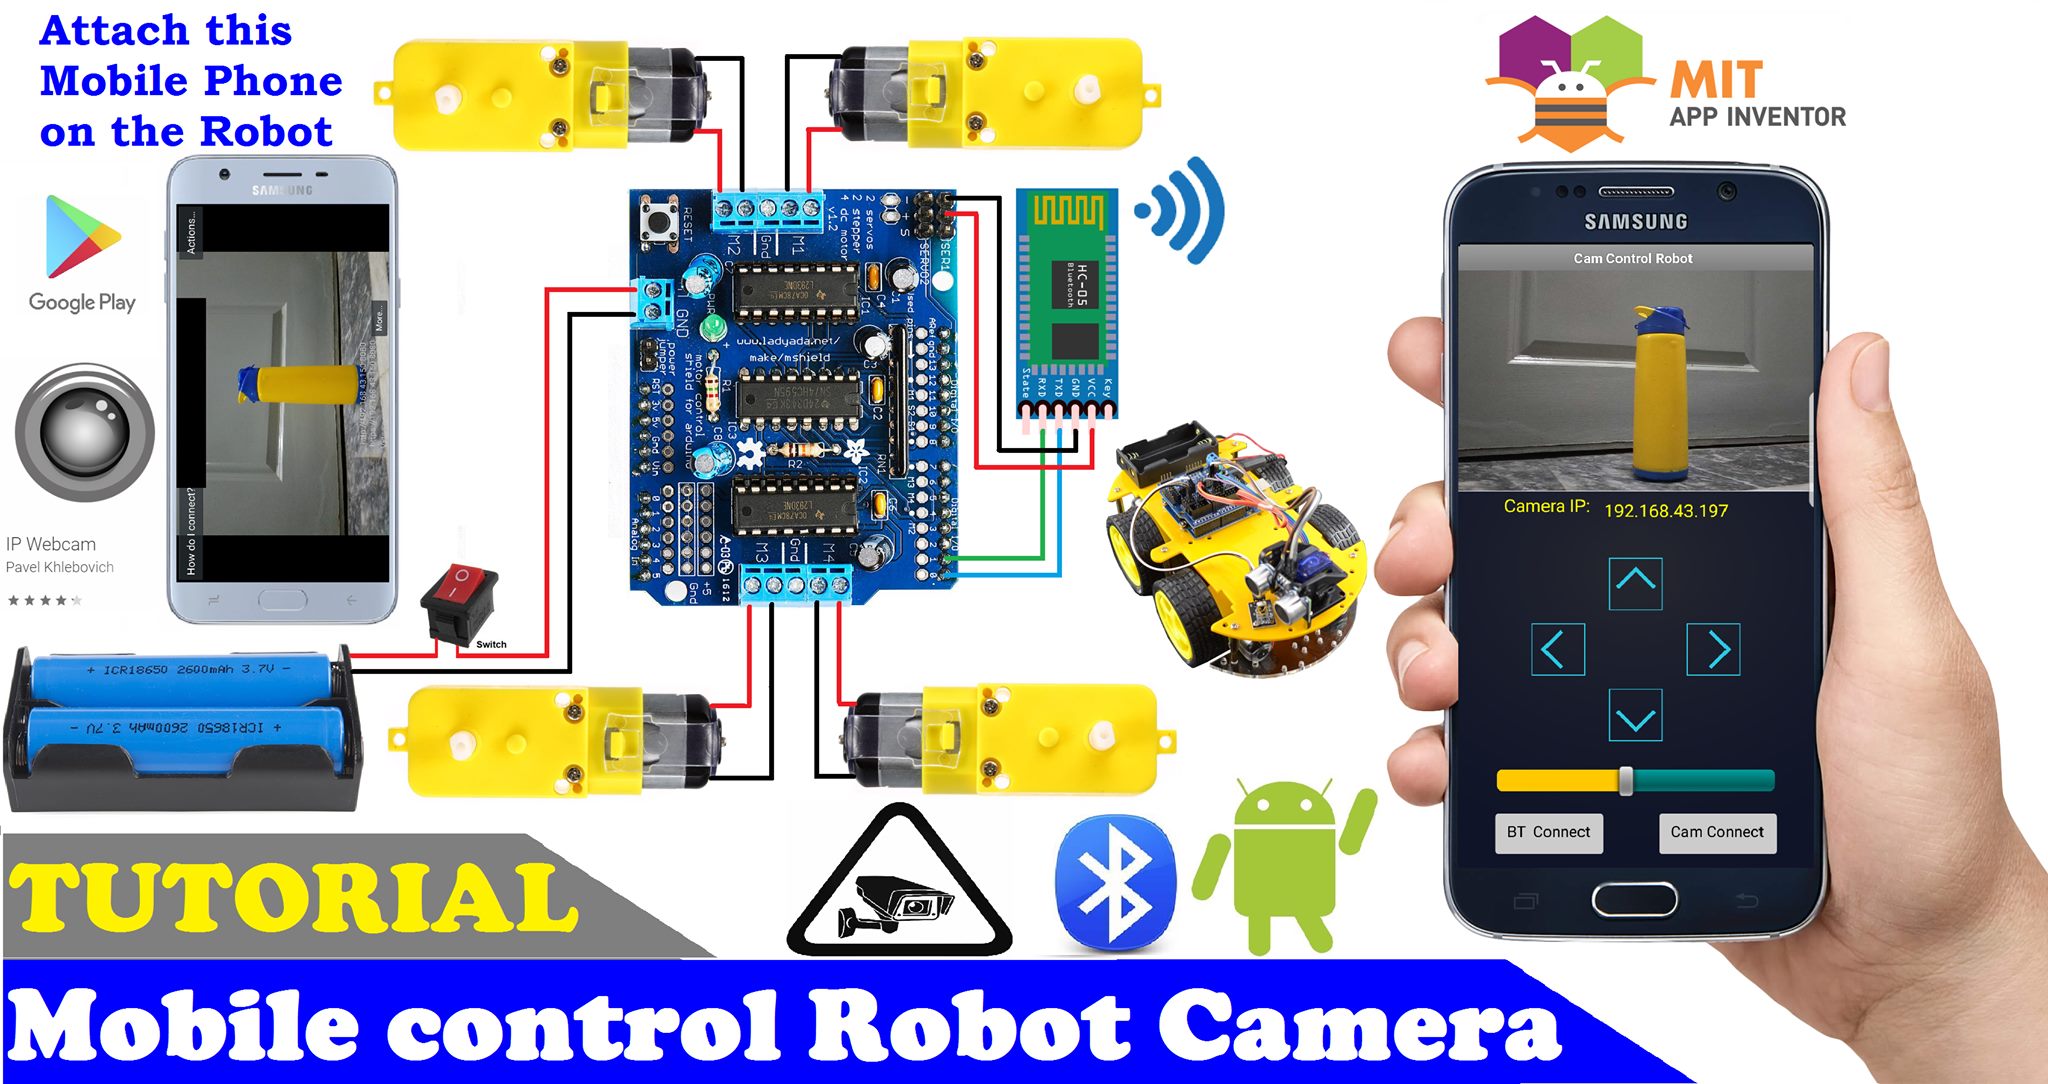
Android Mobile control Robot Camera © MPL-2.0
How to make a Android Mobile control Robot Camera using Arduino and L293d shield
How to make a Android Mobile control Robot Camera using Arduino and L293d shield
https://github.com/embeddedlab786/Cam_Control_Robot.git
How to make a Android Mobile control Robot Camera using Arduino and L293d shield

How to make a Android Mobile control Robot Camera using Arduino and L293d shield
Please log in or sign up to comment.
Author

Muhammad Ansar
- 83 projects
- 155 followers
Additional contributors
- How to make a android mobile control robot camera using arduino and l293d shield by Android Mobile control Robot Camera
Published on
Table of contents
Similar projects you might like

RGB LED connected with Arduino Nano and Bluetooth module and control with Android mobile app.
RGB Camera Backlight Control With Android Mobile
Project tutorial by DIY Partners
![]()
Voice Control Robot using Arduino, L293d shield, Hc 05 Bluetooth Module and MIT App inventor for Android Application
Voice Control Robot

Created an Android app to control the LittleArm Arduino robot through Bluetooth.
Control Arduino Robot Arm with Android App
Project tutorial by Slant Concepts
Jrobot adds wheels to mobile phone and makes it truly mobile. Jrobot on 4G has unlimited range and goes anywhere in the world.
Jrobot — Android and Arduino-Based Global Control Robot Car
Project showcase by joechen
Control toys like a superhero. A DIY video for how to make gesture-controlled car.
How to Make a Gesture Control Robot at Home
- 29,511 views
- 26 comments
- 89 respects
![]()
How to make Arduino based Home Appliance Control Using Android Application | Home Automation Project
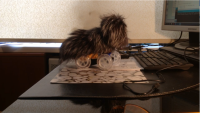
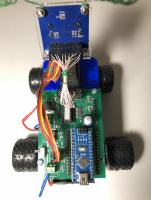
ARDUINO Робот LAHU гоняется за лазером (Ардуино НАНО с камерой 7670)

Andre_L
Небольшой робот гоняется за лазерным зайчиком аки кот…
DIY проект.
Шустренький, веселый робот сделан из Ардуино НАНО и камеры OV 7670.
Камера в режиме VGA 640*480. 10 кадров в секунду. Скетч -1 кб.
Если скучно на локдауне, можете сами построить.
Деталюшек на 20-30$.
Собрать не сложно, но для настройки требуются некоторые познания… ;-)
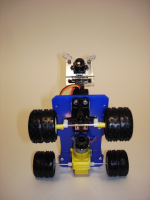
Вот фотки робота.
Вариант 1. В виде неведомой зверушки.
Вариант 2. Роботенок LAHU (Laser Hanter)
Видео ролик, как они бегают.
Зверушка — шустрая и бюджетная.
Заранее смотрим внимательно на фотки, может что забыл…
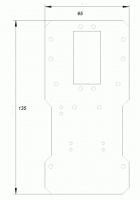
Чертеж шасси. Печатаем в размер на бумаге, приклеиваем на акрил и вырезаем сами. Или заказываем гравировщиков.
Базовая схема робота. Паяем на макетке.
Как это работает.
На самом деле, цвет зайчика для камеры – белый, так как очень яркий.
Включаем формат вывода данных с камеры YCbCr 4:2:2 YUYV.
Получаем каждый второй байт – яркость. Белый цвет – последовательность FF(hex) через байт.
Зайчик- последовательность из 4х таких байт.
Берем четыре старших бита данных с камеры + операция 4И.
Получили последовательность бит. Для зайчика будет 1x1x1x1x .
Загоняем ее в регистр сдвига. На выходах регистра ставим опять элемент 4И(Через бит).
Зайчик даст 1 на выходе.
Это — прерывание для НАНО.
Нано ведет подсчет числа строк с начала кадра. В какой строке прерывание- там и зайчик.
Поэтому скетч маленький. Пофигу, какой видеопоток с камеры. Для нано – это всего 1 бит.
Режим — 10 кадров в секунду определяется быстродействием сервомашинок и скоростью робота.
Дергать машинки быстрее не получиться. Да и реакция человека такая -же. При мощном приводе
робот кидался на зайчика и я не успевал отвести лазер.
Можно замерять и время от начала строки – будет расстояние.
Камера установлена так, что строки идут по вертикали. По центру 240 строка. Угол обзора камеры 30 градусов.
Сервой вертим камеру +-30 градусов. Всего обзор будет 3*30 =90. Поворачиваем передние колеса пропорционально номеру строки.
Ловим зайку и включаем движок на всю.
Можно еще приделать УЗ(ИФ) дальномер(чтоб не биться о табуретки) и звуки с карточки.
Места для установки – рядом с большой сервой.
Как, что собрано – смотрим на фото.
Если собираете из игрушки: Выкидываете мотор переднего привода и крепите большую серву на небольшой пластиковой панельке.
Термоклей в помощь. К серве прикрутим передний мост игрушки. Потребуется ловкость рук.
Впереди обязательно нужен выступ, чтоб не биться камерой о препятствия.
Для увеличения угла обзора пробовал объектив «рыбий глаз» — не получается. Он сжимает зайчика меньше чем 4 пикселя.
Объектив на 60 градусов работает. (Объективы для смартфонов за копейки). Только крепить сложно.
Конец первой части.
Во второй части будет про скетч.
P.S.
Этот пост и робот DIY — для тех, кто хочет сам повозиться и поглубже разобраться с электроникой.
Я не торгую набором и запчастями робота.
Пока пишу вторую часть спрашиваем, голосуем.
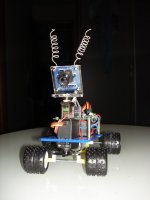
danionescu0/robot-camera-platform
Use Git or checkout with SVN using the web URL.
Work fast with our official CLI. Learn more.
Launching GitHub Desktop
If nothing happens, download GitHub Desktop and try again.
Launching GitHub Desktop
If nothing happens, download GitHub Desktop and try again.
Launching Xcode
If nothing happens, download Xcode and try again.
Launching Visual Studio Code
Your codespace will open once ready.
There was a problem preparing your codespace, please try again.
Latest commit
Git stats
Files
Failed to load latest commit information.
README.md
This is the versatile robot platform. I’ve gave it a few usecases:
a surveillence robot for home
a object follower
remote controll over alexa echo dot
This is a research project fun to build and fun to explore and we’ll take on the following concepts and technologies:
programming: Computer vision, Python, Arduino (C++), Java for Android, AWS lambda functions
miscelanious: MQTT, Docker, Docker compose, UV4l, linux services
electronics: Raspberry pi, Arduino, H-Bridge, DC motors, sensors, soldering, building a robot etc
1. Surveillence robot usecase

2. Object follower usecase

3. Alexa voice robot commands demo
4. Building the robot parts & schameatics
Workarounds for not having a public ip on your dev board
you can port forward 1883 and 9090 ports on your router
Why does an intermediary arduino layer has to exist and not directly the Pi ?
- it’s more modular, you can reuse the arduino robot in another project without the PI
- for safety, it’s cheaper to replace a 3$ arduino pro mini than to replace a Pi (35$)
- an arduino it’s not intrerupted by the operating system like the pi is, so it’s more efficient to implement PWM controlls for the mottors, polling the front and back sensors a few times per second
- if an error might occur in the python script the robot might run forever draining the batteries and probably damaging it or catching fire if not supervised, in an arduino sketch a safeguard it’s more reliable because it does not depends on an operating system
Prerequisites
a. Ensure that your development board has an serial port. If your’re using a Raspberry pi please ensure that the serial console it’s disabled and the port can be used. In the config i’ve assumed it’s on /dev/ttyS0
b. Your board works with a camera. If it’s raspberry pi and picamera, ensure the camera is connected and enabled through raspi-config.
1. The first usecase is a surveillence robot that is controlled using an android interface:**
A video demo is available on youtube
How does it work
a. The android app shows the uv4l streaming inside a webview. The uv4l process runs on the raspberry pi, captures video input from the camera and streams it. It’s an awesome tool with many features
b. Using controls inside the android app lights and engines commands are issued to the MQTT server
c. The python server inside the docker container on the raspberry pi listens to MQTT commands and passes them using serial interface to the arduino board. The arduino board controlls the motors and the lights.
d. The arduino board senses distances in front and back of the robot and sends the data through the serial interface to the python server, the python forwards them to the MQTT and they get picked up by the android interface and shown to the user

Extra
The robot will stream the video using UV4l
The android application is located in this repository
Installation for RaspberryPi
Clone the project in the home folder:
The folder location it’s important because in docker-compose.yml the location is hardcoded as: /home/pi/robot-camera-platform:/root/debug If you need to change the location, please change the value in docker-compose too
Install Uv4l streamming:
Warning you’ll see warning messages: «The following signatures were invalid» because on latest raspbian operating system the uv4l packages are not fully supported.
Configure the project:
- by editing uv4l/start.sh you can configure the following aspects of the video streaming: password, port, framerate, with, height, rotation and some other minor aspects
- edit config.py and replace password with your own password that you’ve set on the mosquitto server
- edit docker-container/mosquitto/Dockerfile and replace this line with your own user and password for mosquitto
Test uv4l installation
b. Test it in the browser at the address: http://your_ip:9090/stream
Install docker and docker-compose
Auto starting services on reboot/startup
a. Copy the files from systemctl folder in systemctl folder to /etc/systemd/system/
b. Enable services:
d. Optional, check status:
Build and install the Android app
a. Clone the repository
b. Follow the instructions there to configure and build it
2. Object follower usecase
The robot is able to follow
objects of a specific color (YouTube video youtube)
- Enable VNC on raspberry pi
- Install VNC viewer on your operating system and log in into the pi
- Docker is installed
Install dependencies
use virtualenv to install dependencies, you may need to remove opencv from dependencies list
Troubleshooting:
If the camera module is not working please check this official Raspberry pi tutorial first
I’ve used opencv to capture the camera image from /dev/video0 so ensure it exists, if not you can try to activate it using:
Configuration
In navigation/config_navigation.py you’ll find:
Optional run unit tests
Unit tests are using nose2
Running the colored object detector:
The colored object detector needs HSV calibration, to get a preview of the HSV bounds, you can use the tool located in navigation/visual_hsv_bounds.py like so:
Calibration, use the sliders to select some color (will be in white on the screen):
Afer the calibration write the values in the /navigation/config_navigation.py under hsv_bounds
To run the colored object detector:
Running the object tracking script with no video output means omitting the —show-video parameter
Running the face detector:
- a Raspberry PI 4 is recommended with 2.5A power bank
Running the person detector:
How does the image detection works ?
1. colored object detector
- First the image is converted to HSV
- Using the function «inRange» HSV ranges are applied to the image (the ranges are defined in the the config)
- Erode and Dilate opencv functions are applied to make the interest zones more clear
- FindContours functon is applied and we select the largest contour (the largest colored object)
- From our selected contour we apply «minEnclosingCircle» and «moments» to get the coordonates of a circle that will best enclose our largest colored object
For the code see «ColoredObjectDetector.py» file
2. face recognition
For the face recognition we’re using «face_recognition» library to extract our specific face of interst from the image.
The problem is this library is quite slow on a development board even if we scale the image to 300 x 300 it takes more than a second for a detection. We’ll use a new adition to Opencv 3.4 object trackers. These trackers are quite fast but far less accurate than «face_detection» technique
So i’m combining the two detectors to build a compromise between the two. First the «face_recognition» library runs in a different async process, and when a face is found, it communicates to the faster library the face coordonates. The faster method is called «TrackerCSRT_create» from the opencv library and it’s able to run syncronious on the pi, processing frame by frame and help guide the robot.
For the code you can start with «SpecificFaceDetector.py» file
3. Alexa voice robot commands demo
Still work in progress !
Prerequisites For this you’ll need:
The Android / IOS application (check out this guide for pair: https://www.techradar.com/how-to/amazon-echo-setup)
A ngrok account: https://ngrok.com/ or public ip address
Configure ngrok
Login, download ngrok for Linux (arm) and unzip on the board: https://dashboard.ngrok.com/get-started
Connect your account running the command, replacing your token with the actual token
Create new Skil with the skil from alexa/skil.json, build the skil
Create new lambda function skil/lambda_function.py , connect it with the skil
Replace API_ENDPOINT with ngrok instance or your own public ip
4. Building the robot platform
The arduino sketch can be found in ./arduino-sketck folder.
Components

Checklist:
- The robot itself, either build it your selves or buy a kit (search TS100 robot tank on ebay, aliexpress)
The important thing to remember is that, the robot should have two DC (6-12V) motors and that each motor should be responsable for direction on left respectively right.
Small nuts and bolts, spacers
A robot case, this should be made out of a light material, and it will house the electronics and batteries
LED light (optional)
Arduino pro mini 328p
2 x infrared obstacle sensor (optional)
NPN tranzistor (for the flashlight)
L7805CV 5V regulator
Rezistor 220 Ohms
Male usb connector, wires
AMS1117 3.3v regulator (for communication between arduino and raspberry pi)
Male & female PCB connectors
On / off switch (for cutting the power to the motor battery)
2S 1300 mAh LiPo battery with XT-60 connector, XT-60 female LiPo connector
5v battery pack for the Rasberry
Raspberry Pi, 16 GB SD card Raspberry Pi card, acrylic case with fan
Raspberry Pi camera
Pinout:
Led flashlight: D3
Left motor: PWM (D5), EN1, EN2(A4, A5)
Right motor: PWM (D6), EN1, EN2(A3, A2)
Infrared sensors: Front (A0), Back(A1)
Serial communication pins: Tx: D11, Rx: D10
About
An raspberry pi and arduino platform for an android controlled robot camera.