Arch Linux User Repository
Search Criteria
Package Details: arduino-ide-bin 2.0.0-2
Package Actions
| Git Clone URL: | https://aur.archlinux.org/arduino-ide-bin.git (read-only, click to copy) |
|---|---|
| Package Base: | arduino-ide-bin |
| Description: | Arduino prototyping platform IDE, rewrite based on the Theia IDE framework. |
| Upstream URL: | https://github.com/arduino/arduino-ide |
| Licenses: | AGPL3 |
| Conflicts: | arduino-ide |
| Provides: | arduino-ide |
| Replaces: | arduino-ide-beta-bin |
| Submitter: | SuperNinja_4965 |
| Maintainer: | SuperNinja_4965 (FabioLolix) |
| Last Packager: | SuperNinja_4965 |
| Votes: | 8 |
| Popularity: | 1.17 |
| First Submitted: | 2022-09-14 17:38 (UTC) |
| Last Updated: | 2022-09-17 19:48 (UTC) |
Dependencies (9)
- git(git-vfs, git-git, git-run-command-patch-git)
- libsecret
- libxkbfile
- libxss
- nss(nss-hg)
- libusb(libusb-git)(optional) – Needed for some libraries or boards
- libusb-compat(libusb0)(optional) – Needed for the `micronucleus` cli utility
- python-pyserial(optional) – Needed for esptool
- usbutils(usbutils-git)(optional) – Needed for stm32 boards using st-link
Required by (0)
Sources (2)
Pinned Comments
SuperNinja_4965 commented on 2022-09-14 17:44 (UTC)
Arduino IDE 2.x has left beta. Its package has been renamed to arduino-ide-bin.
Latest Comments
RVA965 commented on 2022-10-01 03:24 (UTC)
This is a small thing, but could you remove the spaces in the .desktop file? This messes with programs which parse desktop files (e.g. Rofi).
To be more specific, there is a space before every newline which should be removed.
SuperNinja_4965 commented on 2022-09-17 19:37 (UTC) (edited on 2022-09-17 19:38 (UTC) by SuperNinja_4965)
@Zdrobot The arduino-ide-bin package has the replaces tag in it meaning that the beta will be uninstalled upon installing the release. As for moving libraries, boards configurations etc these are stored in your user folder and so are not removed or managed by pacman. Uninstalling the IDE will not remove these files. When installing the arduino-ide-bin package you will NOT need to make any extra steps in order to continue using your existing boards or libraries.
Zdrobot commented on 2022-09-17 05:00 (UTC)
So, how do you transition from arduino-ide-beta-bin to arduino-ide-bin, other than uninstalling the former and installing the latter? Would that mean you’d have to install all the platforms and libraries again?
SuperNinja_4965 commented on 2022-09-14 17:49 (UTC)
possibly as i doubt it as to quote the arduino download page: https://www.arduino.cc/en/software «Nightly builds with the latest bugfixes are available through the section below.». But if you want me to cancel the request i can.
FabioLolix commented on 2022-09-14 17:47 (UTC)
I wouldn’t merge this pkgbuild yet because there could be future development release
SuperNinja_4965 commented on 2022-09-14 17:44 (UTC)
Arduino IDE 2.x has left beta. Its package has been renamed to arduino-ide-bin.
SuperNinja_4965 commented on 2022-09-14 17:40 (UTC)
@FabioLolix Ok I have created the package. I have added you as a co-maintainer but if you dont want to be a maintainer just disown it. I will create a merge request for this package as well.
FabioLolix commented on 2022-09-14 17:28 (UTC)
Call it arduino-ide-bin, no need to add version to pkgname, about the future of Arduino 1.x I don’t know, anyway the pkgname are different (arduino-ide vs arduino), if Arduino 1.x is dropped from Arch one can always create here arduino-bin for avoiding compiling from source
SuperNinja_4965 commented on 2022-09-14 17:20 (UTC)
@FabioLolix I’m thinking of creating a arduino-ide-2-bin package here on the aur as even though 2.x is designed to replace legacy 1.x it might be worth keeping these packages separate. Thoughts?
FabioLolix commented on 2022-09-14 17:18 (UTC) (edited on 2022-09-14 17:18 (UTC) by FabioLolix)
@yangtsesu v2.0 is a stable release which require a new pkgbuild, I have flagged out-of-date the Arch package yesterday
Copyright © 2004-2022 aurweb Development Team.
AUR packages are user produced content. Any use of the provided files is at your own risk.
Arduino
Arduino is an open-source electronics prototyping platform based on flexible, easy-to-use hardware and software. It is intended for artists, designers, hobbyists, and anyone interested in creating interactive objects or environments.
Contents
Installation
- Install either arduino for the original 1.x version of the IDE, arduino-cli for the official CLI or arduino-ide-binAUR for the new 2.x release of the IDE. The offline documentation for the 1.x IDE can be installed via arduino-docs .
- Add your user to the uucp user group (more information in the #Accessing serial section).
- You may need to load the cdc_acm module.
Arduino IDE 1.x
The following section only applies to the 1.x version of the IDE. However, it may be possible to adapt some of this for the new IDE.
AVR Boards
To use AVR boards such as the Arduino Uno you can install arduino-avr-core optionally to use Arch Linux upstream avr-gcc instead of the bundled older avr-core. If you still want to use the older arduino-core you need to install it in the board manager. You can always switch between the different cores in the «Tools>Board» menu.
Pinoccio Scout
Pinoccio Scouts can also be programmed using the Arduino IDE. Instructions can be found here. Alternative you can install arduino-pinoccio AUR from the AUR.
Intel Galileo
To use the Intel Galileo boards with Arch Linux install the Arduino IDE and download the Galileo tools package via «Tools->Board->Boards Manager». To fix the installation you can follow this github post.
On Arm7 devices
See here for a work around.
Arduino IDE 1.x or 2.x
These steps should be valid for both versions of the IDE.
AVR Boards
AVR boards are automatically installed by the 2.x release of the IDE however on both the 1.x and 2.x releases the AVR boards can be managed from the boards manager. For 1.x see here.
SparkFun
To use SparkFun boards such as the Pro Micro you need to download their board definitions. More information here and here.
RedBear Duo
You might need to install perl-archive-zip or you will get an error about missing crc32.
Configuration
Accessing serial
The arduino board communicates with the computer via a serial connection or a serial-over-USB connection, so the user needs read/write access to the serial device file. Udev creates files such as /dev/ttyUSB0 owned by group uucp so adding the user to the uucp group gives the required read/write access. See Users and groups#Group management for details.
Before uploading to the Arduino, be sure to set the correct serial port, board, and processor from the Tools menu in 1.x and the Select board option (located at the top of the IDE) in 2.x.
Sending commands through Terminal without new line after command
Reading what your Arduino has to tell you
Arduino-Builder
 This article or section is out of date.
You can also build Arduino sketches with the arduino-builder command line tool. In order to use the provided arduino-avr-core with upstream avr-gcc and avrdude you need to create a small settings file:
Compile a sketch with:
Or pass all options via command line:
Alternatives to the IDE
ArduIDE
ArduIDE is a Qt-based IDE for Arduino. arduide-git AUR is available in the AUR.
Arduino-CMake
Using Arduino-CMake-Toolchain and CMake you can build Arduino firmware from the command line using multiple build systems. CMake lets you generate the build system that fits your needs, using the tools you like. It can generate any type of build system, from simple Makefiles, to complete projects for Eclipse, Visual Studio, XCode, etc.
Makefile
Instead of using the Arduino IDE it is possible to use another editor and a Makefile.
Set up a directory to program your Arduino and copy the Makefile into this directory. A copy of the Makefile can be obtained from this GitHub template You will have to modify this a little bit to reflect your settings. The makefile should be pretty self explanatory. Here are some lines you may have to edit.
Depending on which library functions you call in your sketch, you may need to compile parts of the library. To do that you need to edit your SRC and CXXSRC to include the required libraries.
Now you should be able to make && make upload to your board to execute your sketch.
Arduino-mk
arduino-mk AUR is another alternative Makefile approach. It allows users to have a local Makefile that includes Arduino.mk. See project page for usage.
For Arduino 1.5, try the following local Makefile (because Arduino 1.5’s library directory structure is slightly different):
In some cases you could need to install avr-libc and avrdude .
Scons
Using scons together with arscons it is very easy to use to compile and upload Arduino projects from the command line. Scons is based on python and you will need python-pyserial to use the serial interface. Install python-pyserial and scons .
That will get the dependencies you need too. You will also need Arduino itself so install it as described above. Create project directory (eg. test), then create a arduino project file in your new directory. Use the same name as the directory and add .ino (eg. test.ino). Get the SConstruct script from arscons and put it in your directory. Have a peek in it and, if necessary, edit it. It is a python script. Edit your project as you please, then run
PlatformIO
PlatformIO is a python tool to build and upload sketches for multiple Hardware Platforms, at the moment of writing these are Arduino/AVR based boards, TI MSP430 and TI TM4C12x Boards. In the near future the author plans to add a library function that allows to search and include libraries directly from GitHub.
Installation
Usage
Emacs
It is possible to configure Emacs as IDE.
Install the package emacs-arduino-mode-git AUR from the AUR in order to enable the arduino-mode in emacs.
Add to the init script:
You can compile and upload the sketches using Arduino-mk (see above) with M-x compile make upload .
Troubleshooting
Consistent naming of Arduino devices
If you have more than one Arduino you may have noticed that they names /dev/ttyUSB[0-9] are assigned in the order of connection. In the IDE this is not so much of a problem, but when you have programmed your own software to communicate with an Arduino project in the background this can be annoying. Use the following udev rules to assign static symlinks to your Arduino’s:
Your Arduino’s will be available under names like /dev/sensors/ftdi_A700dzaF . If you want you can also assign more meaningfull names to several devices like this:
which will create a symlink in /dev/arduino/nano to the device with the specified serialnumber. You do need to unplug and replug your Arduino for this to take effect or run
Common idVendor / idProduct pairs can be found in /usr/share/arduino/hardware/archlinux-arduino/avr/boards.txt in the distribution package. Note that some of them (notably FTDI ones) are not unique to the Arduino platform. Using serial attribute is a good way to distinguish between various devices.
Error opening serial port
You may see the serial port initially when the IDE starts, but the TX/RX leds do nothing when uploading. You may have previously changed the baudrate in the serial monitor to something it does not like. Edit
/.arduino/preferences.txt so that serial.debug_rate is a different speed, like 115200.
Working with Uno/Mega2560
The Arduino Uno and Mega2560 have an onboard USB interface (an Atmel 8U2) that accepts serial data, so they are accessed through /dev/ttyACM0 created by the cdc-acm kernel module when it is plugged in.
The 8U2 firmware may need an update to ease serial communications. See [1] for more details and reply #11 for a fix. The original arduino bbs, where you can find an image explaining how to get your Uno into DFU, is now in a read-only state. If you do not have an account to view the image, see [2].
You can perform a general function test of the Uno by putting it in loopback mode and typing characters into the arduino serial monitor at 115200 baud. It should echo the characters back to you. To put it in loopback, short pins 0 -> 1 on the digital side and either hold the reset button or short the GND -> RESET pins while you type.
Not recognizing USB port with Mega2560 cheap Chinese clones
1.x Application not resizing with WM, menus immediately closing
Fails to upload: programmer is not responding
Changing processor setting from ATmega328P to ATmega328P (Old Bootloader) (See Tools->Processor in Arduino IDE) may help with upload failures.
1.x Crashing with java.lang.NullPointerException after a fresh install
Serial port conflict with brltty
If the serial port for the arduino is not visible at /dev/ttyUSB*, and dmesg outputs the following when the device is connected:
Then you may need to uninstall the brltty package. See [3] for more details.
Install the Arduino Software (IDE) on Linux
This document explains how to install the Arduino Software (IDE) on Linux machines.
Quick Start
The Linux build of the Arduino Software (IDE) comes in different packages depending on your system architecture. There are no specific instructions needed for the different distributions of Linux (e.g. Ubuntu).
Download the Arduino Software (IDE)
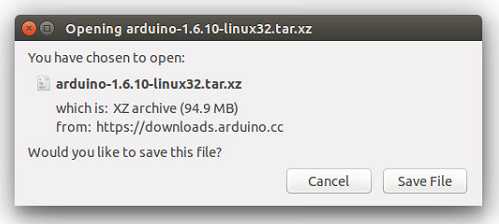
Get the latest version from the download page. You can choose between the 32, 64 and ARM versions. It is very important that you choose the right version for your Linux distro. Clicking on the chosen version brings you to the donation page and then you can either open or save the file. Please save it on your computer.
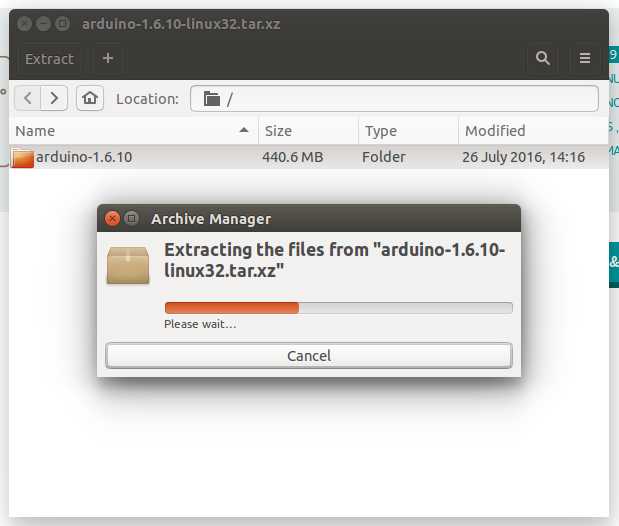
Extract the package
The file is compressed and you have to extract it in a suitable folder, remembering that it will be executed from there.
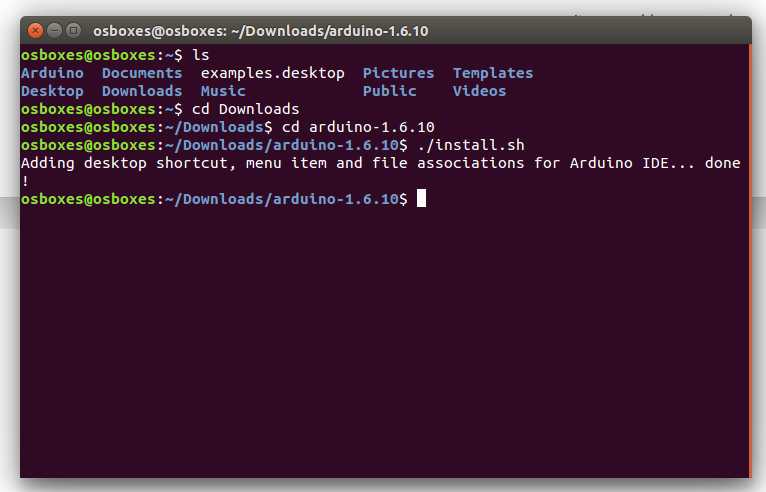
Run the install script
Open the arduino-1.6.x folder just created by the extraction process and spot the install.sh file. Right click on it and choose Run in Terminal from the contextual menu. The installation process will quickly end and you should find a new icon on your desktop.
If you don’t find the option to run the script from the contextual menu, you have to open a Terminal window and move into the arduino-1.6.x folder. Type the command ./install.sh and wait for the process to finish. You should find a new icon on your desktop.
Proceed with board-specific instructions
When the Arduino Software (IDE) is properly installed you can go back to the Getting Started Home and choose your board from the list on the right of the page.
Please Read.
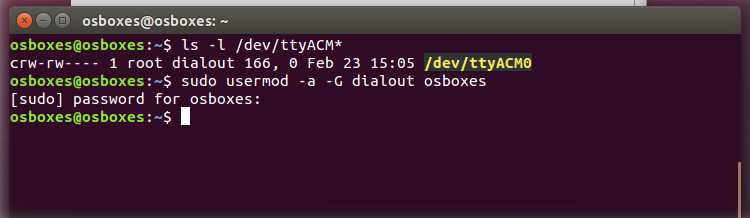
It might happen that when you upload a sketch — after you have selected your board and the serial port -, you get an error Error opening serial port . If you get this error, you need to set serial port permission.
Open Terminal and type:
you will get something like:
crw-rw—- 1 root dialout 188, 0 5 apr 23.01 ttyACM0
The «0» at the end of ACM might be a different number, or multiple entries might be returned. The data we need is «dialout» (is the group owner of the file).
Now we just need to add our user to the group:
sudo usermod -a -G dialout
where is your Linux user name. You will need to log out and log in again for this change to take effect.
This is the procedure to access the serial port from the Arduino Software (IDE) if you get an error
After this procedure, you should be able to proceed normally and upload the sketch to your board or use the Serial Monitor.
The text of the Arduino getting started guide is licensed under a Creative Commons Attribution-ShareAlike 3.0 License. Code samples in the guide are released into the public domain.